In this guide, we’ll walk you through the essential aspects of setting up Terms and Conditions for your store. Terms and Conditions are crucial for any business, as they clarify your shop’s rules and policies. By understanding and agreeing to these terms, your customers can navigate your store confidently, reducing the likelihood of disputes and ensuring a smoother shopping experience. This documentation will provide you with clear instructions on configuring your Terms and Conditions settings using the Woo Additional Terms plugin, helping you create a professional and transparent shopping environment for your customers.
Creating Terms Checkboxes
With Woo Additional Terms, generating “I agree” checkboxes for your store’s terms and conditions is effortless. Here’s how to do it:
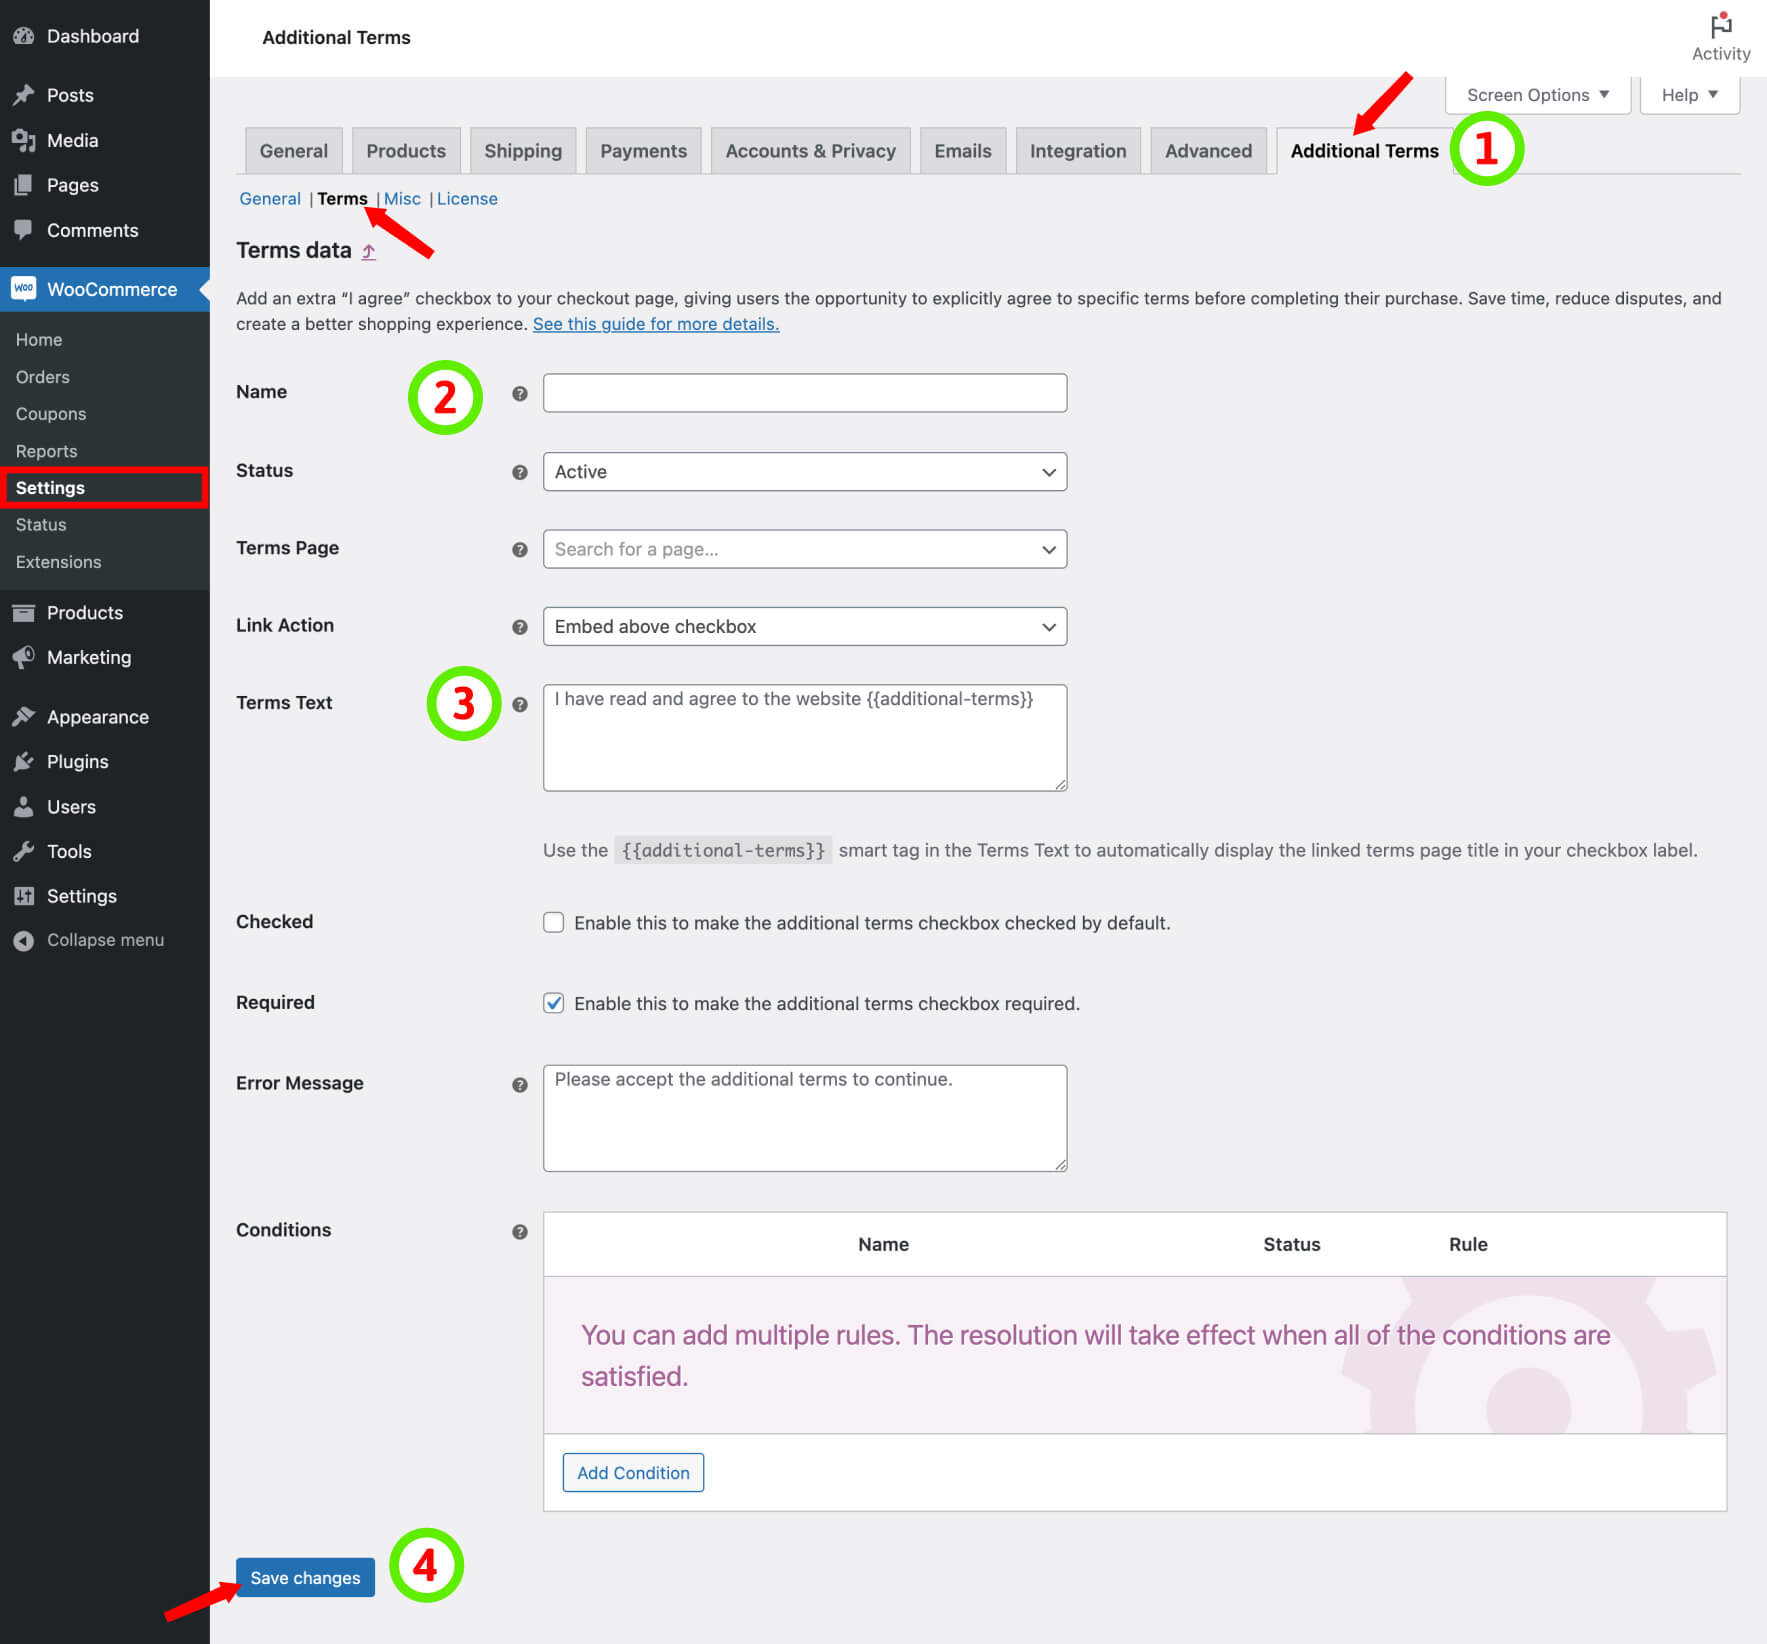
- Go to WooCommerce → Settings → Additional Terms.
- In the current tab, find the Terms section.
- Click on the Add new button.
- Provide a user-friendly Name for your terms checkbox.
- Specify a label for the Terms Text to be displayed alongside the checkbox’s input field.
- Click on the Save changes button.
This allows you to seamlessly create as many checkboxes as you need, enhancing transparency and compliance for your customers.
Editing Terms
Once you’ve created a terms and conditions checkbox, you have the flexibility to make edits and apply changes as needed. Here’s how:
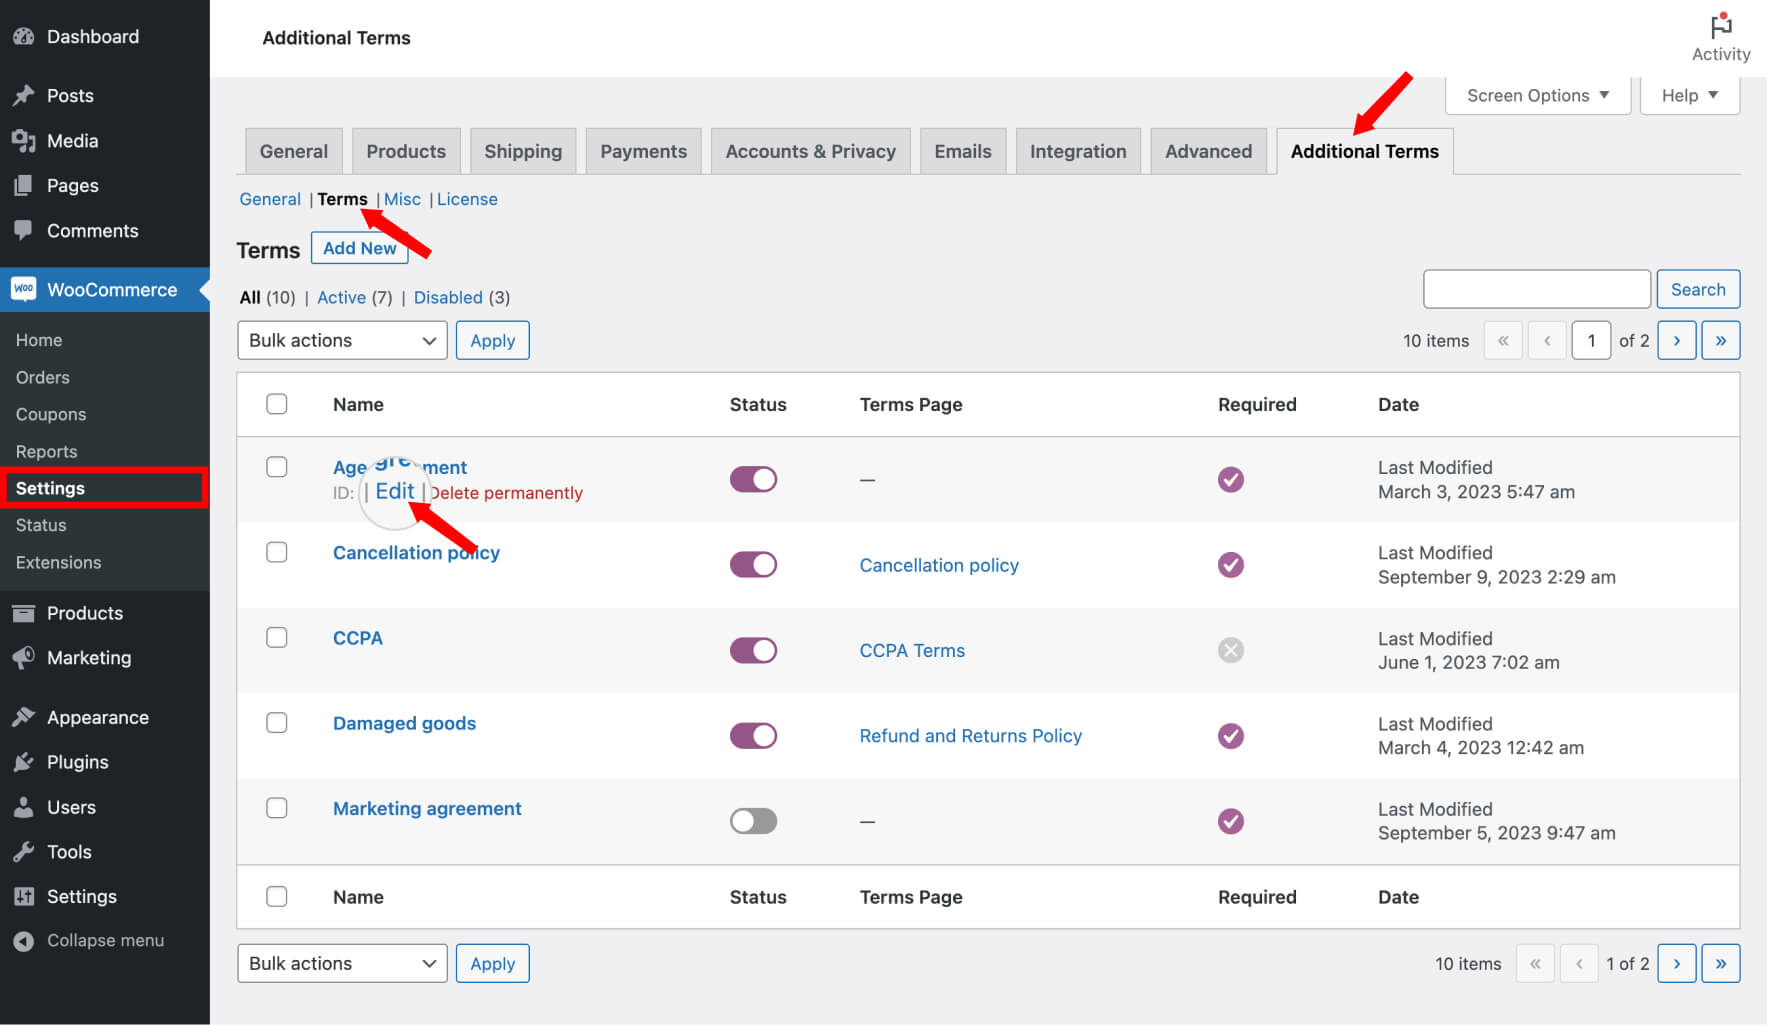
- Navigate to WooCommerce → Settings → Additional Terms.
- Locate the terms checkbox you want to edit, then hover over it and select Edit.
- Implement your desired changes.
- To save your modifications, click the Save changes button.
This allows you to update your terms and conditions checkboxes, ensuring they remain in harmony with your store’s policies and requirements.
Defining the Terms Page
The Terms page is essential for users to access comprehensive terms and gain a thorough understanding of your store’s policies, rules, and guidelines. To set it up, follow these steps:
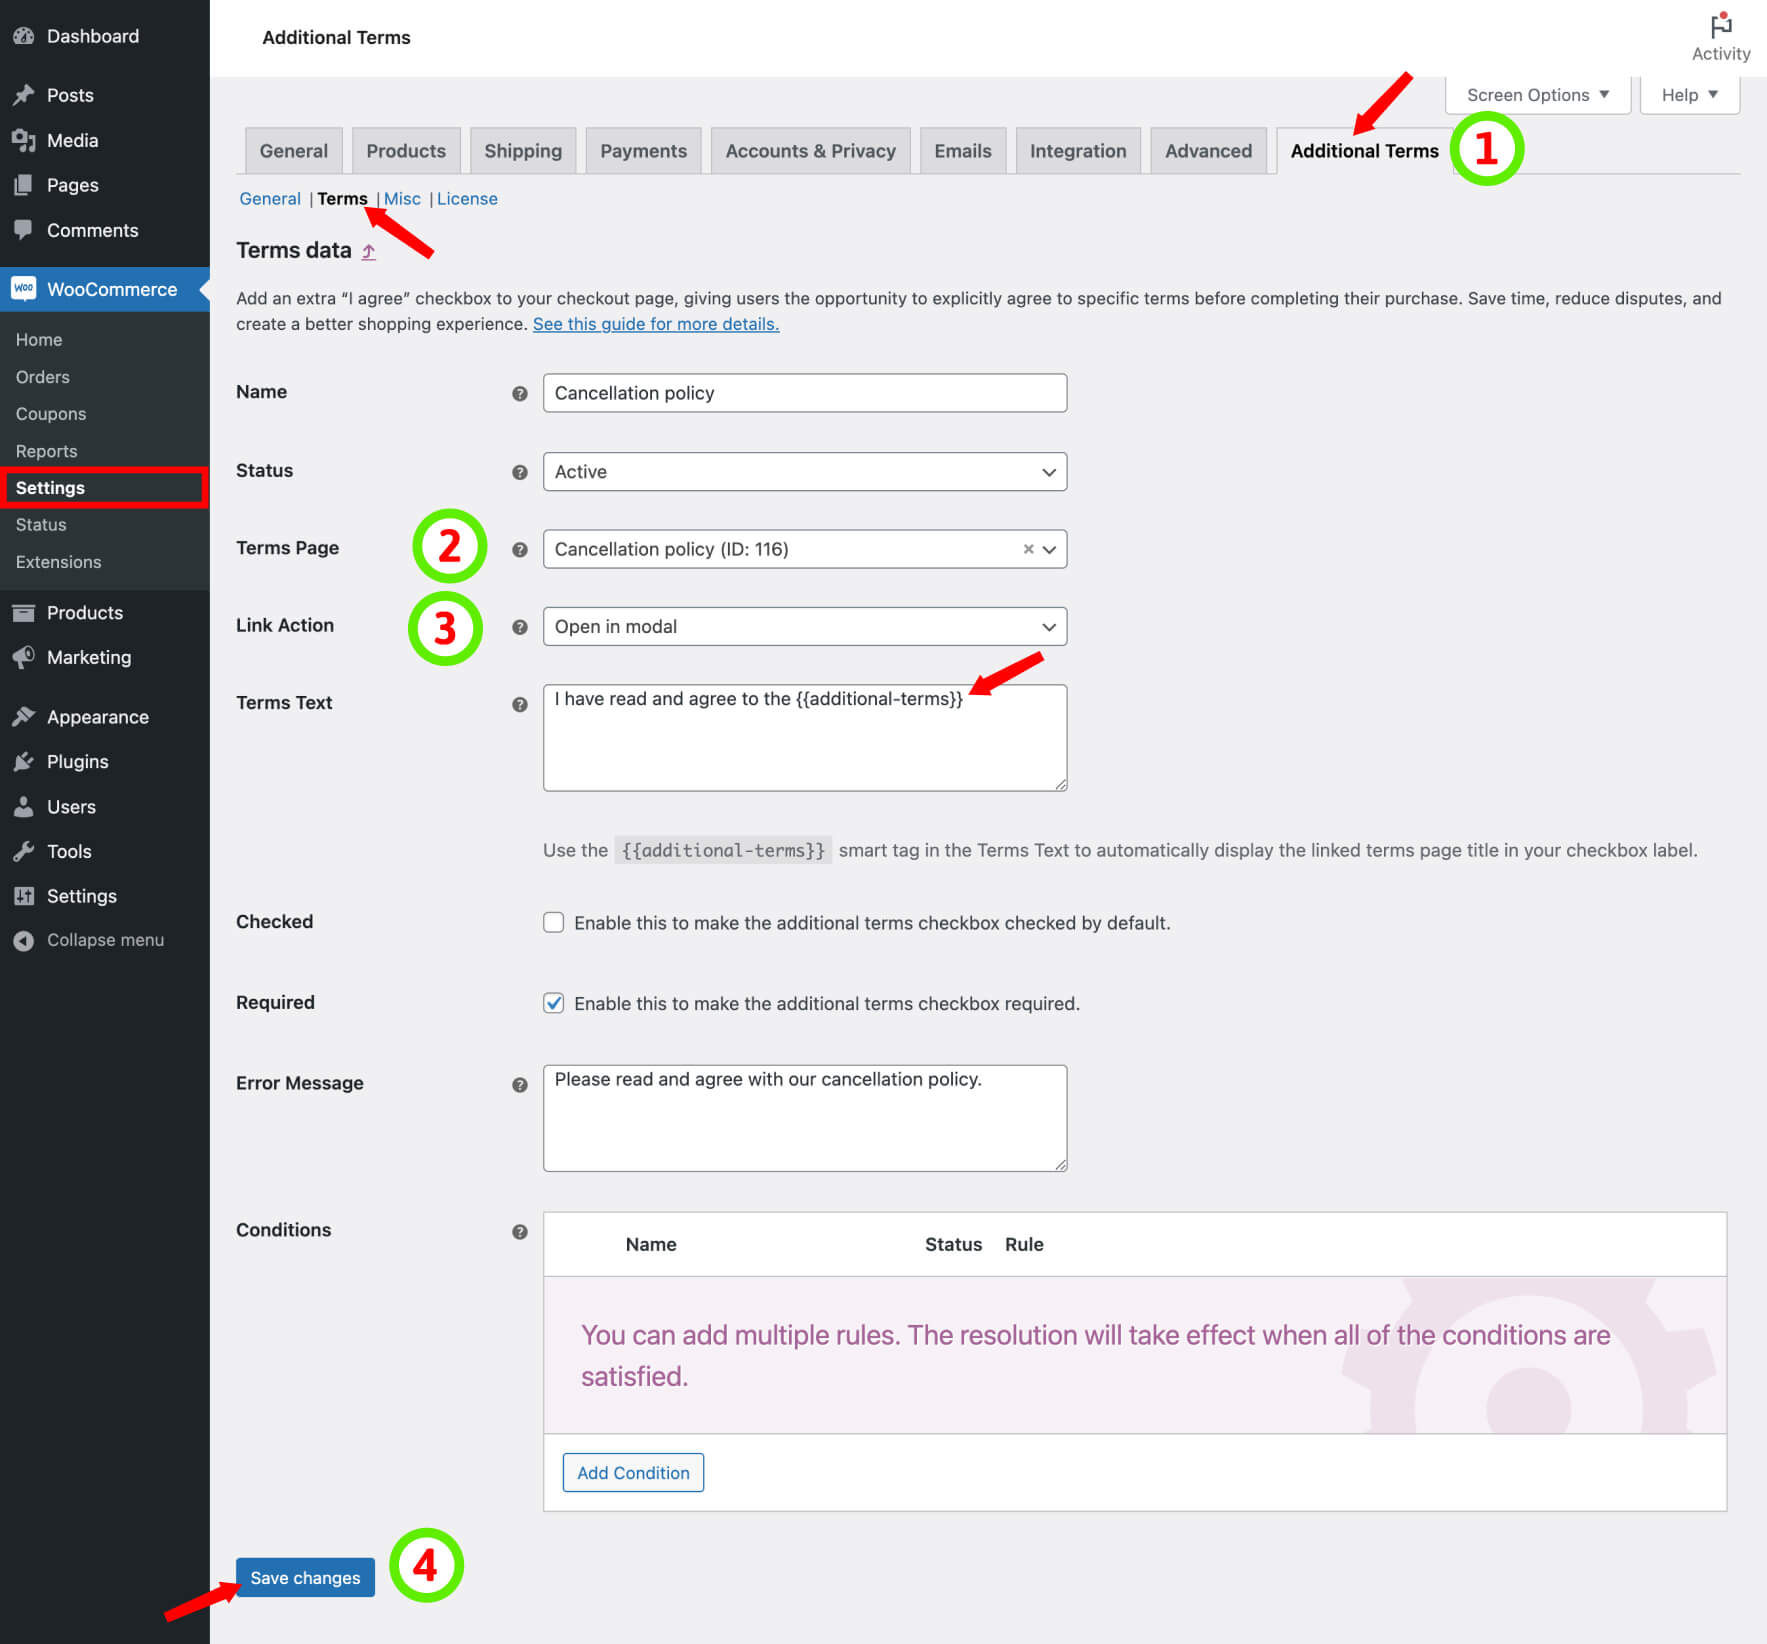
- Create a new page for your terms at Pages → Add new.
- Navigate to WooCommerce → Settings → Additional Terms → Terms.
- Hover over the desired terms checkbox and select Edit.
- In the dropdown menu, choose the Terms Page. Enter at least three words from the page title and select your terms page.
- Select the Action for displaying the full page content after clicking the linked terms page:
- Embed above checkbox: When selected, the full page content will be displayed directly above the relevant checkbox field after clicking the linked page.
- Open in modal: This option causes the full page content to appear in a convenient popup box after clicking the linked page.
- Open in new tab: By choosing this setting, the terms page will open in a new browser tab when the user clicks on it.
- Add the
{{additional-terms}}smart tag to the Notice to display the linked page name in the checkbox label. - Click on the Save changes button.
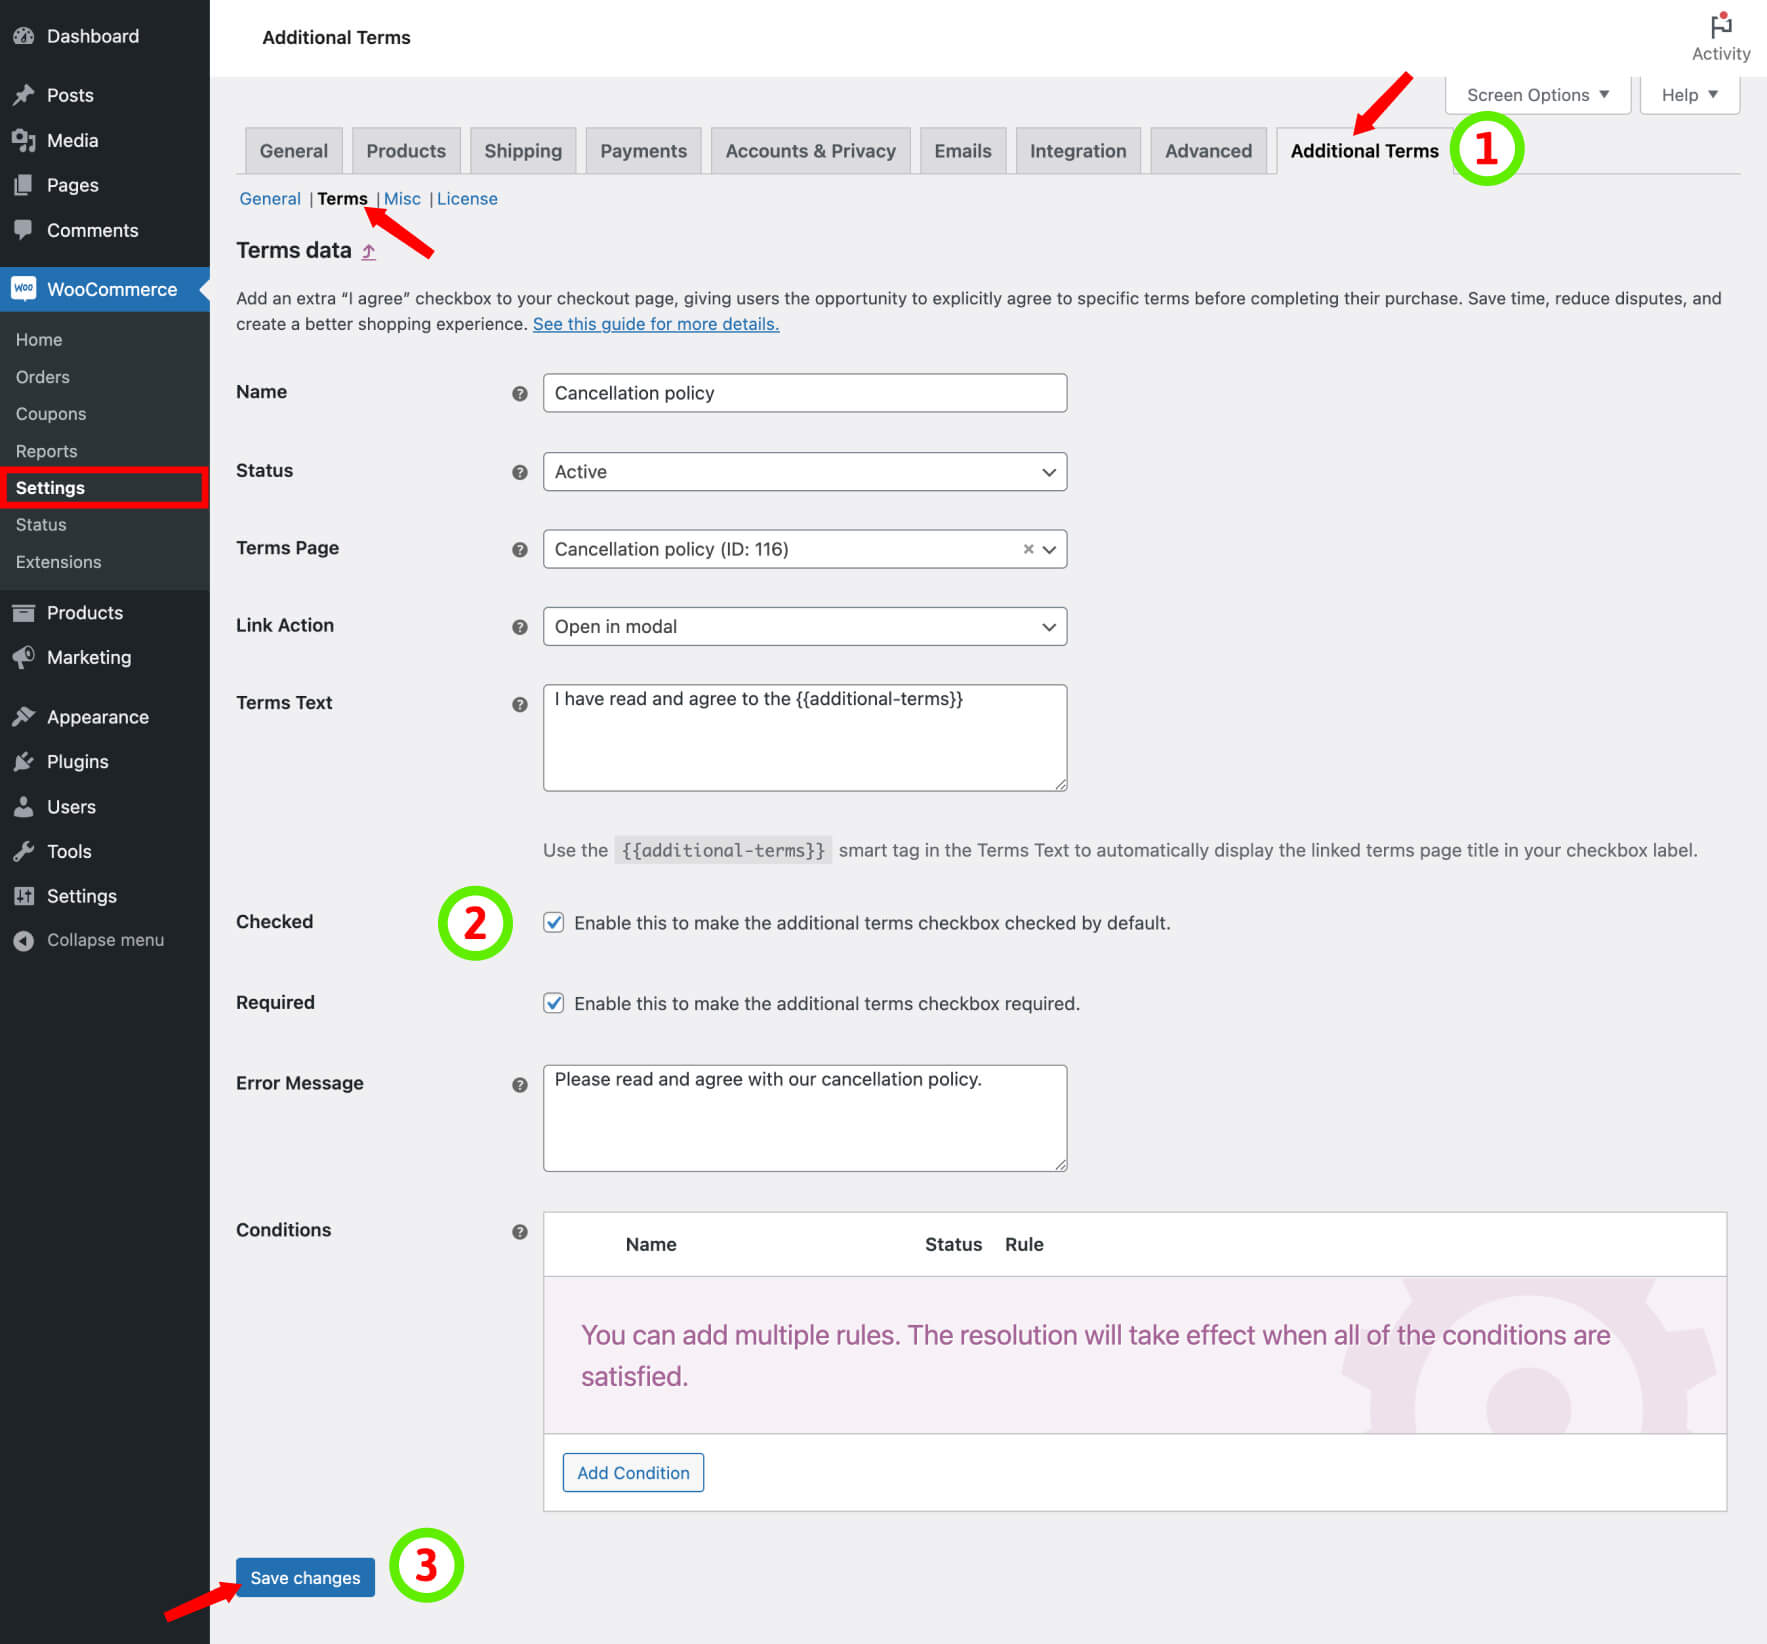
Default Checkbox State
You have the option to set a checkbox as pre-checked by default, simplifying the checkout process for your customers. Here’s how to do it:
- Navigate to WooCommerce → Settings → Additional Terms → Terms.
- Locate the specific terms checkbox you wish to modify and select Edit.
- Choose whether the checkbox be Checked by default on the checkout page:
- Checked: If you select this option, the checkbox will be automatically pre-selected when the checkout page loads.
- Uncheck: Opting for this setting means the checkbox will remain unchecked when the checkout page loads, and customers can choose to check it if desired.
- Click on the Save changes button.
This feature streamlines the checkout process, providing convenience for your customers while ensuring compliance with your terms and conditions.
Customizing Terms Checkbox Requirement
You have the option to make a terms checkbox either mandatory or optional during its creation or editing. Here’s how to do it:
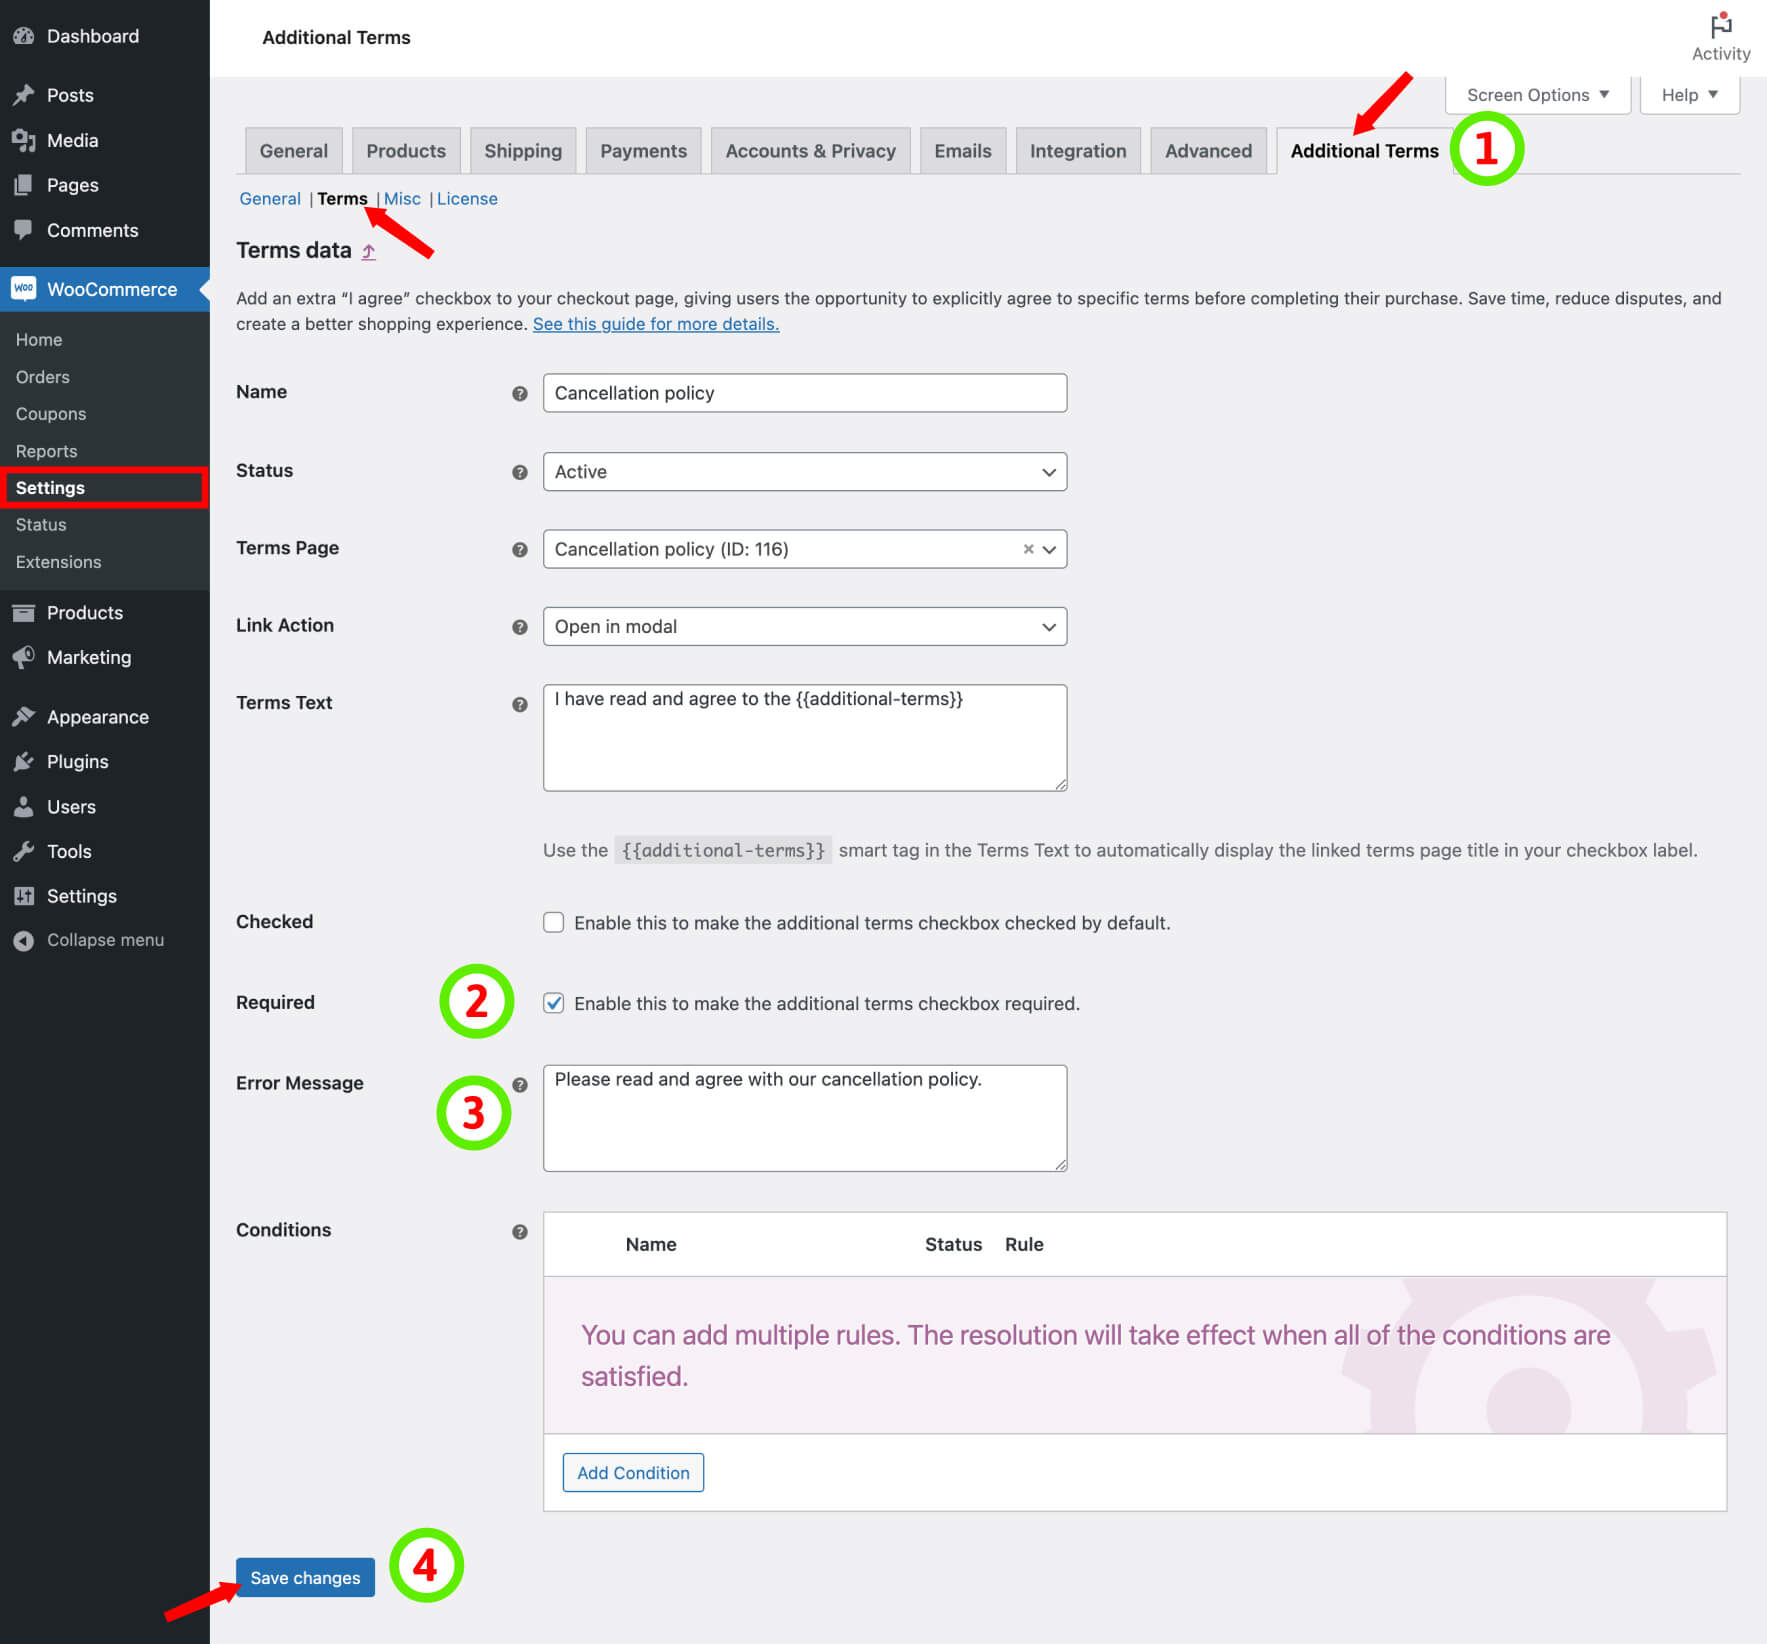
- Go to WooCommerce → Settings → Additional Terms → Terms.
- Hover over the terms checkbox you want to adjust and select Edit.
- Use the Required field to specify your preference:
- Checked: It mandates that customers must agree to the terms checkbox during the checkout process. This is particularly useful when you want to ensure full compliance with your terms and conditions.
- Uncheck: Users have the flexibility to choose whether or not to agree with the terms, enhancing their shopping experience by giving them a choice.
- Enter an Error Message for the Required field. This message will be displayed in the checkout if customers haven’t checked the terms checkbox, ensuring they cannot proceed with the checkout without acknowledging the terms.
- Click on the Save changes button.
Customizing Terms Checkboxes with Conditions
In Woo Additional Terms, you have the power to customize how your terms checkboxes behave by adding conditions. This customization allows you to create smart logic paths that adapt to your unique needs. Based on the rules you set, a terms checkbox can either be displayed or hidden on the checkout page.
To explore the full potential of this capability, we recommend reading our dedicated article on Conditional Terms Checkboxes. This resource offers detailed guidance on effectively utilizing this feature for your store.
Updating Terms Checkbox Status
Managing the status of your terms checkboxes to control their display on the checkout page is a breeze. Here’s how you can do it:
Updating Status from Terms Table
- Visit the Terms table.
- Locate the terms checkbox you want to update.
- Click on the toggle switch in the Status column to change the checkbox’s display status.
Updating Status While Editing or Creating a Term
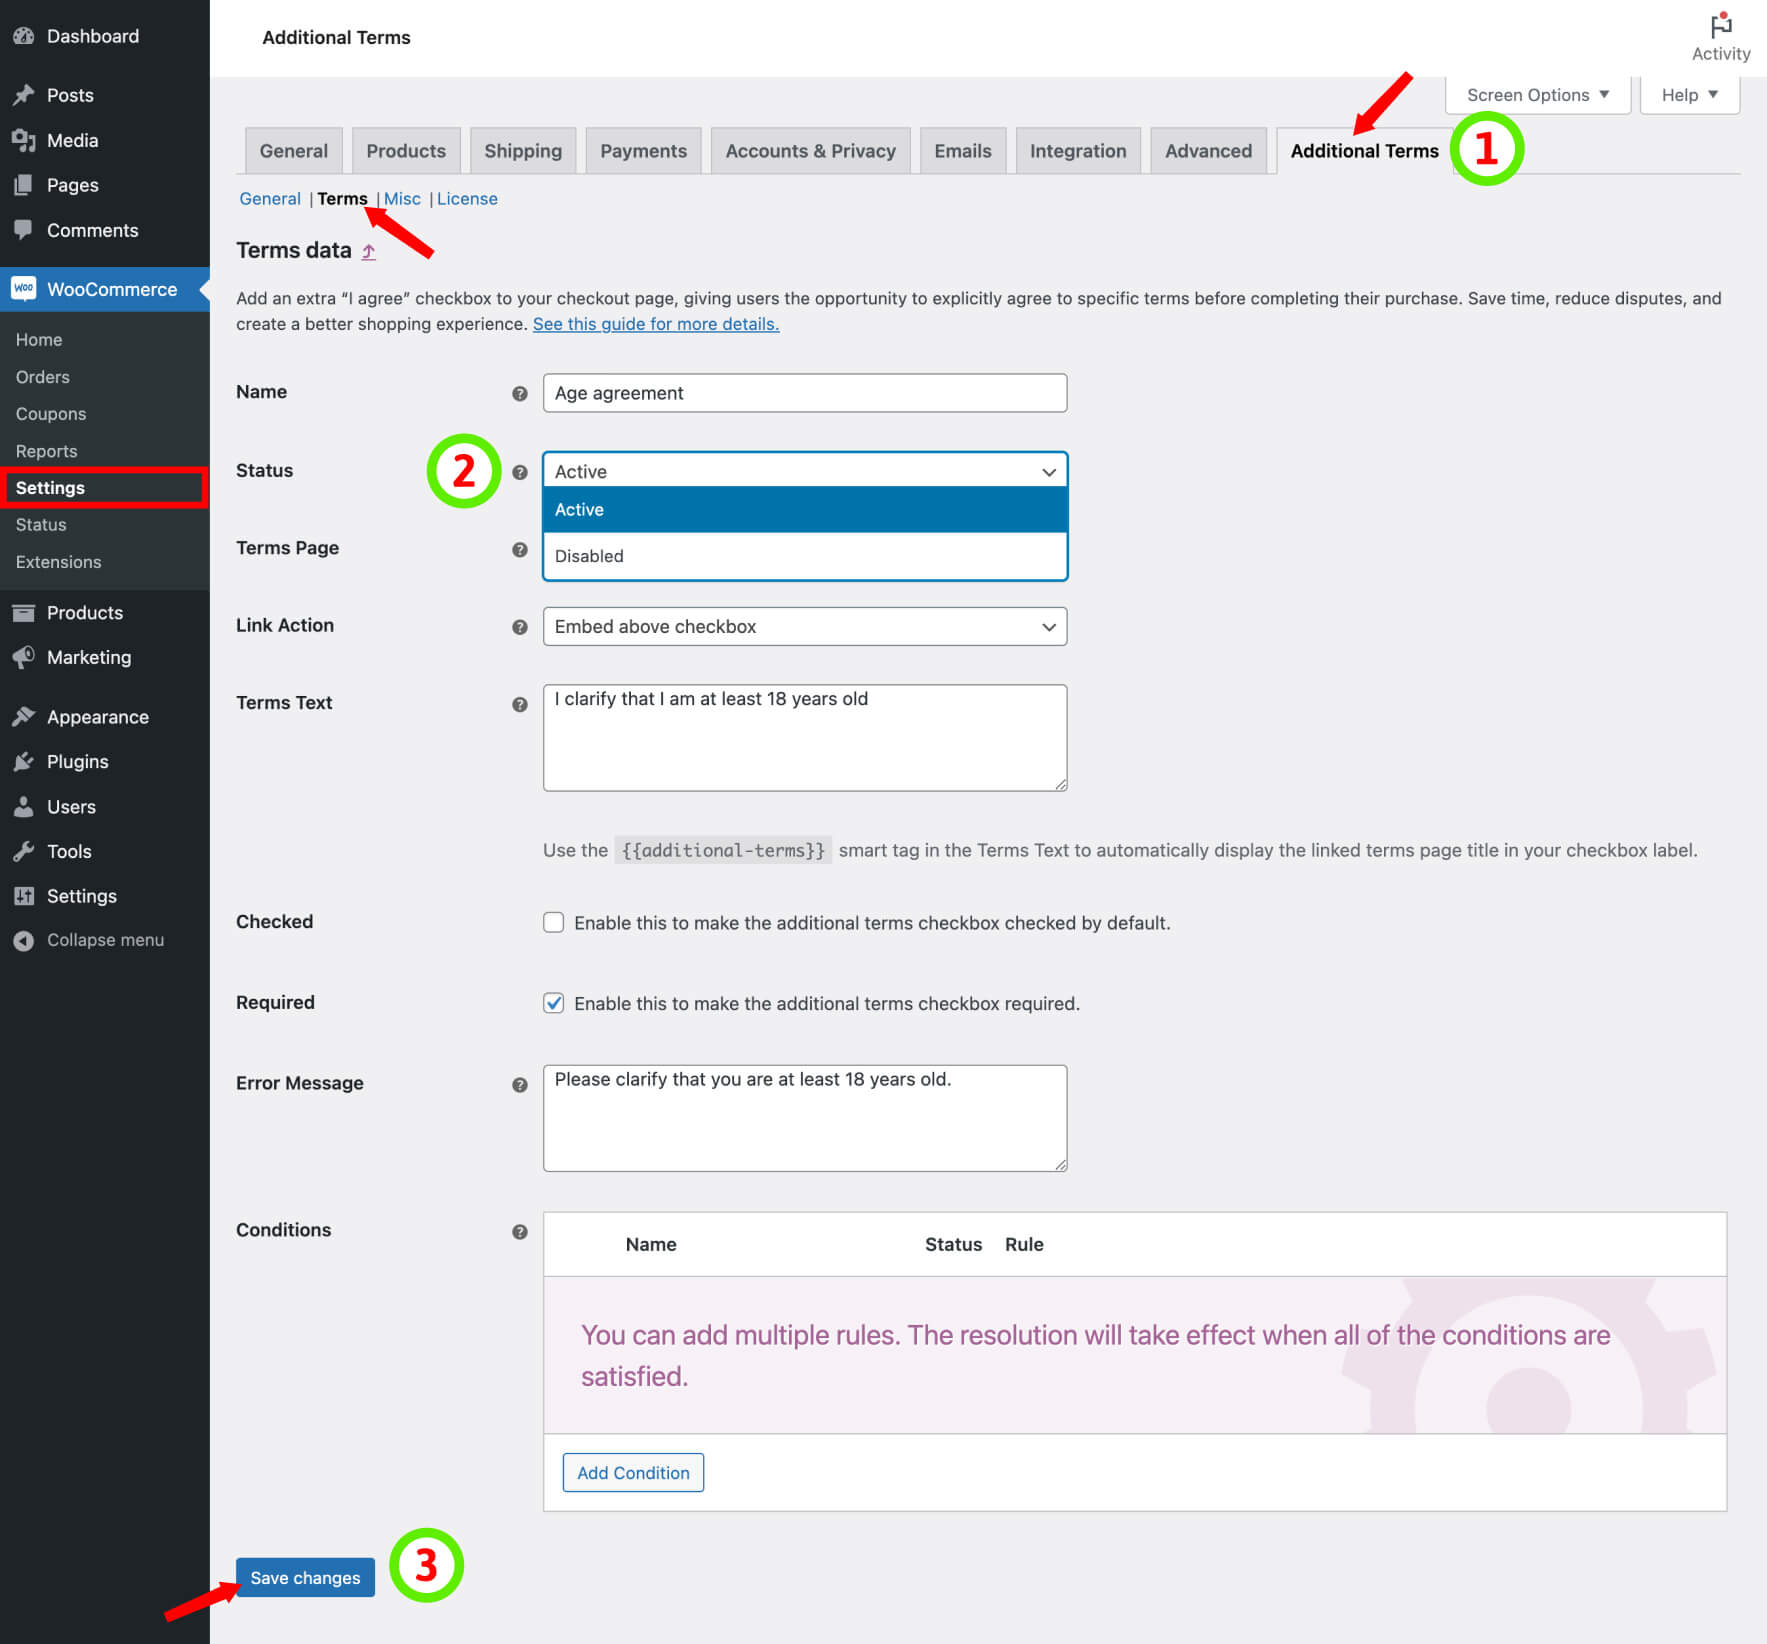
- Go to WooCommerce → Settings → Additional Terms → Terms.
- Hover over the desired terms checkbox and select Edit.
- In the Status field, you have two options:
- Active: Choose this option if you want the checkbox to be operational and visible on the checkout page.
- Disabled: Select this option if you want the checkbox to be non-operational and excluded from the checkout page.
This flexibility ensures that you have full control over when and where your terms checkboxes are displayed during the checkout process, aligning them perfectly with your store’s requirements.
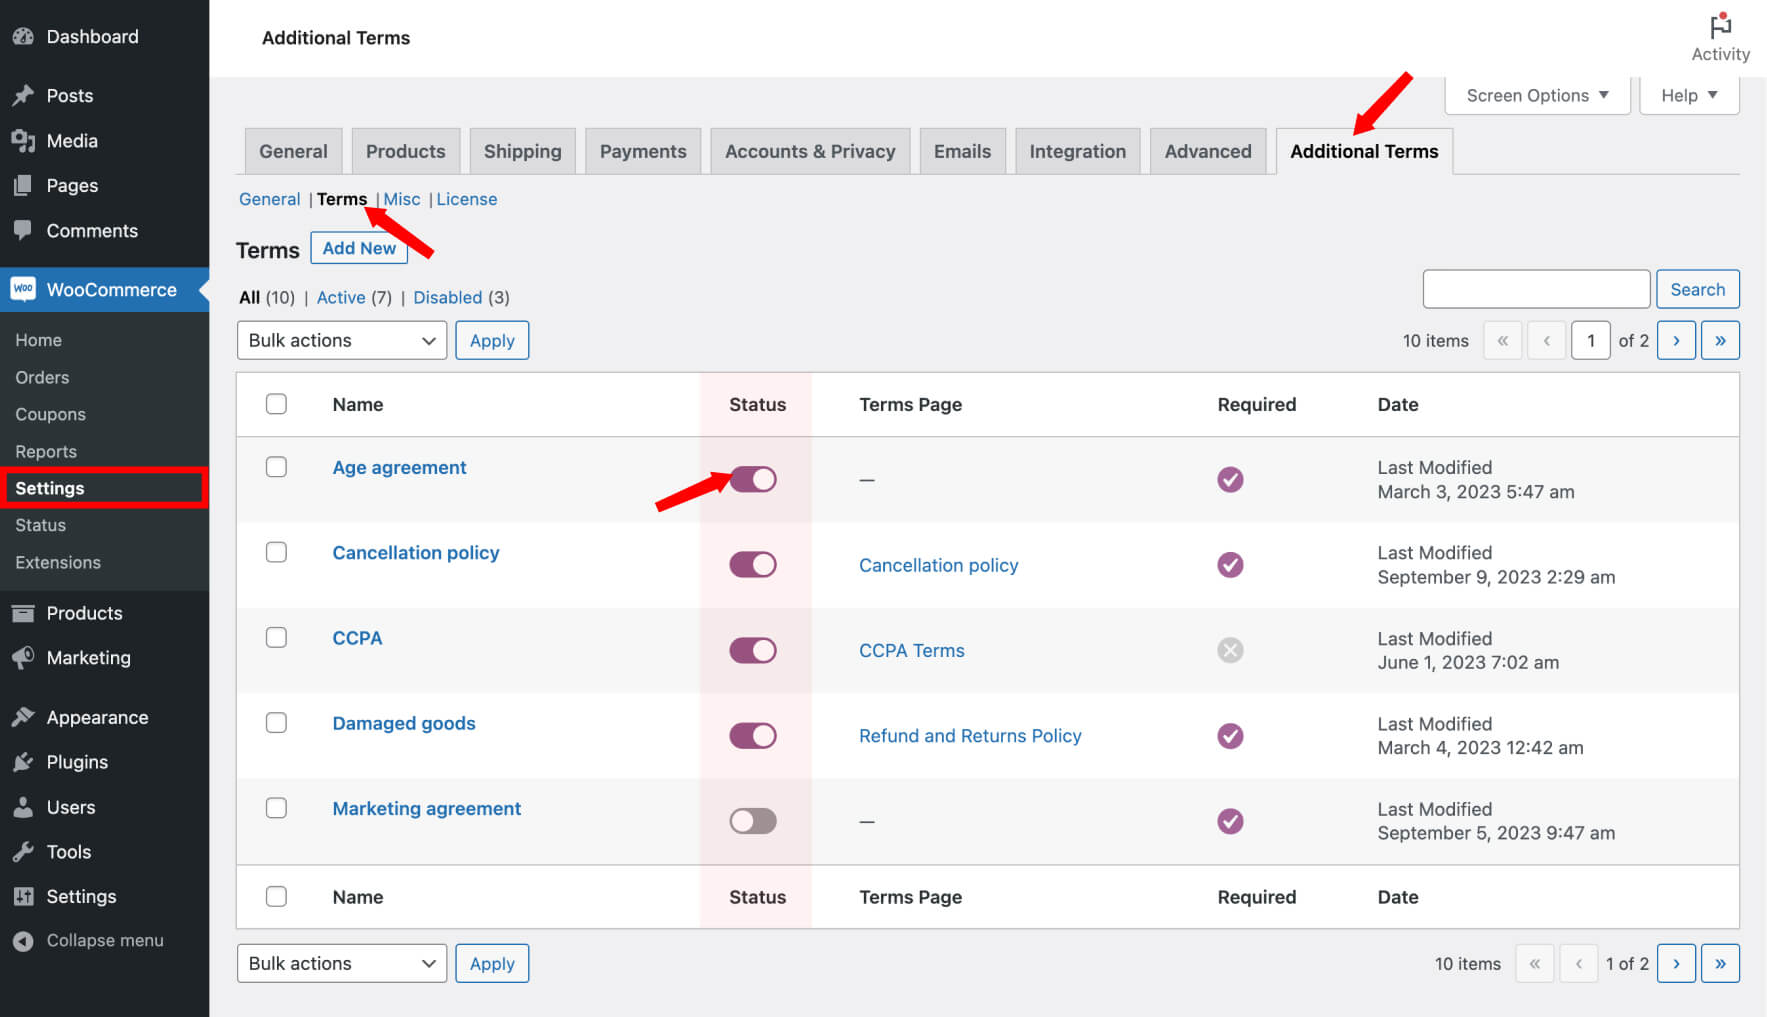
Terms Overview Table
You have a table on the terms page that provides an overview of all the defined terms checkboxes. Here’s what you’ll find in this table:
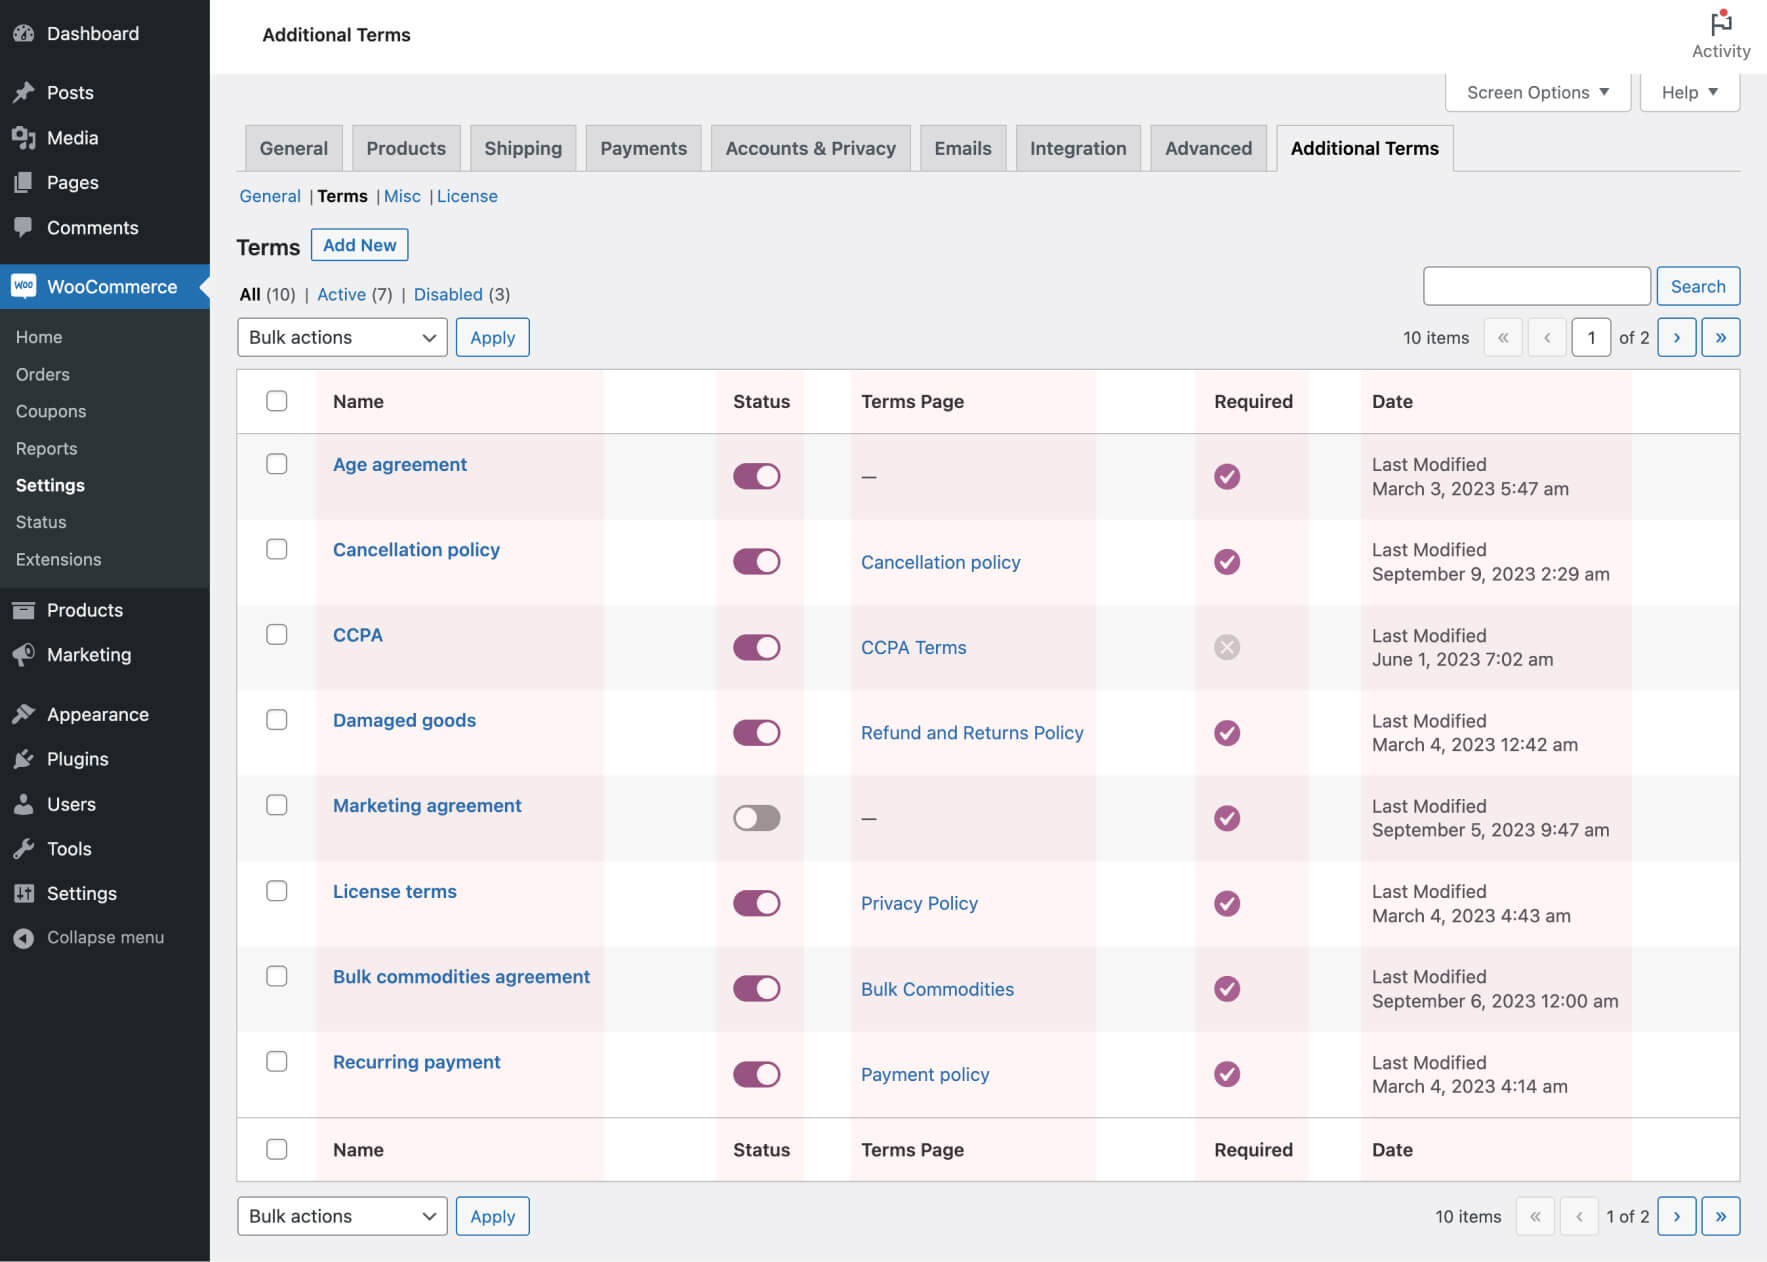
- Name: This column displays the name of your terms and conditions. If you didn’t enter a custom name when creating the terms, the timestamp of the entry creation serves as a placeholder.
- Status: Here, you can see the activation status of your terms and conditions. You can easily toggle the Status by clicking the switch in this column.
- Page: This column shows the terms and conditions page linked to the respective terms checkbox.
- Required: In this section, you’ll find whether the terms field is required during the checkout process. A checkmark indicates that users must agree to the terms, while a cross icon signifies that agreeing to the terms is optional.
- Date: Lastly, this column displays the date of the last modification made to the terms.
This overview table makes it simple to manage and review your terms checkboxes, ensuring clarity and compliance with your store’s policies.
Removing Terms Checkboxes
Removing a terms checkbox is a straightforward process that you can execute at any time. Here’s how:
Individual Removal:
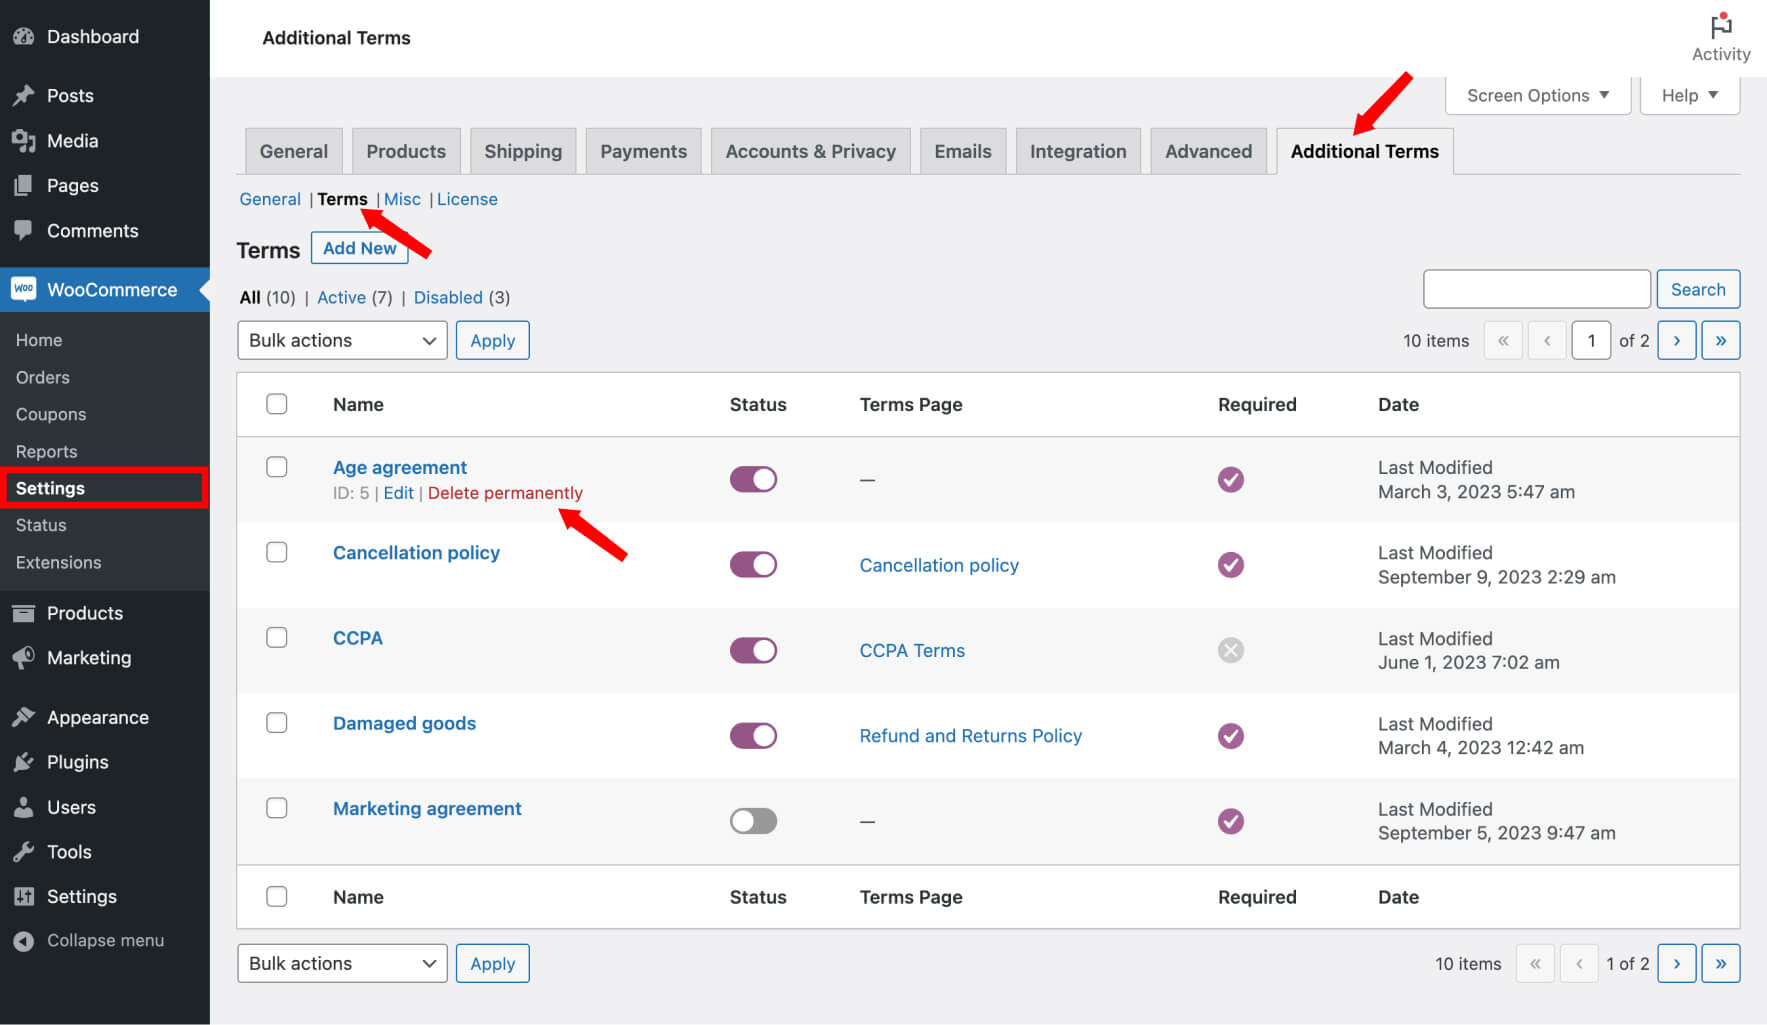
- Go to WooCommerce → Settings → Additional Terms → Terms.
- Hover over the specific terms checkbox you wish to remove, then click Delete permanently.
- A confirmation message will appear. Click the Ok button to confirm and remove the terms field.
Bulk Removal:
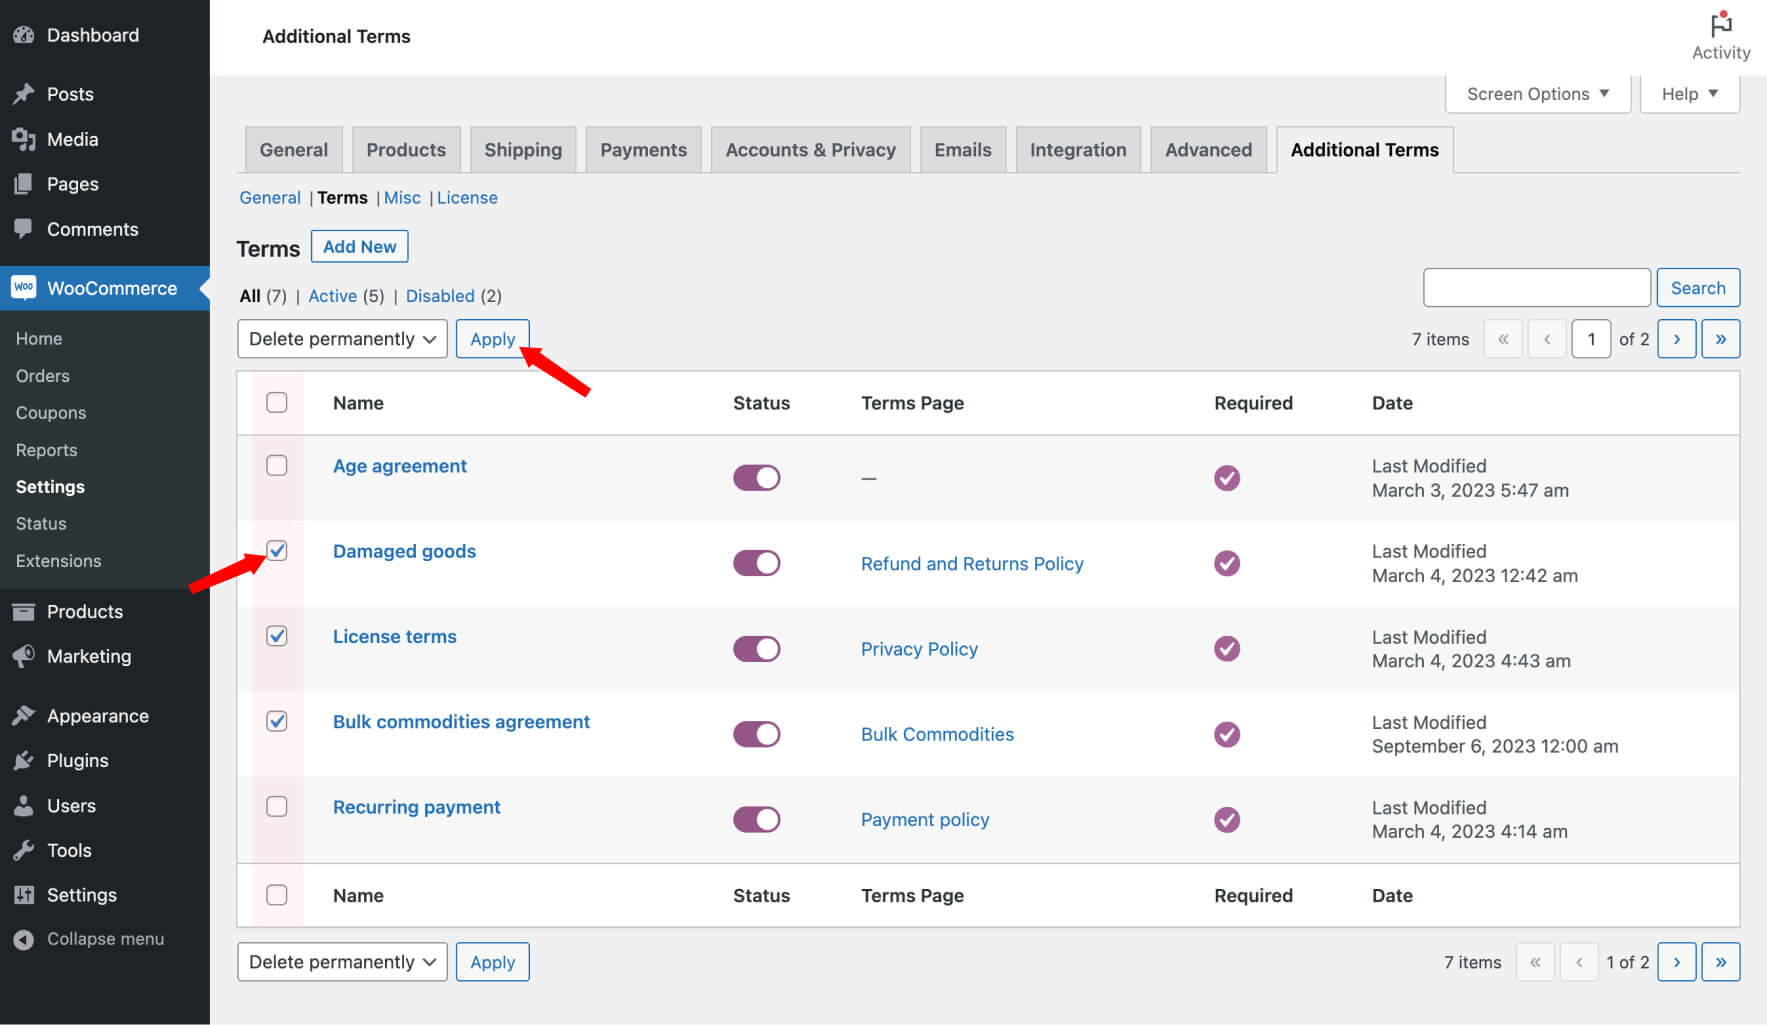
- To remove multiple terms checkboxes simultaneously, navigate to WooCommerce → Settings → Additional Terms → Terms.
- Select several terms by using the checkboxes on the left.
- Next, go to the Bulk actions dropdown menu and choose Delete permanently.
- Click on the Apply button to execute the bulk deletion.

Please note that deleting a terms field permanently removes it, and this action cannot be undone. Be certain of your decision before proceeding with removal.
Locating Active Terms
You can quickly identify the terms checkboxes that are currently active and operational during the checkout process. Here’s how:
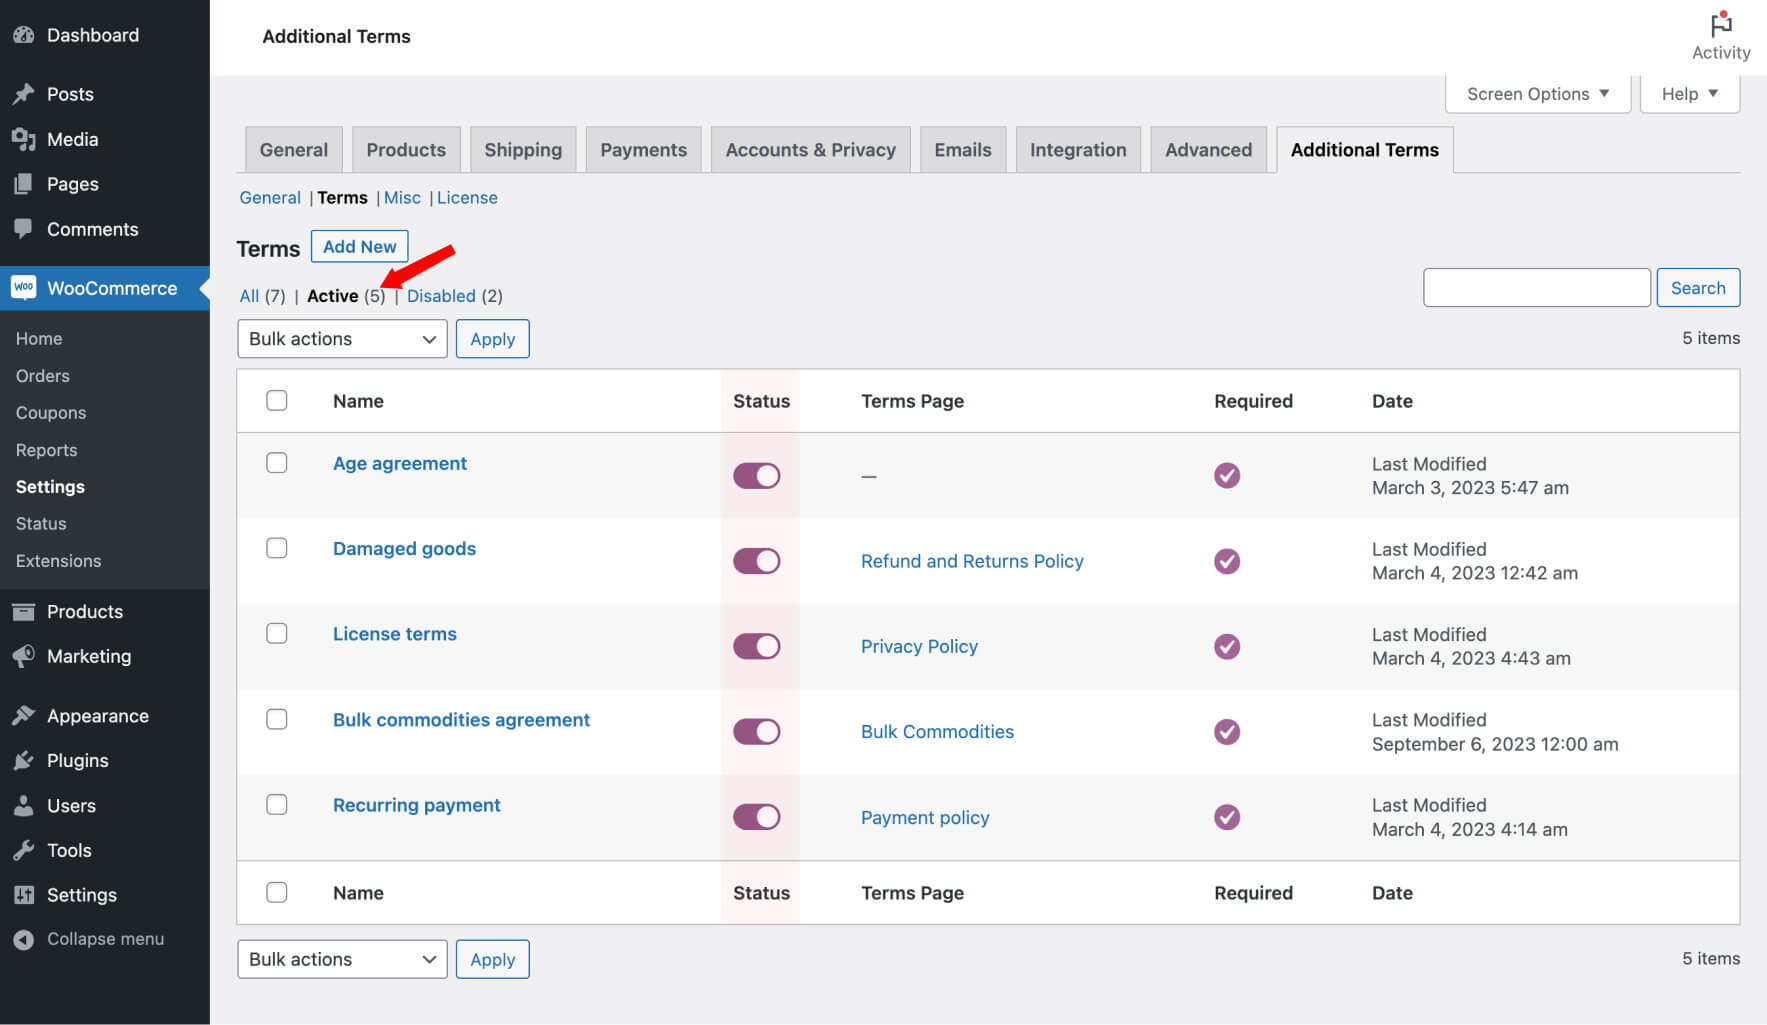
- Look for the new filter link labeled Active.
- Click on this link to access a list of terms checkbox fields currently used and displayed during the purchase process.
This feature streamlines your management by allowing you to quickly pinpoint and review the terms that are currently in effect, ensuring a smooth shopping experience for your customers.
Locating Disabled Terms
To efficiently manage your terms checkboxes, it’s essential to identify those that are currently inactive or non-functional during the purchase process. Here’s how you can do it:
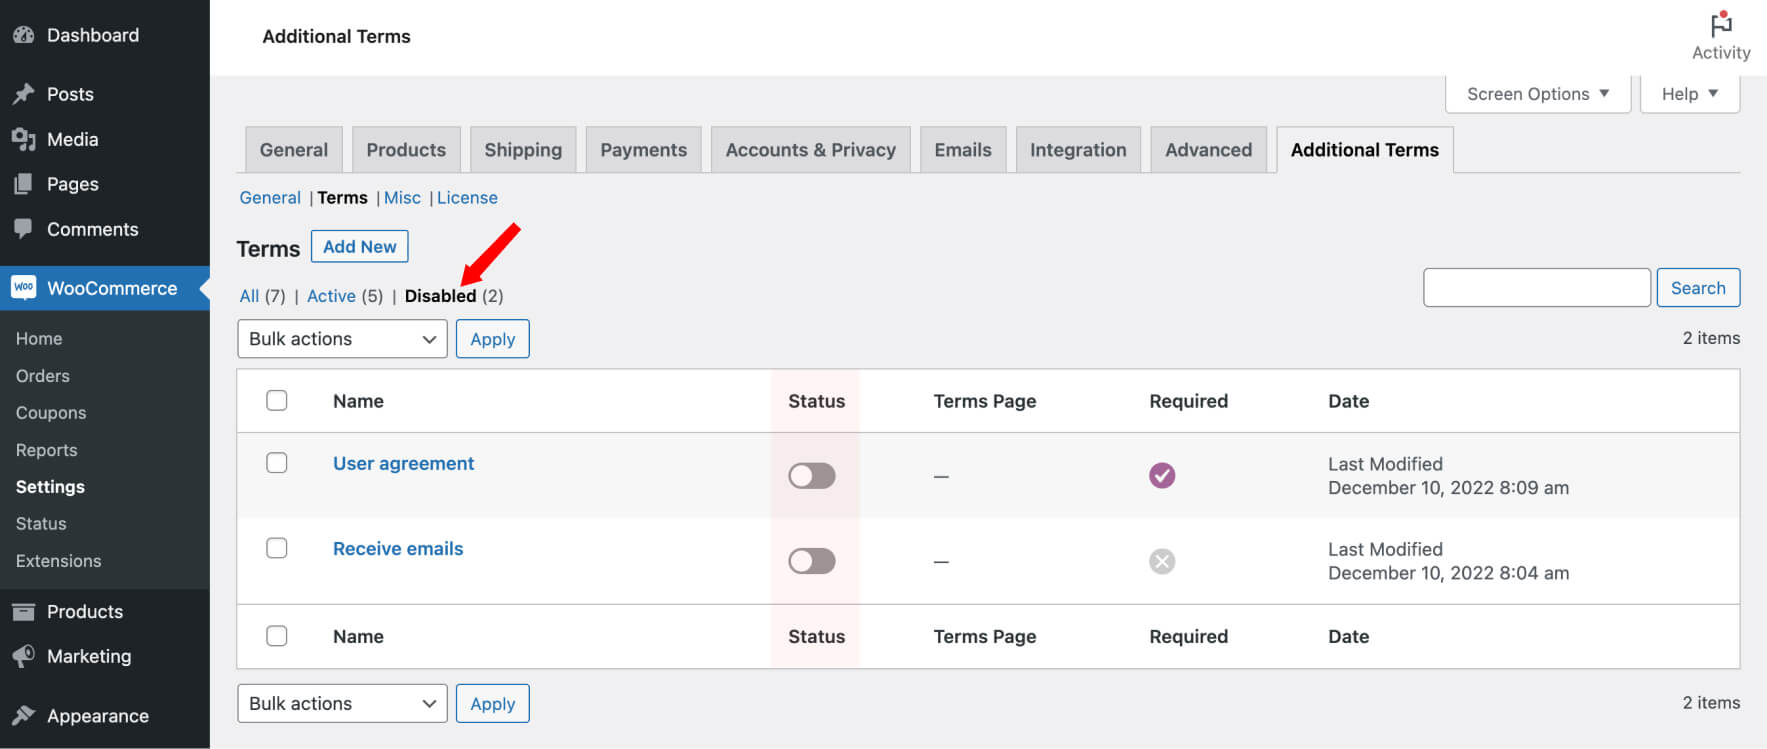
- Look for the new filter link labeled Disabled.
- Click on this link to access a list of terms checkbox fields that are currently not in use and are not displayed during the purchase process.
This feature simplifies your management tasks by enabling you to easily identify and review the terms that are presently disabled, ensuring that your checkout process runs smoothly and in compliance with your store’s policies.
Customizing Your Terms Table
Tailoring your view of the Terms table is simple and flexible. Here’s how:
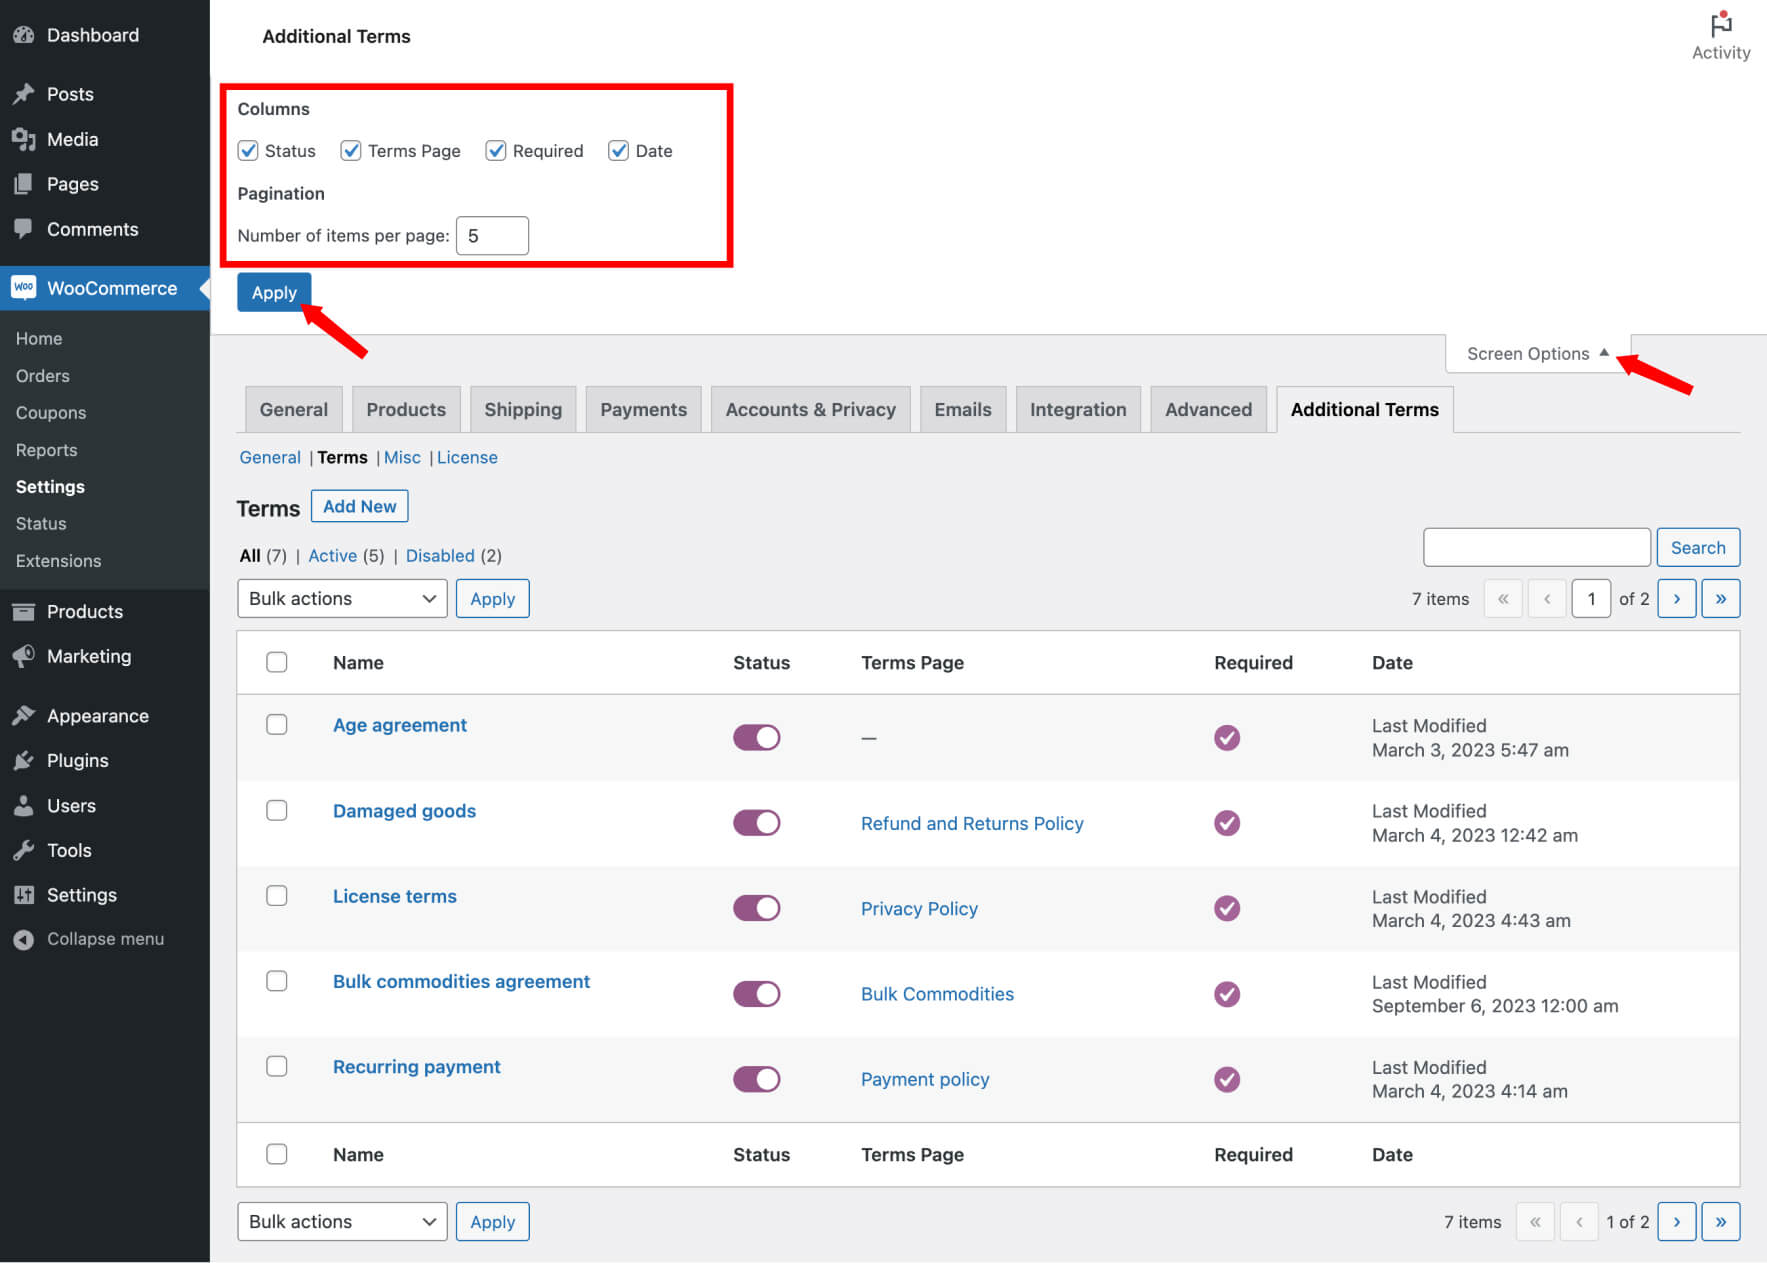
- Locate the Screen Options pull-down at the top right corner of the screen.
- Within this menu, you can toggle the visibility of each column displayed on the Terms table. Customize the view to suit your preferences and management needs.
This feature allows you to focus on the specific information that matters most to you, making the management of your terms checkboxes even more efficient.