
Conditional logic is a feature that empowers you to set rules and conditions that dynamically change the behavior of the Terms and Conditions checkboxes based on the contents of the cart and the details of the checkout process. You can automate specific actions within your “I agree” checkboxes to suit different scenarios and concerns.
For instance, if a customer adds a particular product to their cart, conditional logic can trigger the display or hiding of specific T&C checkboxes on the checkout page. This flexibility allows you to create a more personalized and streamlined shopping experience while ensuring compliance with your store’s policies and legal requirements. Explore the capabilities of conditional logic in this documentation to harness its full potential for your online store.
Creating Conditional Logic
Introducing smart logic to your terms checkboxes is a powerful way to enhance user understanding of your store’s policies. Here’s how to create these rules and conditions:
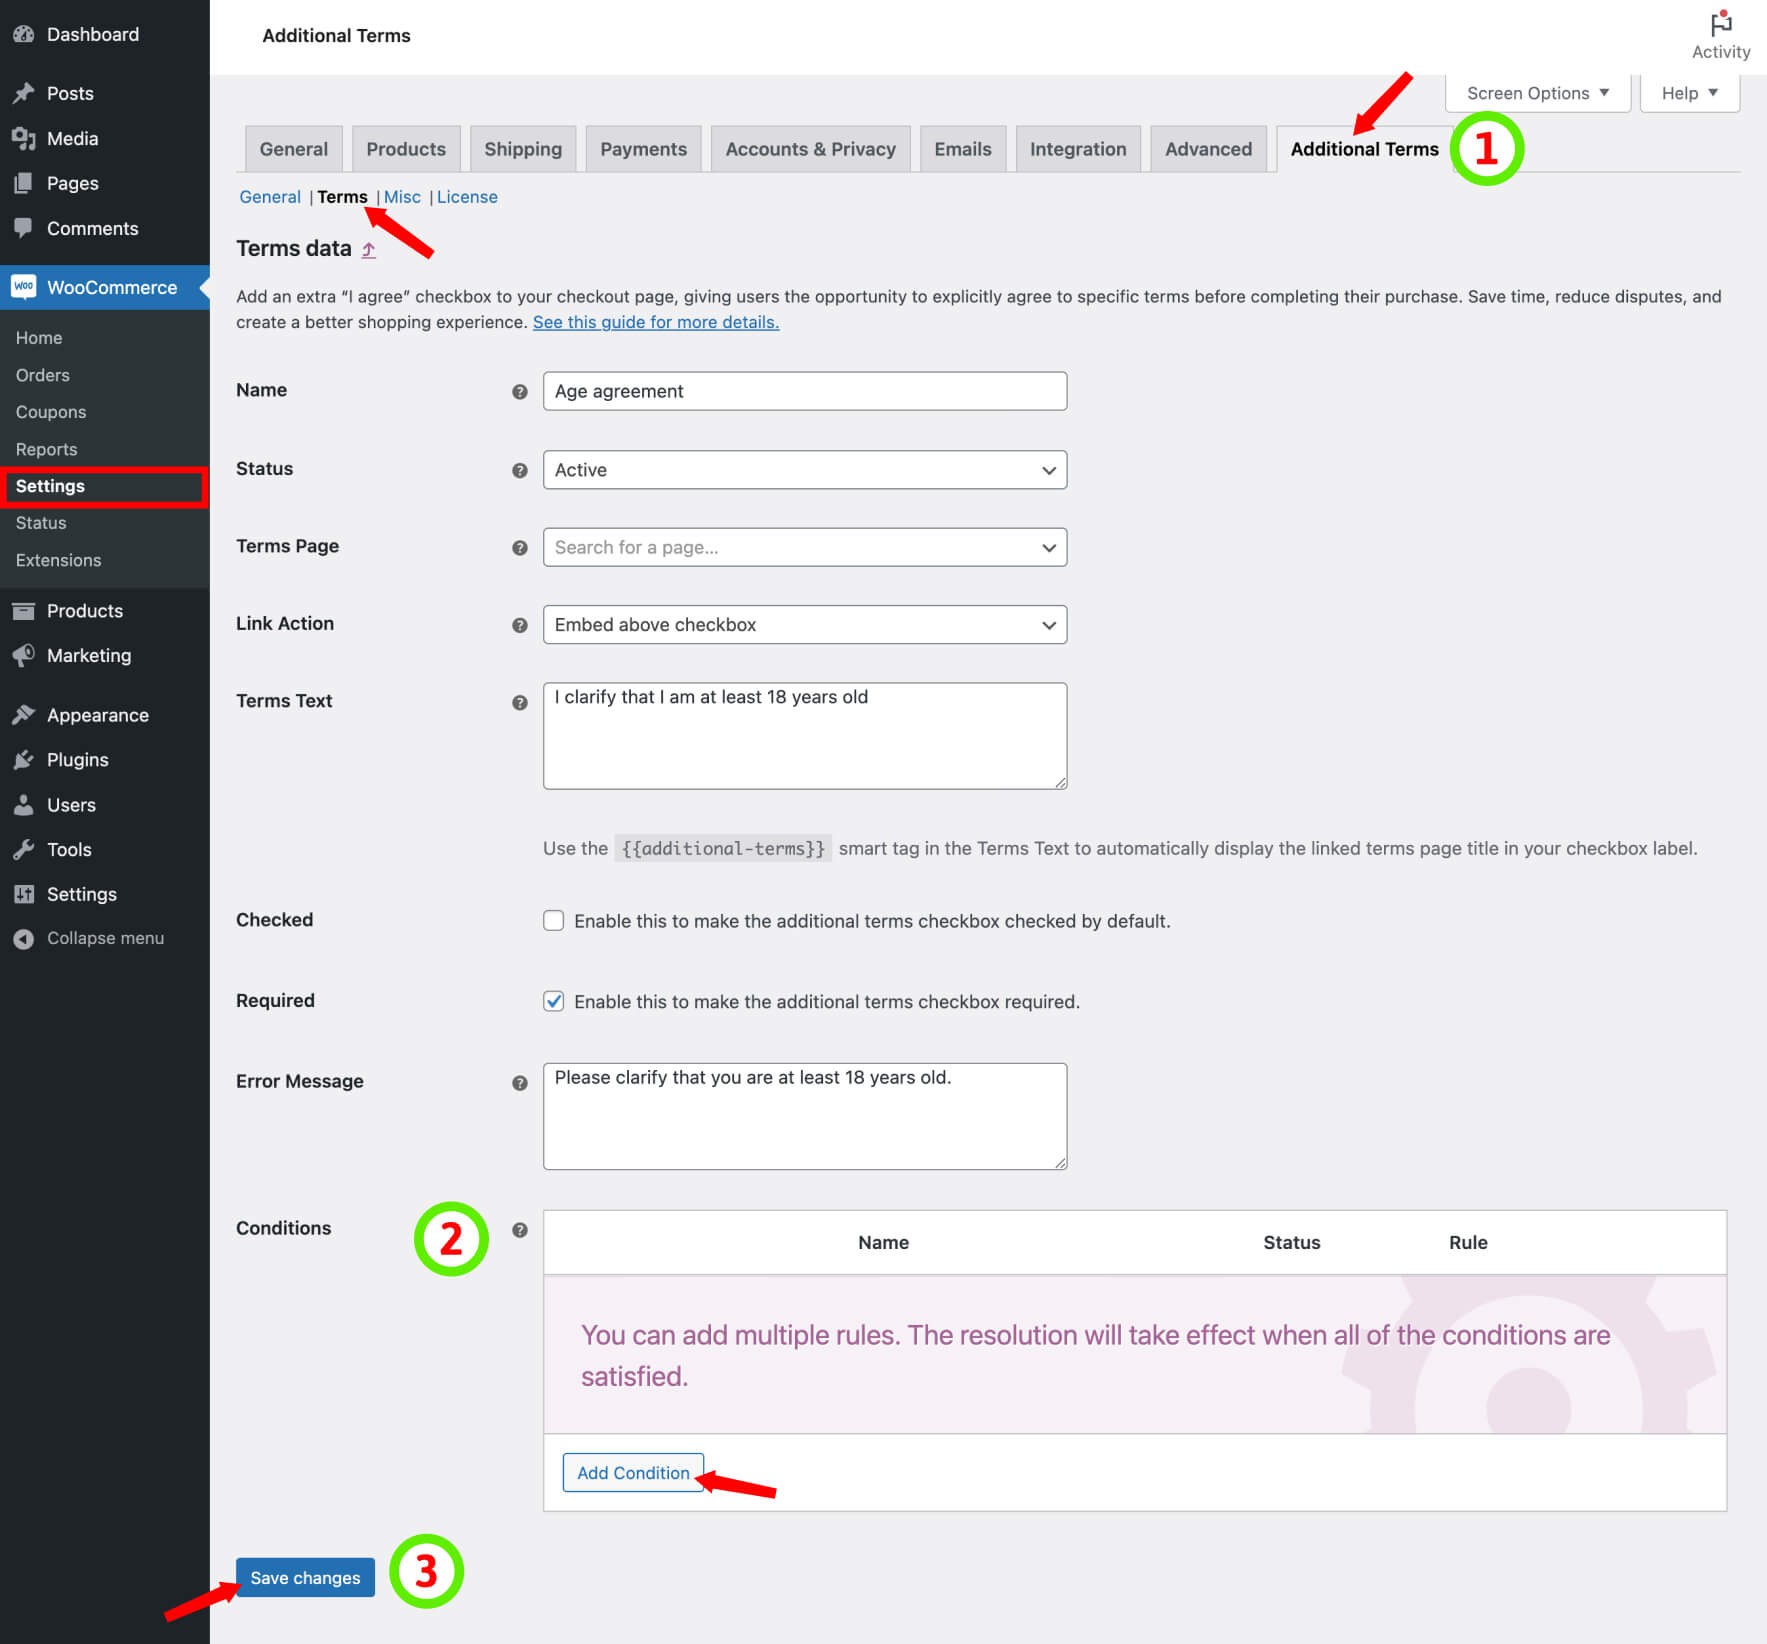
- Go to the terms page either by editing existing terms or creating a new terms checkbox.
- Locate the Conditions table and click on the Add Condition button.
- A Conditional Settings modal will appear, providing options to configure your condition:
- Enter a Name for your condition.
- Choose a Rule that defines how your term and condition checkbox should behave.
- Select an Operator that aligns with your desired condition.
- Depending on the rule you’ve set, you’ll have a range of options to choose from.
- Save your changes by clicking the Save changes button within the modal.
- Save your terms settings by clicking the Save changes button on the edit page.
By following these steps, you can implement conditional logic that simplifies your store’s policies and ensures a smoother shopping experience for your customers.
Restrict by Products
You operate an online art supply store that sells paintbrushes, including variations like “Artist Brush Set – Fine Tip” and “Artist Brush Set – Broad Tip”. Each variation has different care instructions. With smart logic, you can present customized checkboxes for each product to ensure customers acknowledge these instructions before purchasing.
Here’s how to set this up:

- Go to the terms page either by editing existing terms or creating a new terms checkbox.
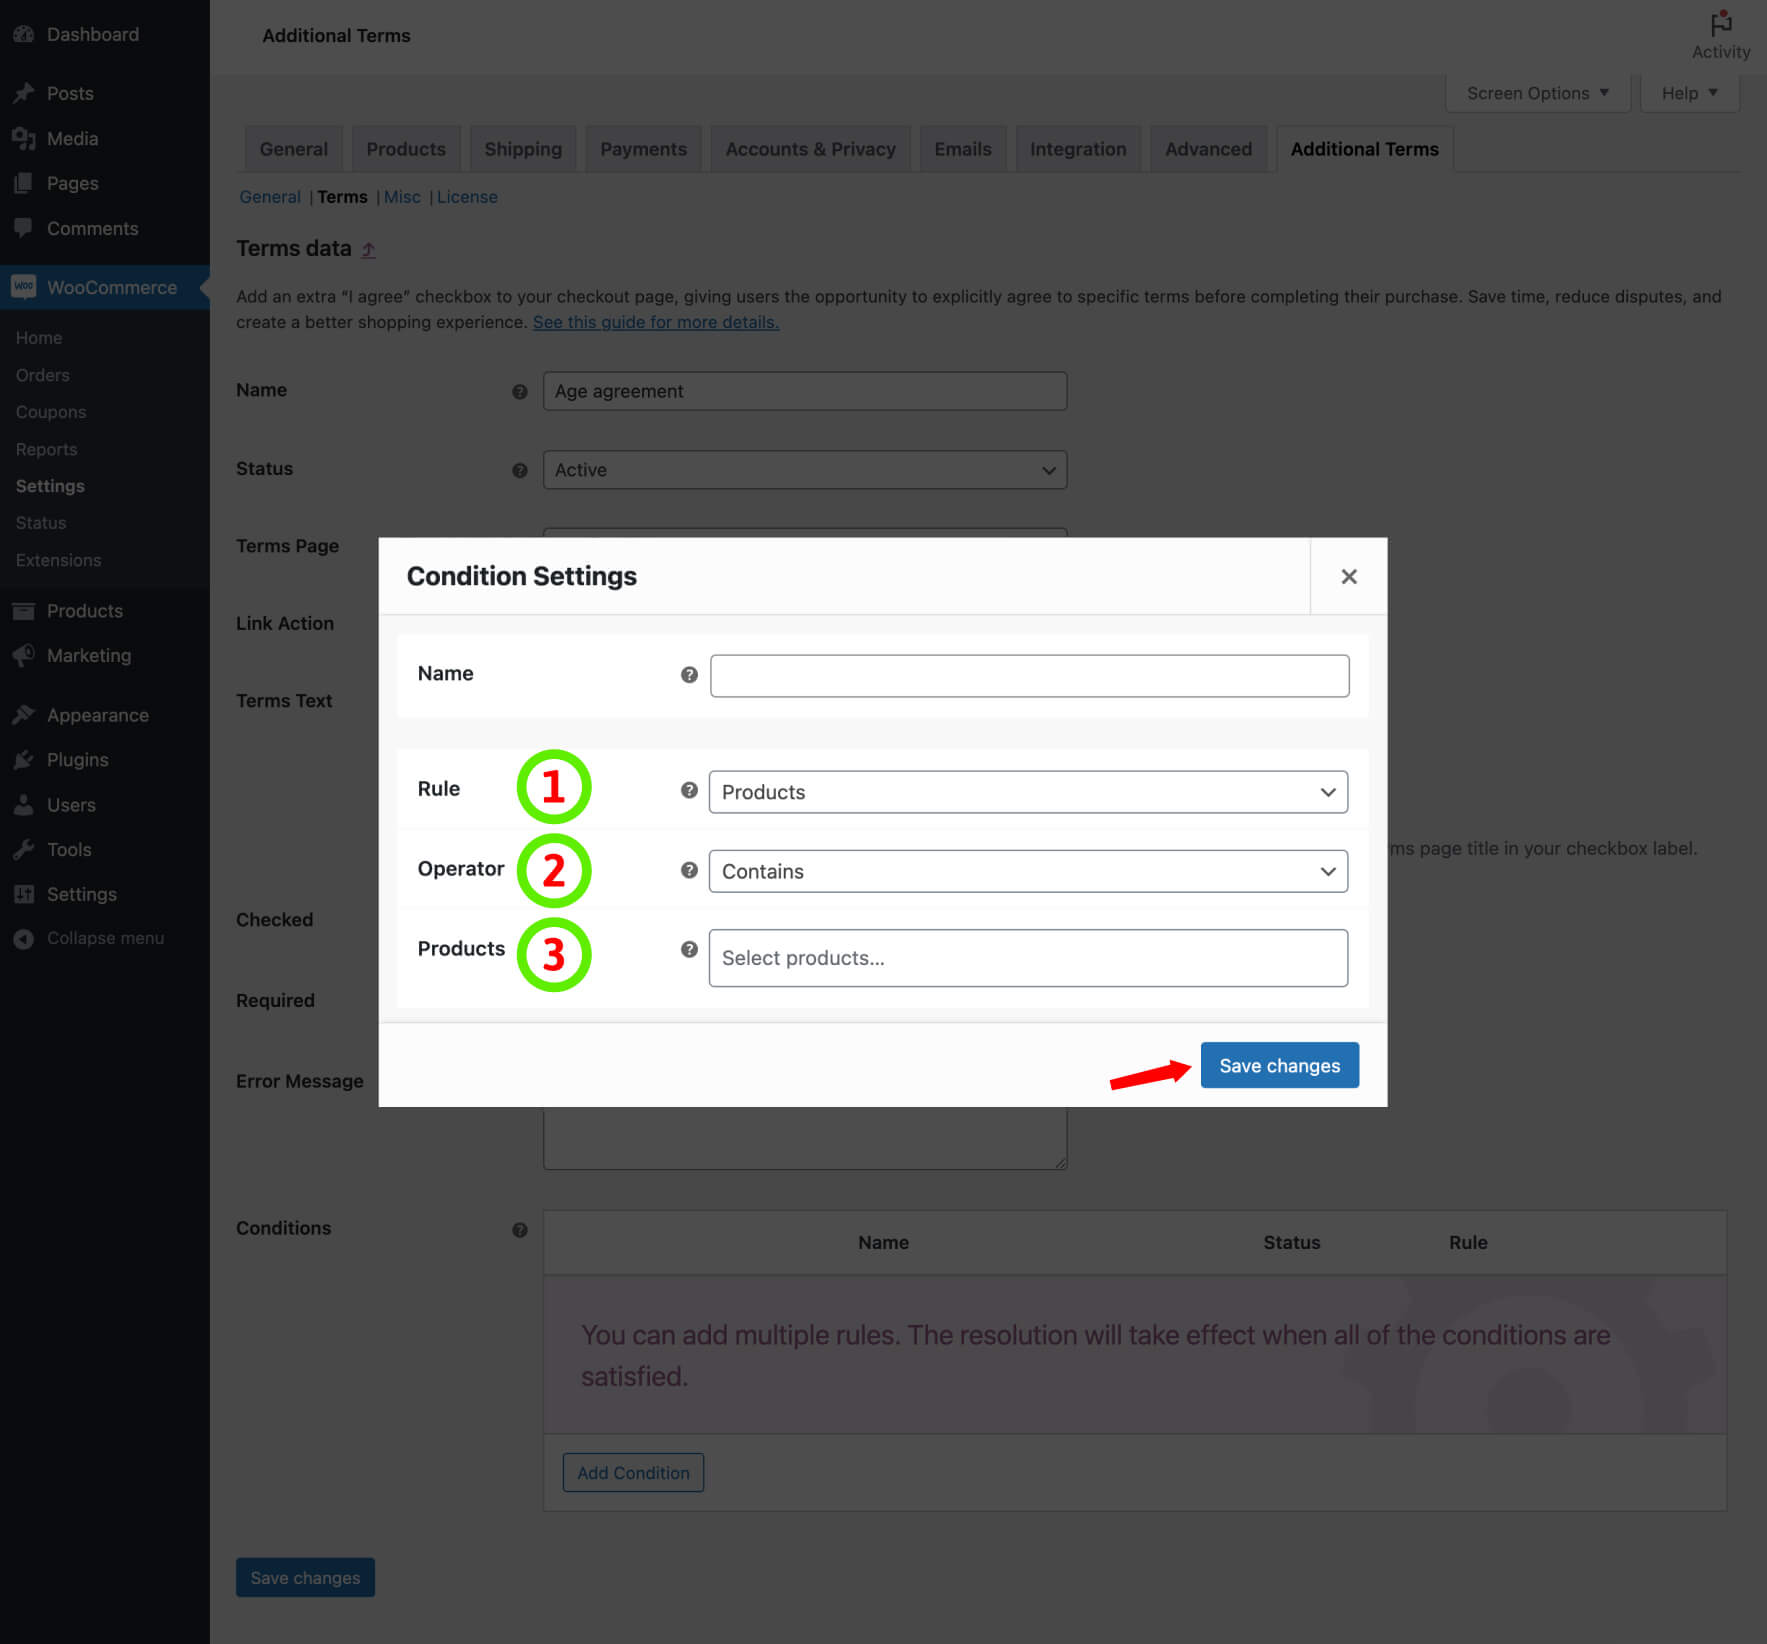
- Locate the Conditions table and click on the Add Condition button.
- A Conditional Settings modal will appear, providing options to configure your condition.
- Enter a Name for your condition.
- Select Products using the Rule dropdown.
- Use the Operator dropdown to determine whether the cart items should contain individual products (as specified in the following field). You have two options:
- Contain: If the shopping cart contains at least one of the required products, the terms checkbox will be displayed on the checkout page.
- Does not contain: If the shopping cart doesn’t contain any of the specified products, the terms checkbox will be shown on the checkout page.
- Choose the Products you want to set for the conditional rule. Multiple products are combined with an “or” logic, meaning if this product or that product is in the cart, then the condition applies.
- Save your changes by clicking the Save changes button within the modal.
- Save your terms settings by clicking the Save changes button on the edit page.
Restrict by Categories
You can elevate your terms and conditions checkboxes by implementing conditional logic based on the product categories in the cart. For example, you can use smart logic to display a warranty agreement checkbox in the checkout when users add a product from the appliance category to their cart.
Here’s how you can set up these intelligent conditions:
- Go to the terms page either by editing existing terms or creating a new terms checkbox.
- Locate the Conditions table and click on the Add Condition button.
- A Conditional Settings modal will appear, providing options to configure your condition.
- Enter a Name for your condition.
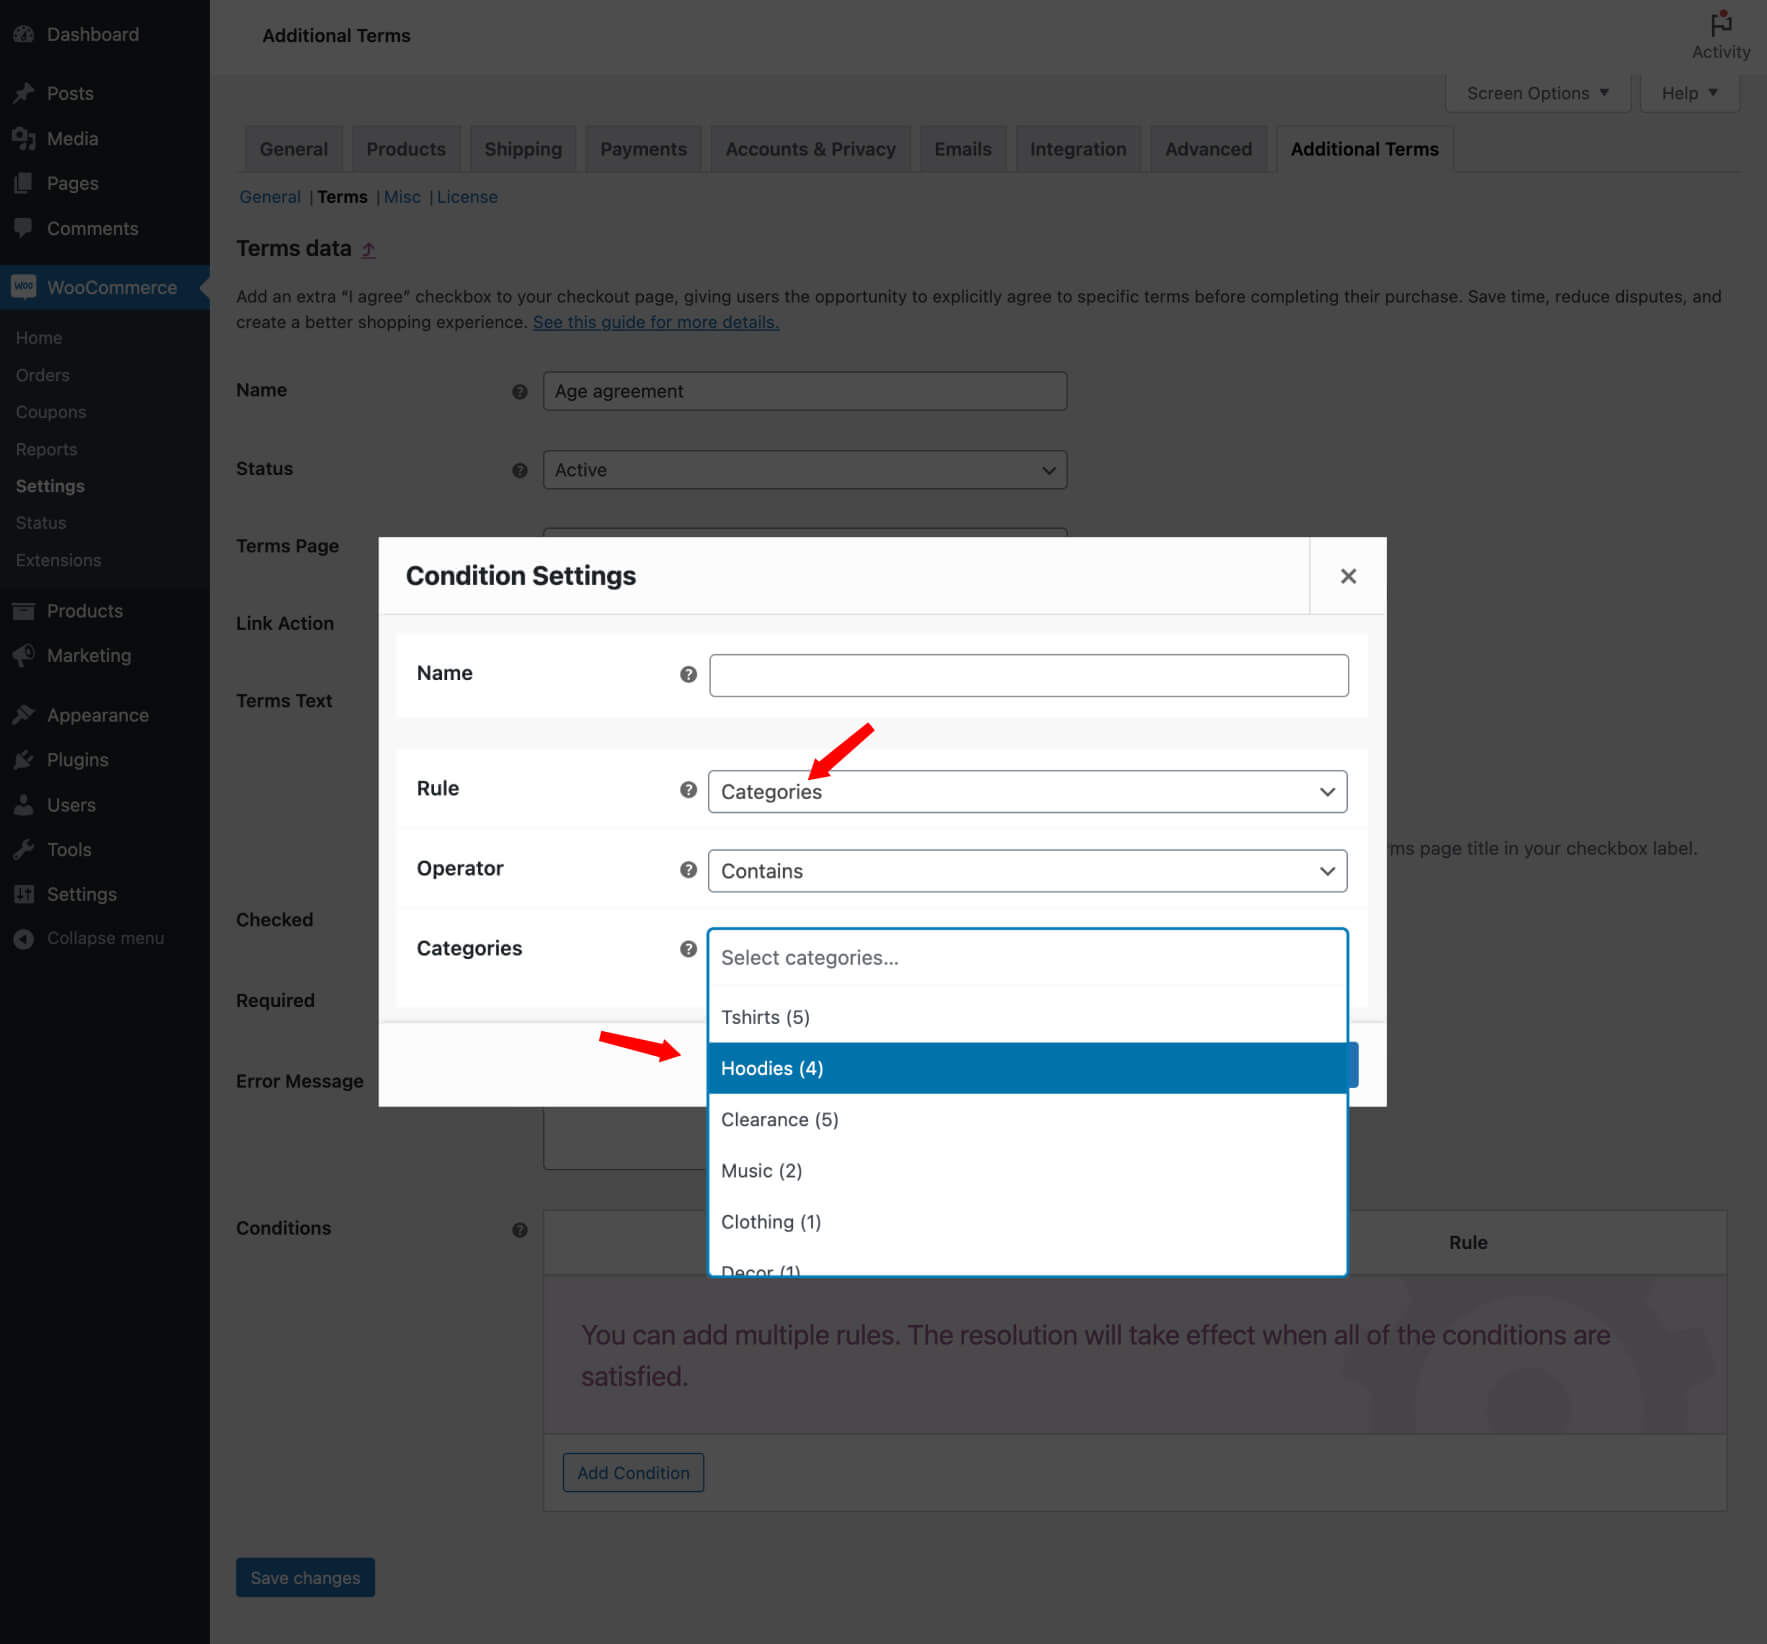
- Select Categories using the Rule dropdown.
- Use the Operator dropdown to determine whether the cart items should contain specific categories (choose the categories in the following field).
- Contain: If the shopping cart contains at least one of the required categories, the terms checkbox will be displayed on the checkout page.
- Does not contain: If the shopping cart doesn’t contain any of the specified categories, the terms checkbox will be shown on the checkout page.
- Select the Categories you want to apply to the conditional rule. You can combine multiple categories using “or“, allowing for flexible rule customization.
- Save your changes by clicking the Save changes button within the modal.
- Save your terms settings by clicking the Save changes button on the edit page.
Restrict by Tags
You can elevate your terms and conditions checkboxes using conditional logic based on the tags assigned to products in the cart. For example, you can employ smart logic to display a damaged goods checkbox in the checkout when users add a product tagged as “fragile” to their cart.
Here’s how to implement these intelligent tag-based conditions:
- Go to the terms page either by editing existing terms or creating a new terms checkbox.
- Locate the Conditions table and click on the Add Condition button.
- A Conditional Settings modal will appear, providing options to configure your condition.
- Enter a Name for your condition.
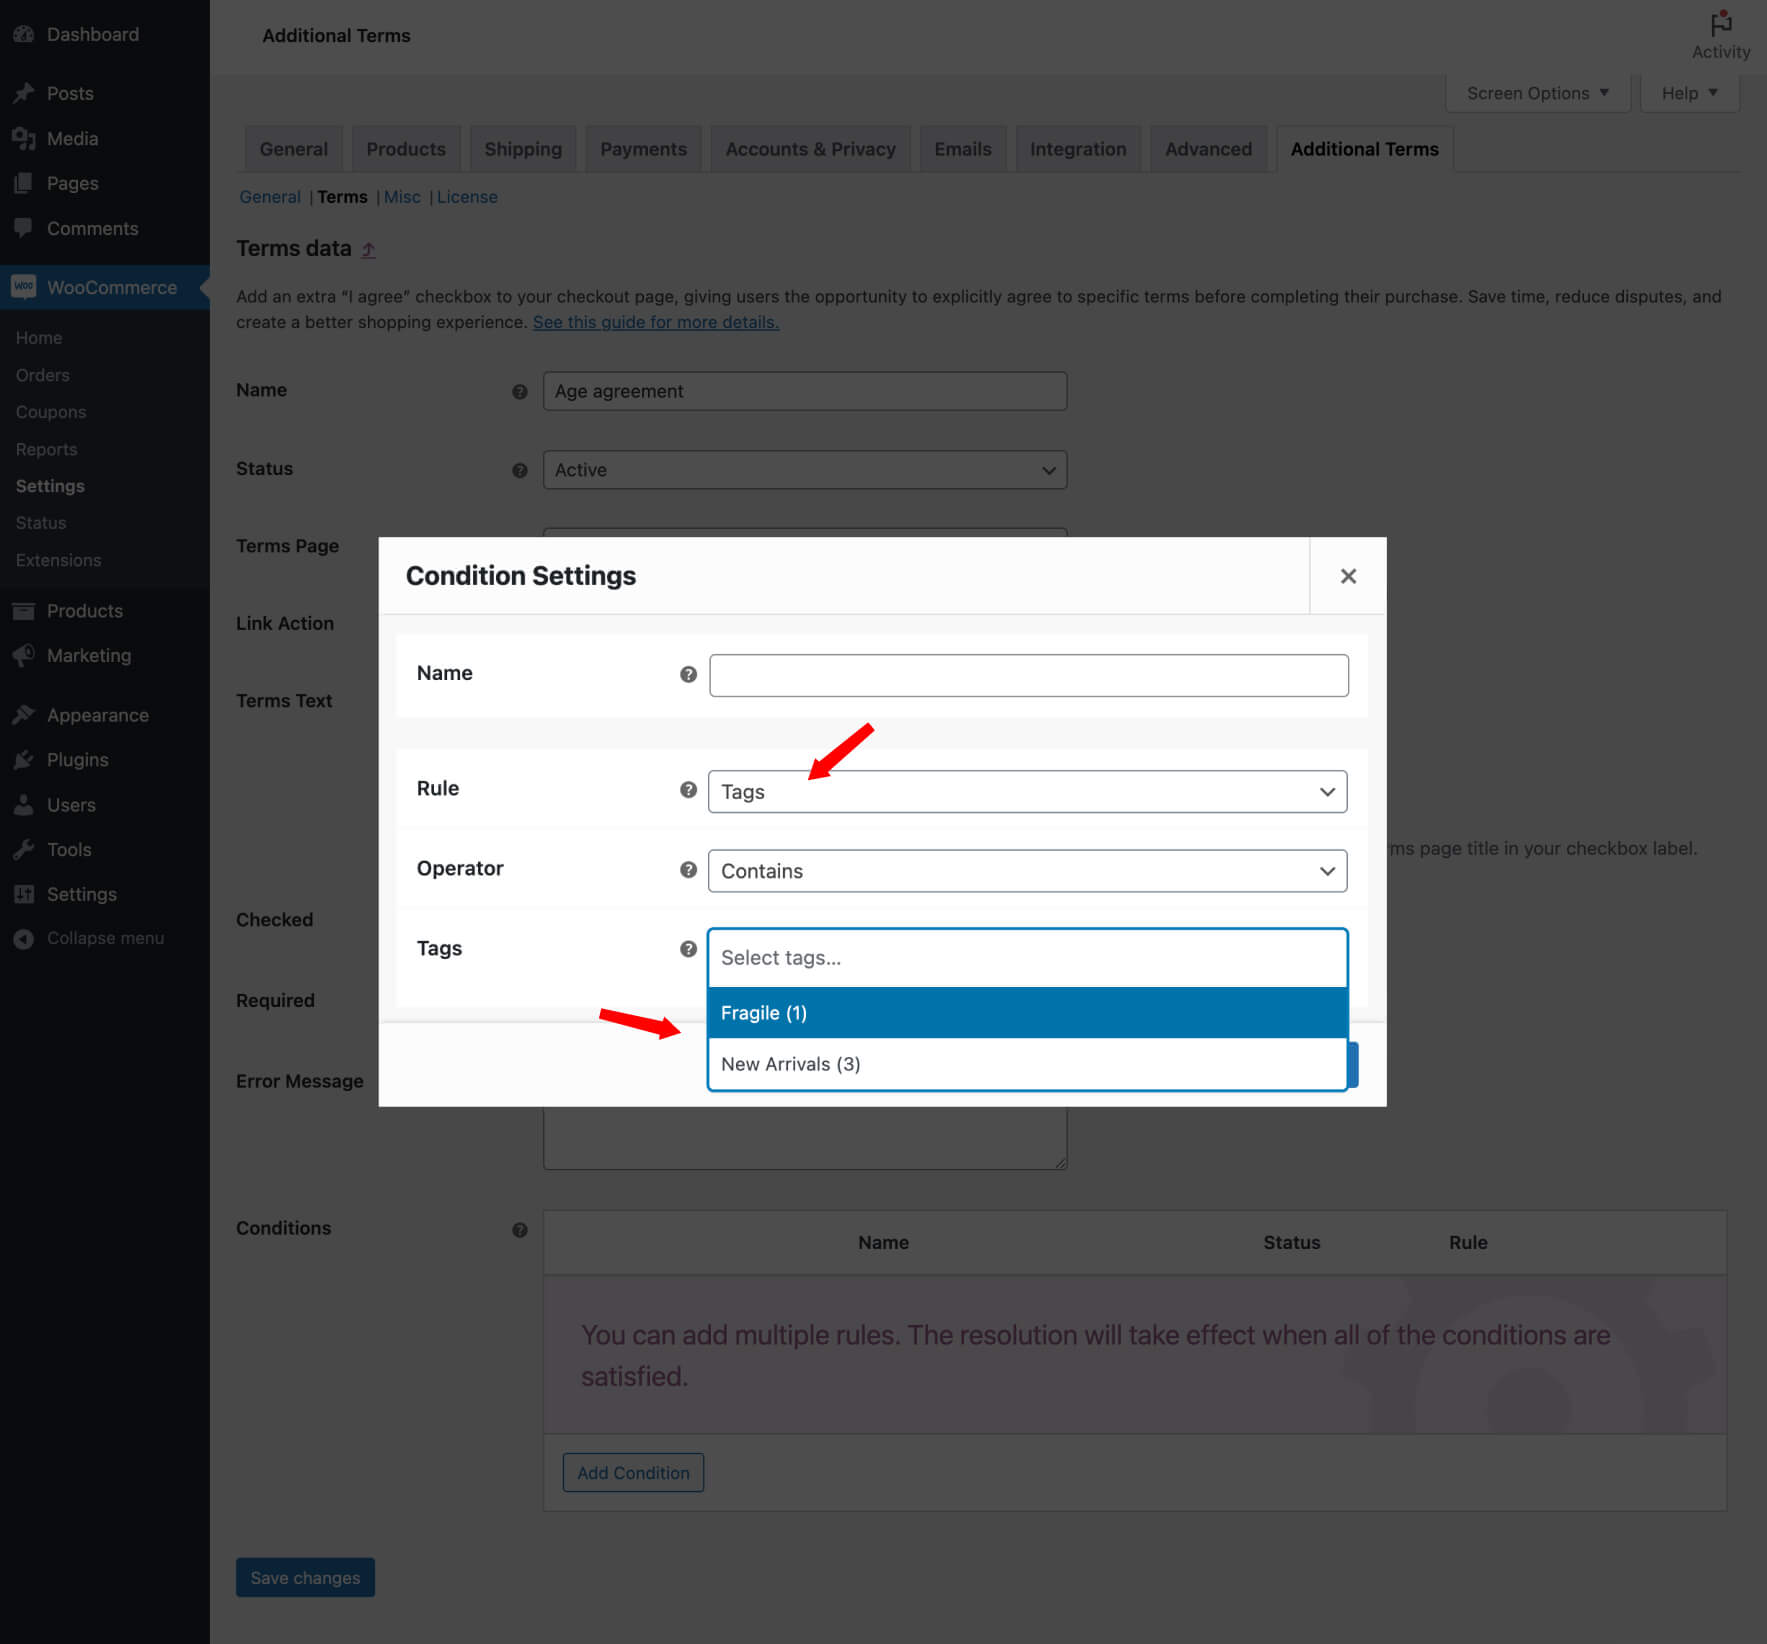
- Select Tags using the Rule dropdown.
- Use the Operator dropdown to determine whether the cart items should contain specific tags (choose the tags in the following field).
- Contain: If the shopping cart contains at least one item with the required tags, the terms checkbox will appear on the checkout page.
- Does not contain: If the shopping cart doesn’t contain any items with the specified tags, the terms checkbox will appear on the checkout page.
- Choose the Tags you want to apply to the conditional rule. You can combine multiple tags using “or“, providing flexibility for rule customization.
- Save your changes by clicking the Save changes button within the modal.
- Save your terms settings by clicking the Save changes button on the edit page.
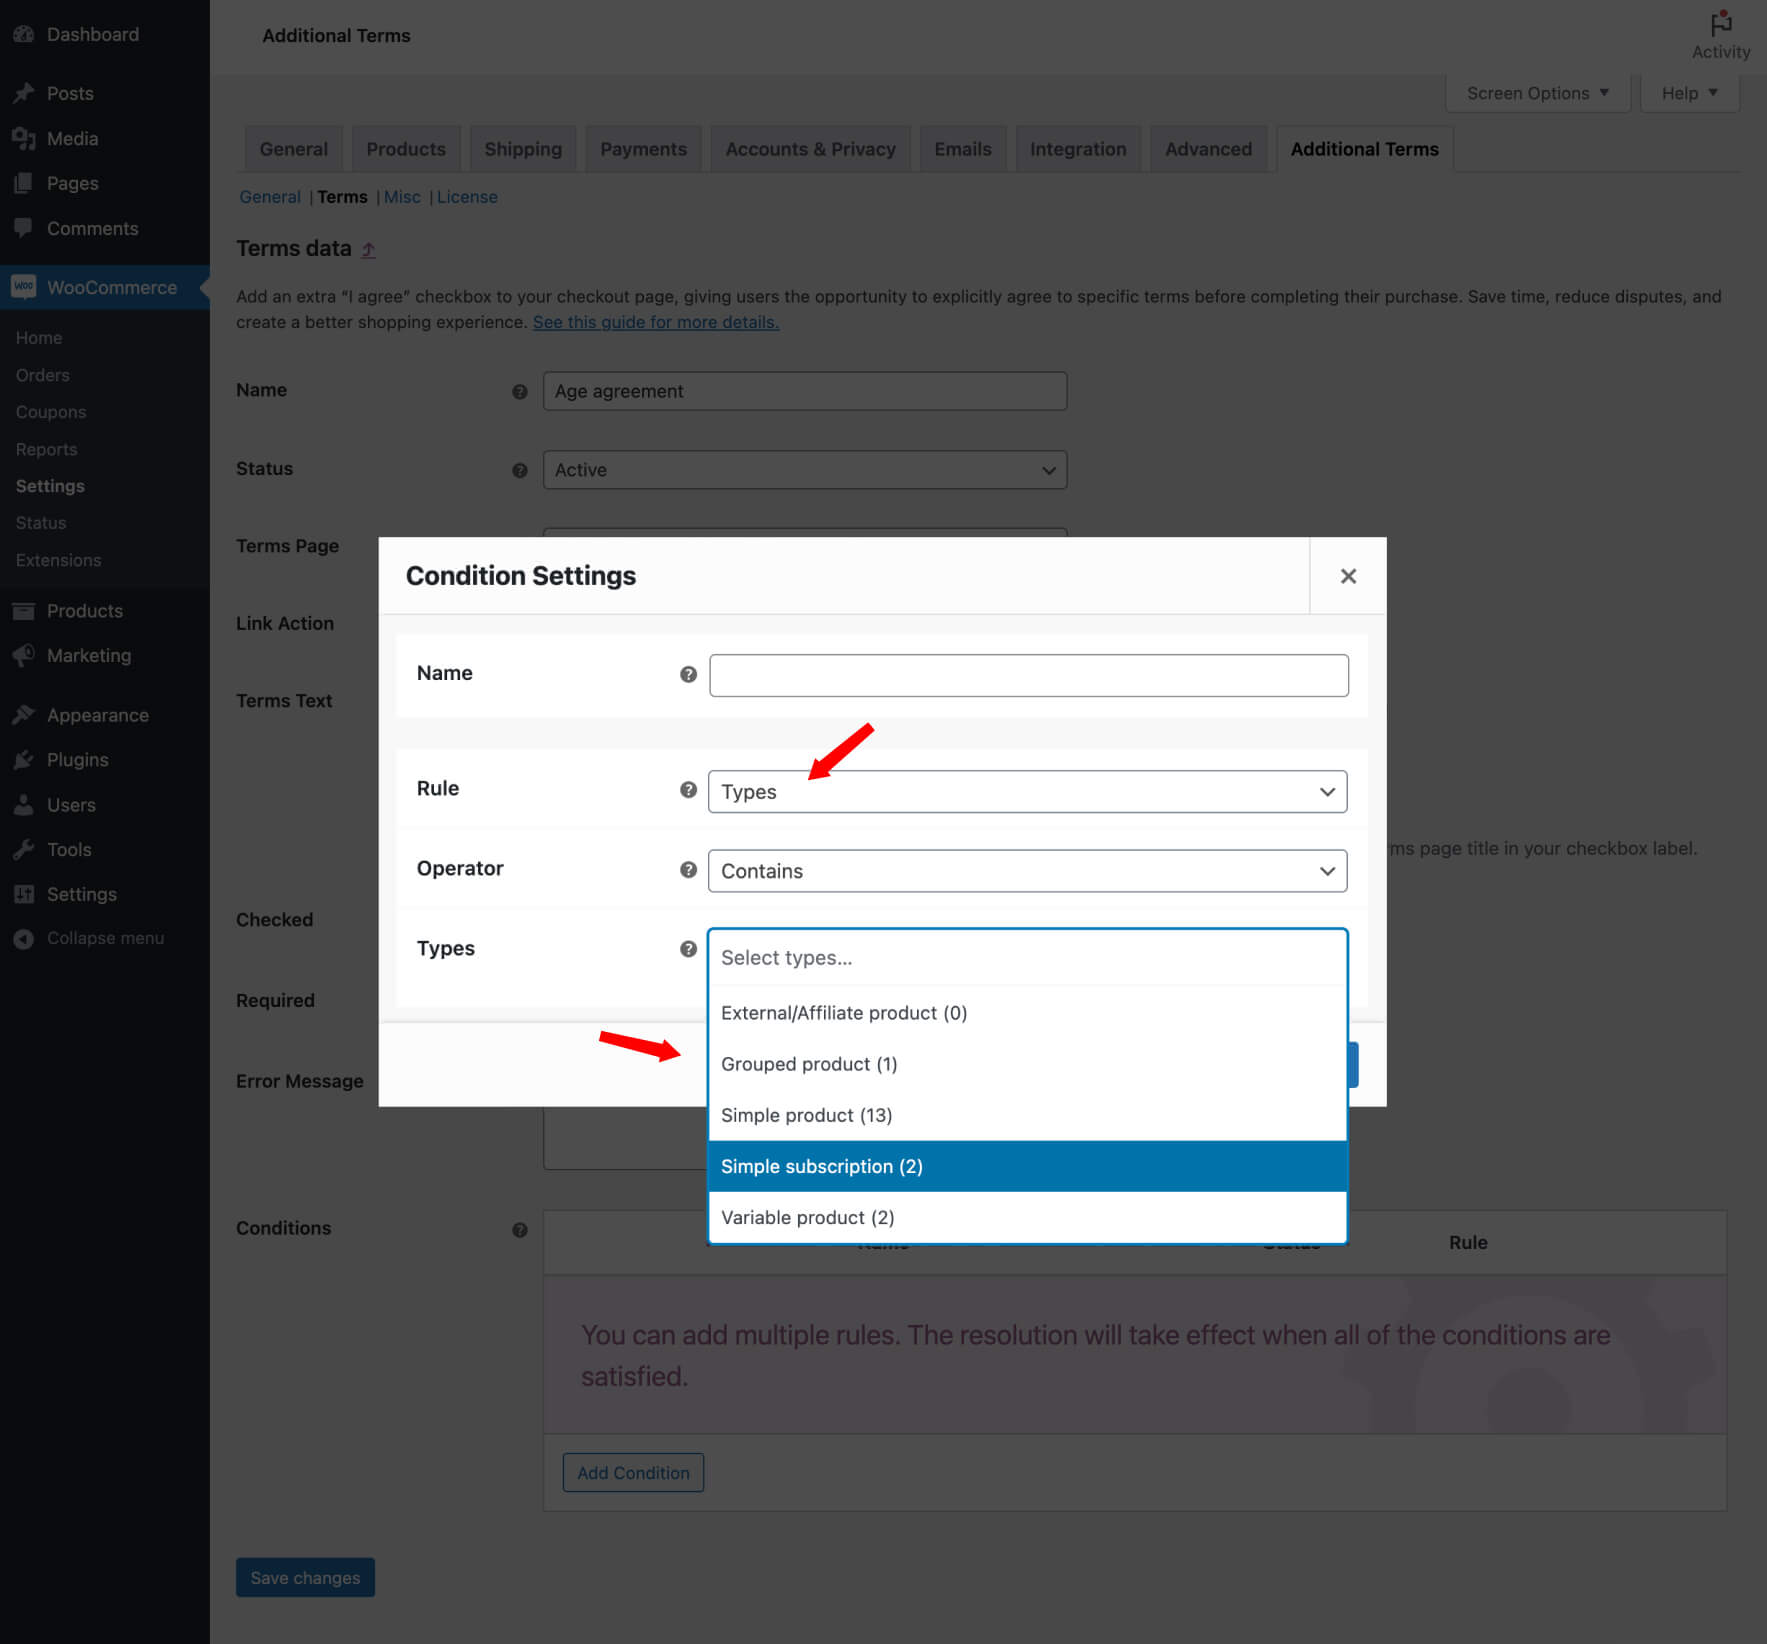
Restrict by Product Types
Enhance the relevance of your terms and conditions checkboxes by applying conditional logic based on the types of products added to the cart. For example, you can use smart logic to present a recurring payment agreement checkbox in the checkout when users add a subscription product to their cart.
- Go to the terms page either by editing existing terms or creating a new terms checkbox.
- Locate the Conditions table and click on the Add Condition button.
- A Conditional Settings modal will appear, providing options to configure your condition.
- Enter a Name for your condition.
- Select Types using the Rule dropdown.
- Use the Operator dropdown to determine whether the cart contains products from specific types (the chosen types in the following field).
- Contain: If the shopping cart contains at least one item of the required product types, the terms checkbox will show on the checkout page.
- Does not contain: If the shopping cart doesn’t contain any item of the specific product types, the terms checkbox will show on the checkout page.
- Choose the product Types you want to set for the conditional rule. The combination between multiple product types is or, which means if-this-or-this-then-that.
- Save your changes by clicking the Save changes button within the modal.
- Save your terms settings by clicking the Save changes button on the edit page.
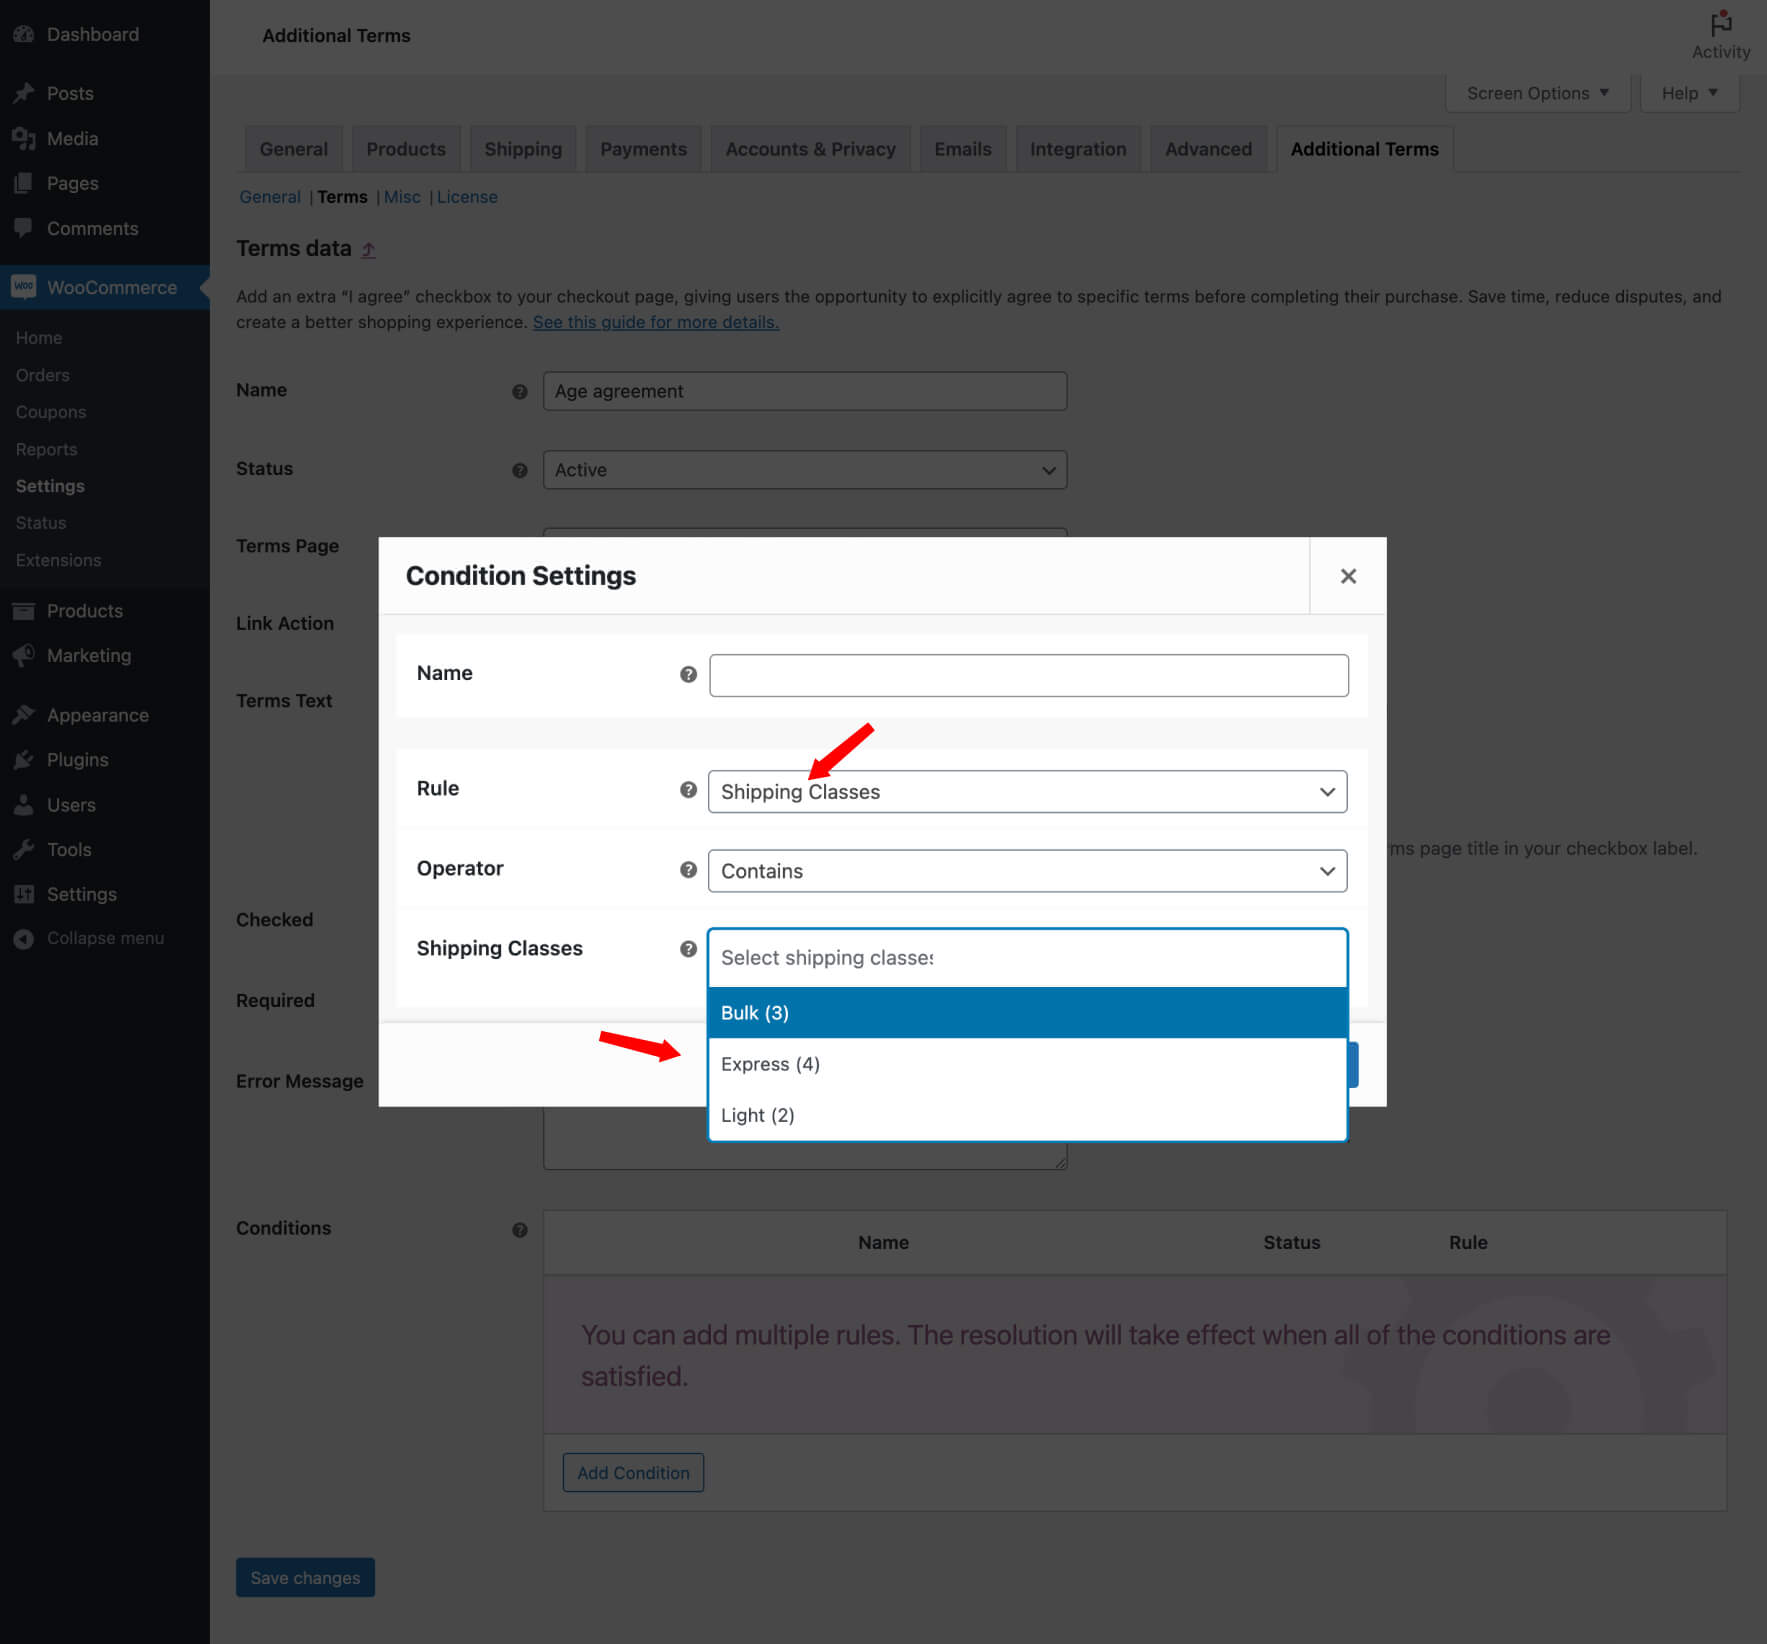
Restrict by Shipping Classes
You can apply conditional logic to a terms and conditions checkbox based on the Shipping Classes assigned to products in the cart. For example, you can use smart logic to display the “bulk commodities agreement” checkbox during checkout when users add a product from the “bulk shipping” class to their cart.
Here’s how to set up this condition:
- Go to the terms page either by editing existing terms or creating a new terms checkbox.
- Locate the Conditions table and click on the Add Condition button.
- A Conditional Settings modal will appear, providing options to configure your condition.
- Enter a Name for your condition.
- Select Shipping Classes using the Rule dropdown.
- Use the Operator dropdown to determine whether the cart should contain products from specific shipping classes to trigger the condition.
- Contain: If the shopping cart contains at least one item of the required shipping classes, the terms checkbox will be displayed on the checkout page.
- Does not contain: If the shopping cart doesn’t contain any item from the specified shipping classes, the terms checkbox will appear on the checkout page.
- Choose the Shipping Classes you want to apply for the conditional rule. You can combine multiple shipping classes using the “or” logic, meaning if any of the selected classes are present in the cart, the condition will be met.
- Save your changes by clicking the Save changes button within the modal.
- Save your terms settings by clicking the Save changes button on the edit page.
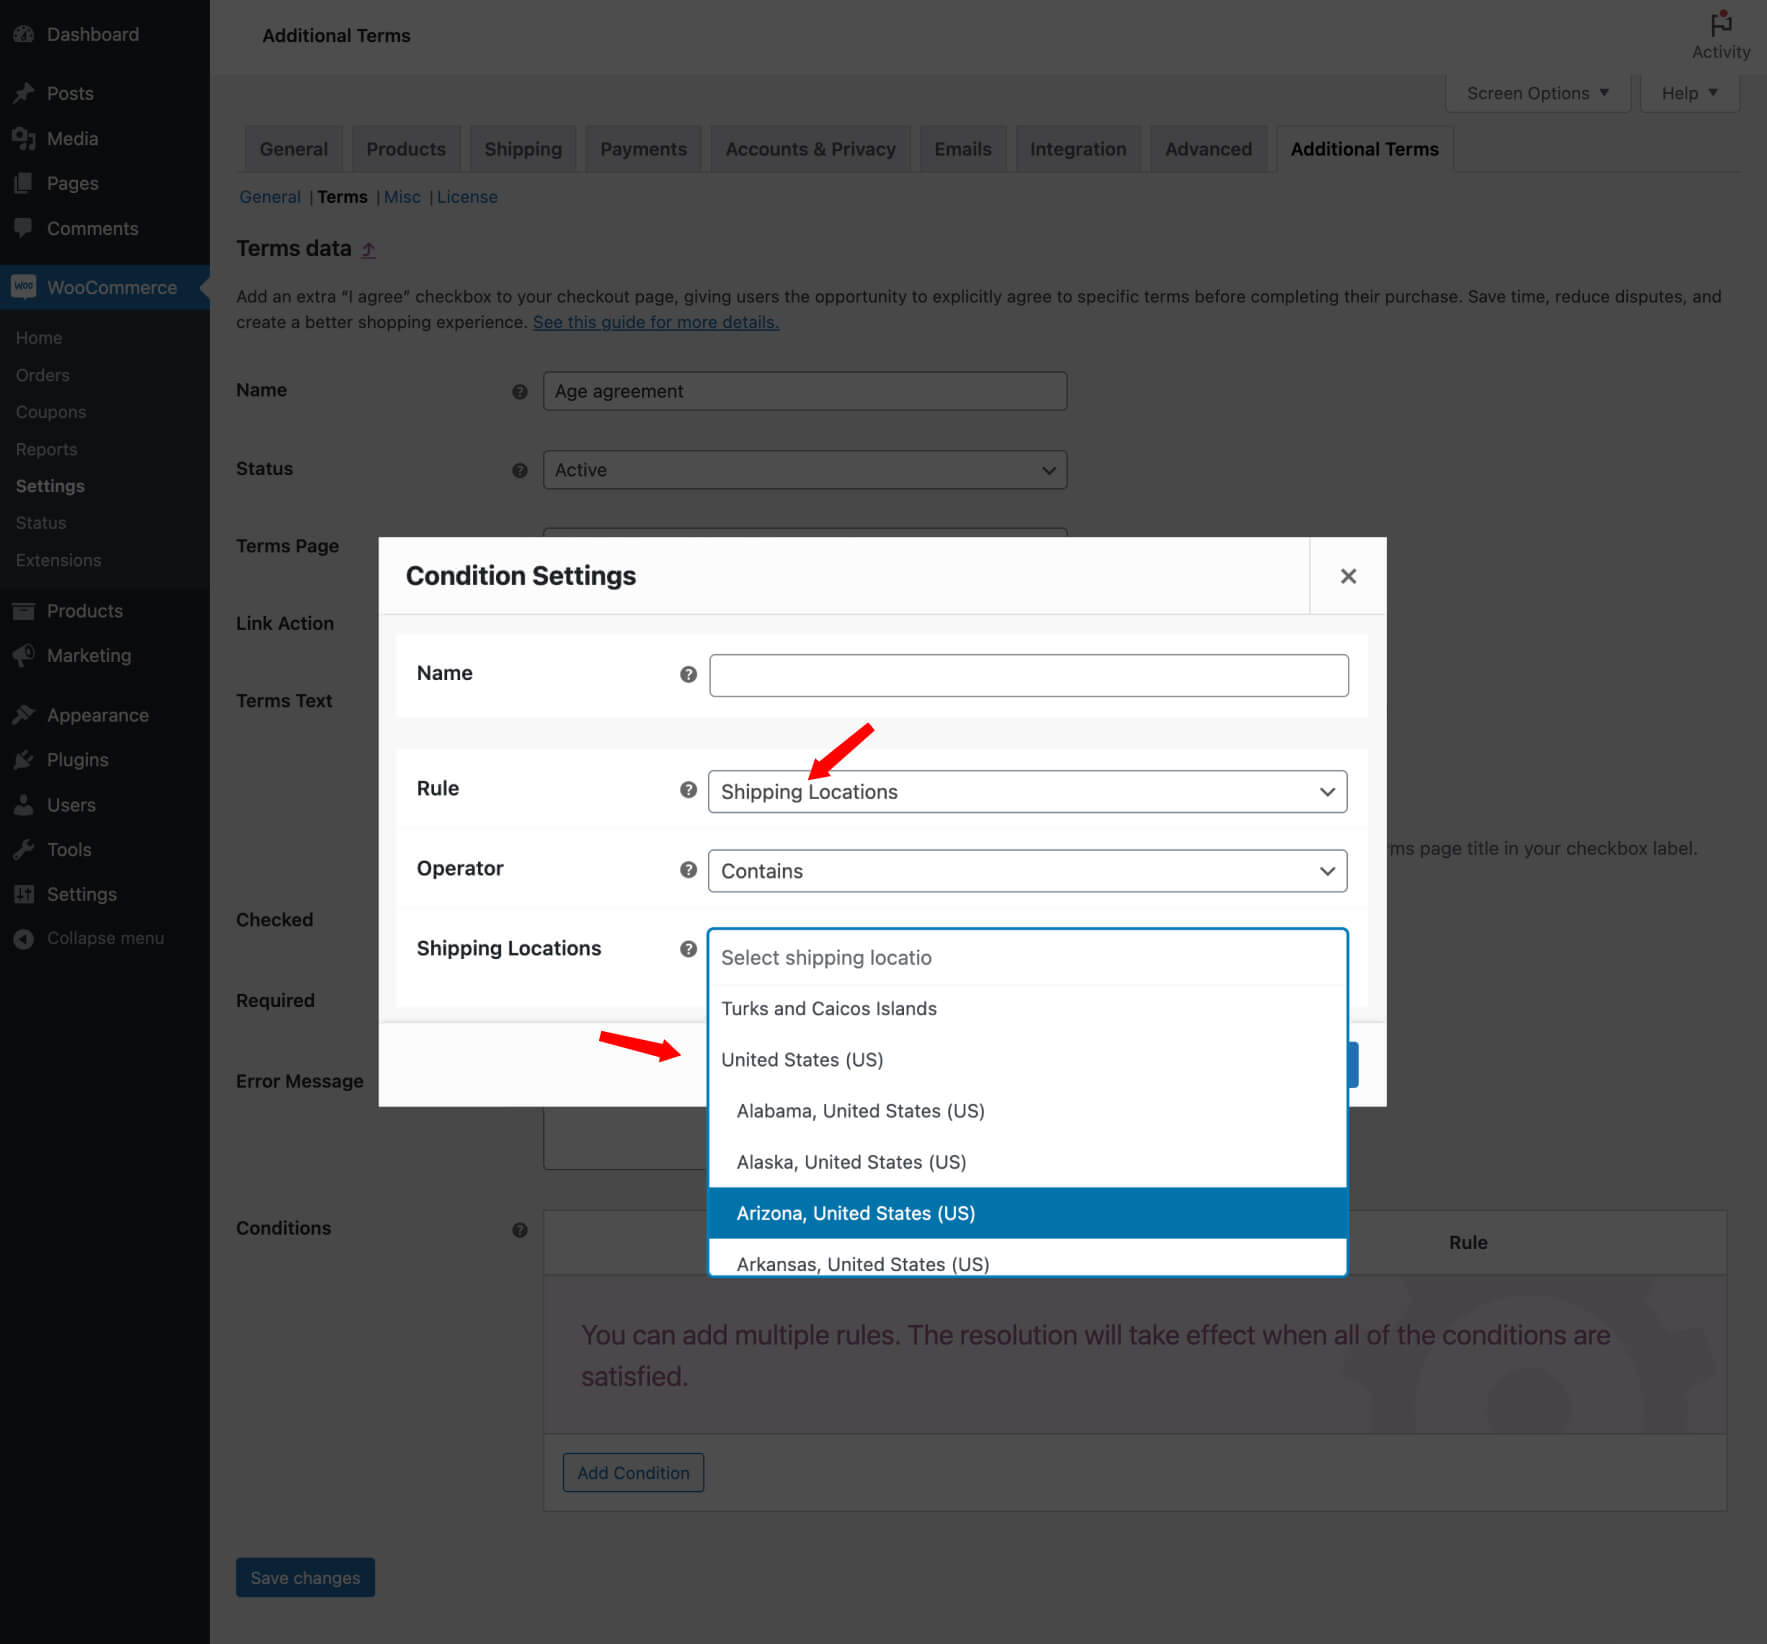
Restrict by Shipping Locations
You can apply conditional logic to a terms and conditions checkbox based on users’ Shipping Locations. For example, you can use smart logic to display the California Consumer Privacy Act (CCPA) terms checkbox during checkout only when users make purchases from California.
Here’s how to configure this condition:
- Go to the terms page either by editing existing terms or creating a new terms checkbox.
- Locate the Conditions table and click on the Add Condition button.
- A Conditional Settings modal will appear, providing options to configure your condition.
- Enter a Name for your condition.
- Select Shipping Locations using the Rule dropdown.
- Use the Operator dropdown to determine whether a user purchases from specific Locations (the chosen shipping locations in the following field).
- Contain: If the user’s shipping location is one of the selected locations, the terms checkbox will be displayed on the checkout page.
- Does not contain: If the user’s shipping location is not included in the selected locations, the terms checkbox will appear on the checkout page.
- Choose the Shipping Locations you want to apply for the conditional rule. You can combine multiple shipping locations using the “or” logic, meaning if user purchases from any of the selected locations, the condition will be met.
- Save your changes by clicking the Save changes button within the modal.
- Save your terms settings by clicking the Save changes button on the edit page.
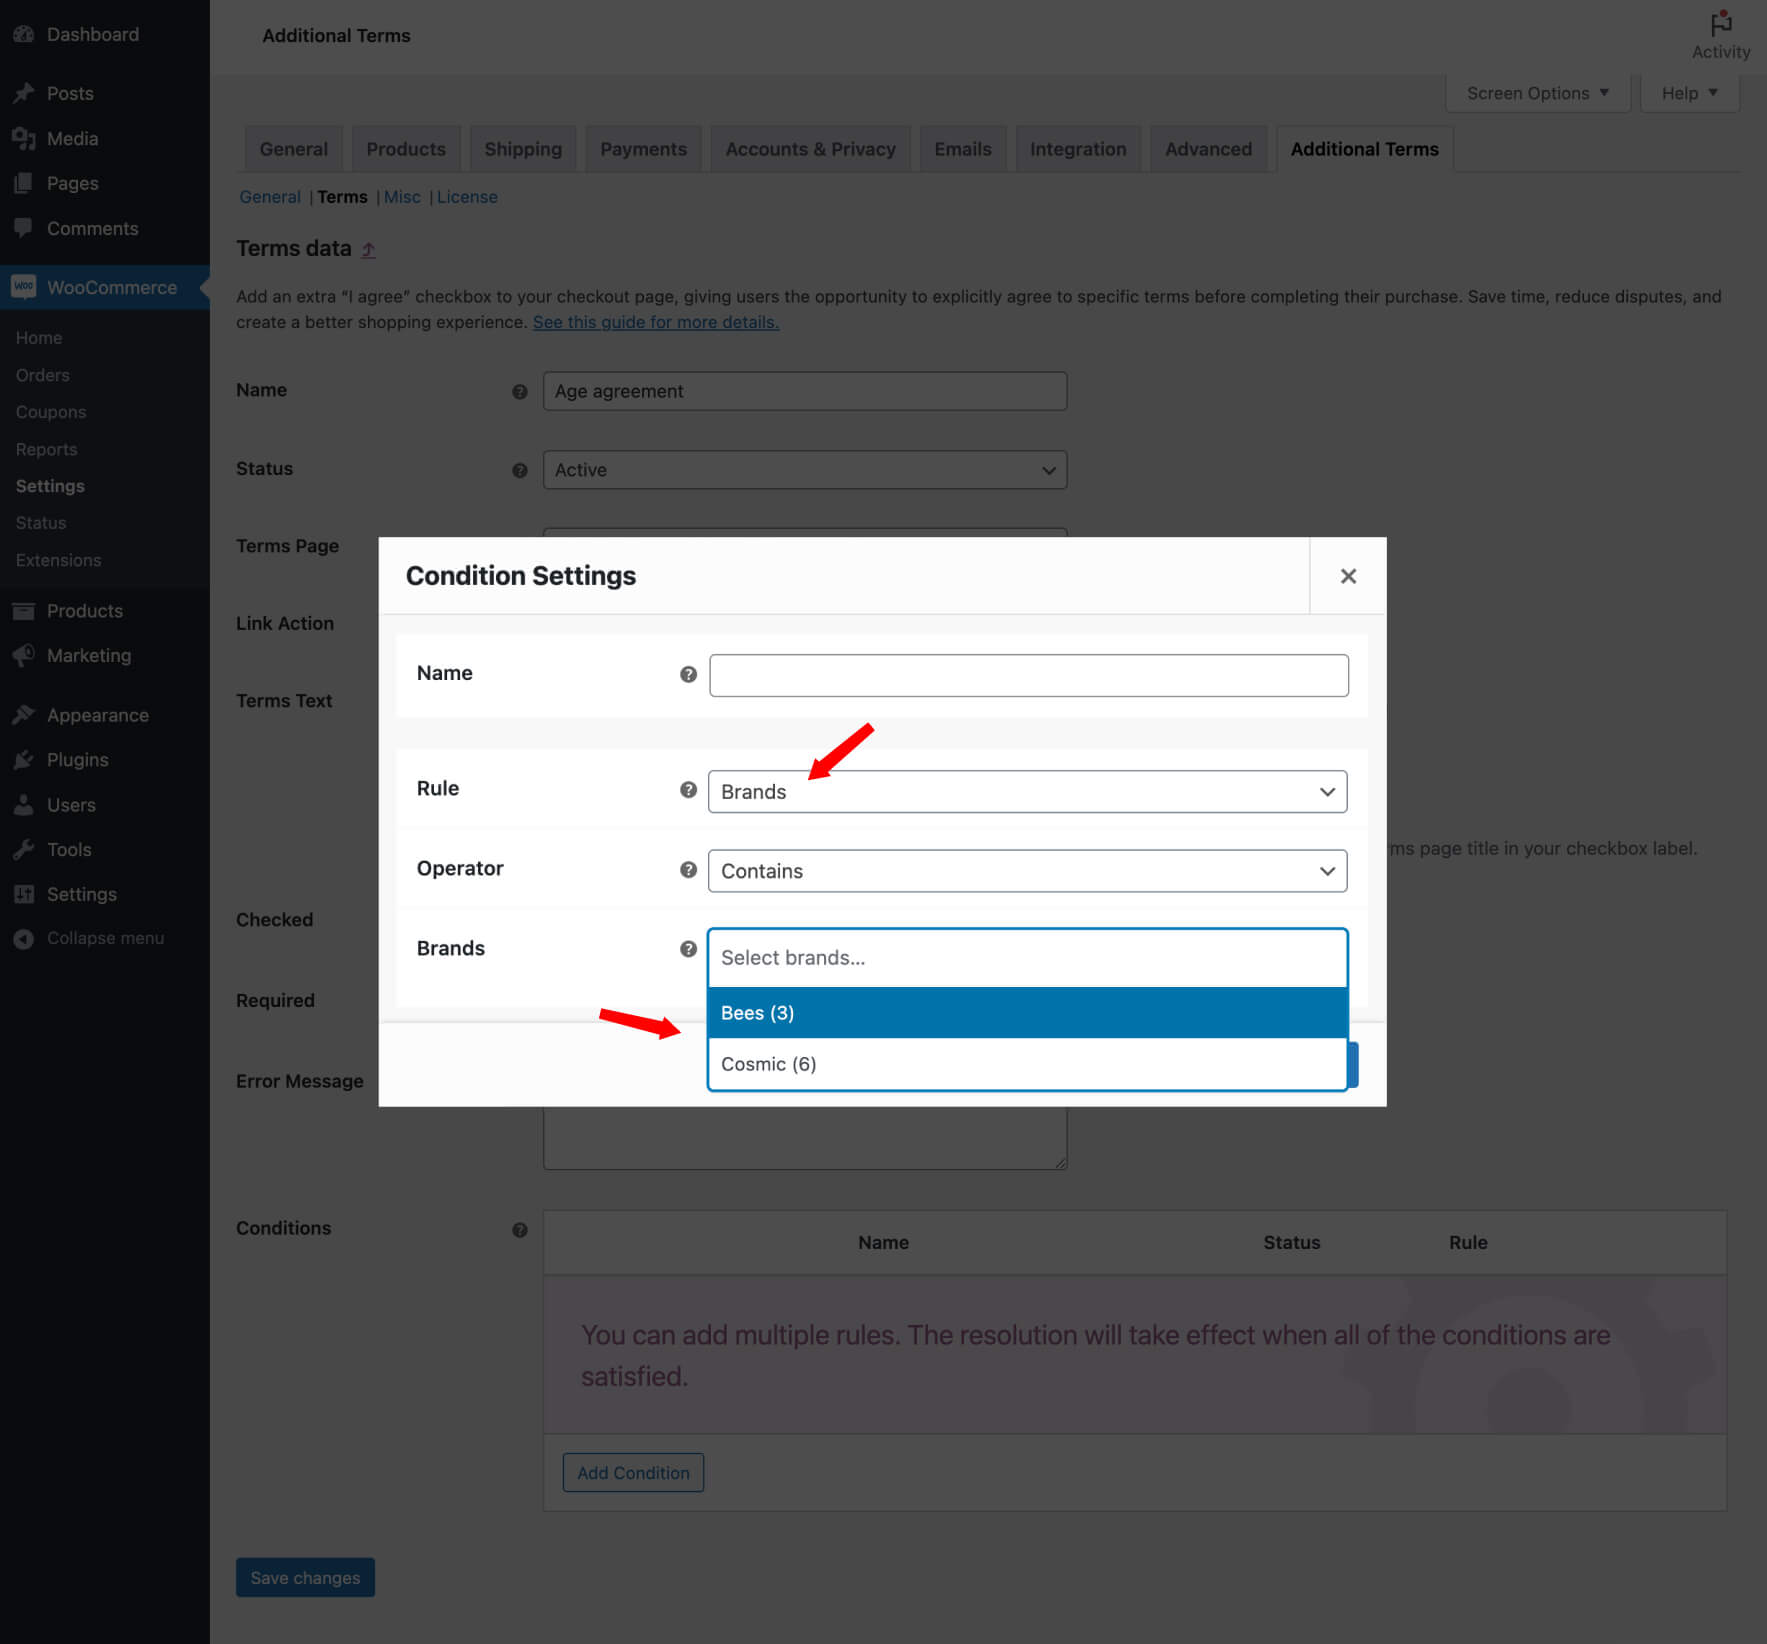
Restrict by WooCommerce Brands
The Woo Additional Terms (PRO) plugin seamlessly integrates with the WooCommerce Brands plugin, allowing you to apply conditional logic to a terms and conditions checkbox based on the brands associated with products in the cart. For example, you can employ intelligent logic to display the “license terms” checkbox during checkout when users add a product from a specific brand to their cart.
Here’s how to configure this condition:
- Go to the terms page either by editing existing terms or creating a new terms checkbox.
- Locate the Conditions table and click on the Add Condition button.
- A Conditional Settings modal will appear, providing options to configure your condition.
- Enter a Name for your condition.
- Select Brands using the Rule dropdown.
- Use the Operator dropdown to determine whether the cart should contain products from specific brands to trigger the condition.
- Contain: If the shopping cart contains at least one item from the specified brands, the terms checkbox will be displayed on the checkout page.
- Does not contain: If the shopping cart doesn’t contain any items from the chosen brands, the terms checkbox will appear on the checkout page.
- Choose the specific Brands you want to apply for the conditional rule. You can combine multiple brands using the “or” logic, meaning that if any of the selected brands are present in the cart, the condition will be met.
- Save your changes by clicking the Save changes button within the modal.
- Save your terms settings by clicking the Save changes button on the edit page.
Complex Conditional Logic
With the Woo Additional Terms (PRO) plugin, you have the flexibility to create complex conditional logic for displaying a terms checkbox by incorporating multiple conditional rules. Here are some examples of what you can achieve:
- Single Conditional Rule:
You can set a checkbox to display if a specific condition is met, such as when users add products from a particular product type to their cart. For instance, the terms checkbox will appear in the checkout when users add items from the “Electronics” product type. - Multiple Rules:
Combine various conditions by using multiple rules. For example, you can display the terms checkbox if users add products from both a specific product type and a particular category to their cart. This provides a more nuanced approach to triggering the checkbox. - Negating Conditions:
Employ “not” operators to negate certain conditions. For instance, you can display the terms checkbox only if users don’t add a particular product to their cart. This allows you to tailor the display of the checkbox based on exclusions.

Multiple Conditional Rules with “AND” Logic
When you use multiple conditional rules in the Woo Additional Terms (PRO) plugin, they are typically combined with “AND” logic. This means that all specified conditions must be valid simultaneously for the statement to be true, and for the terms and conditions checkbox to be displayed.
In other words, when you set up multiple rules, all conditions must be met concurrently in order for the checkbox to appear during the checkout process. This ensures that the checkbox is displayed only when all specified criteria are satisfied, providing precise control over its presentation based on a combination of conditions.
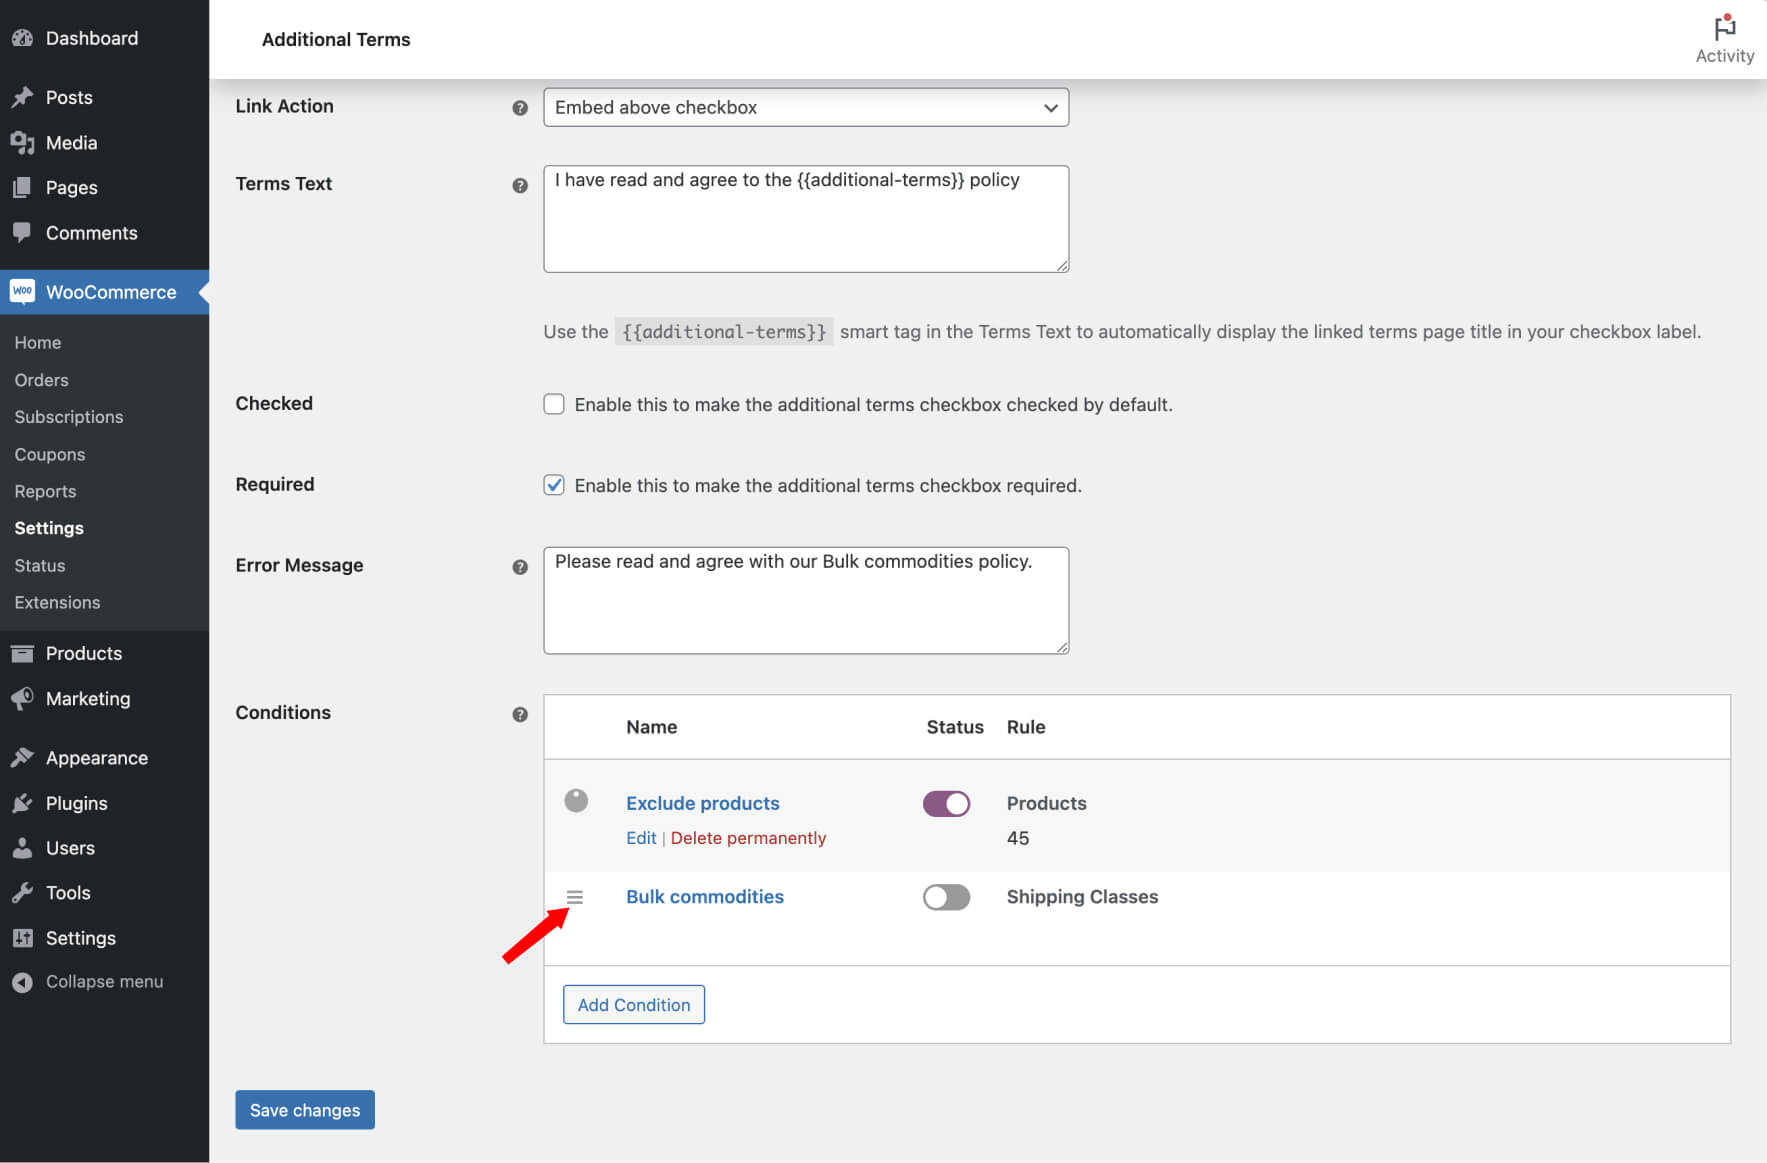
Conditions Table
When you navigate to the edit term page in the Woo Additional Terms (PRO) plugin, you will find a table that provides an overview of the defined conditions for each term checkbox. Here’s what you can expect to see in this table:
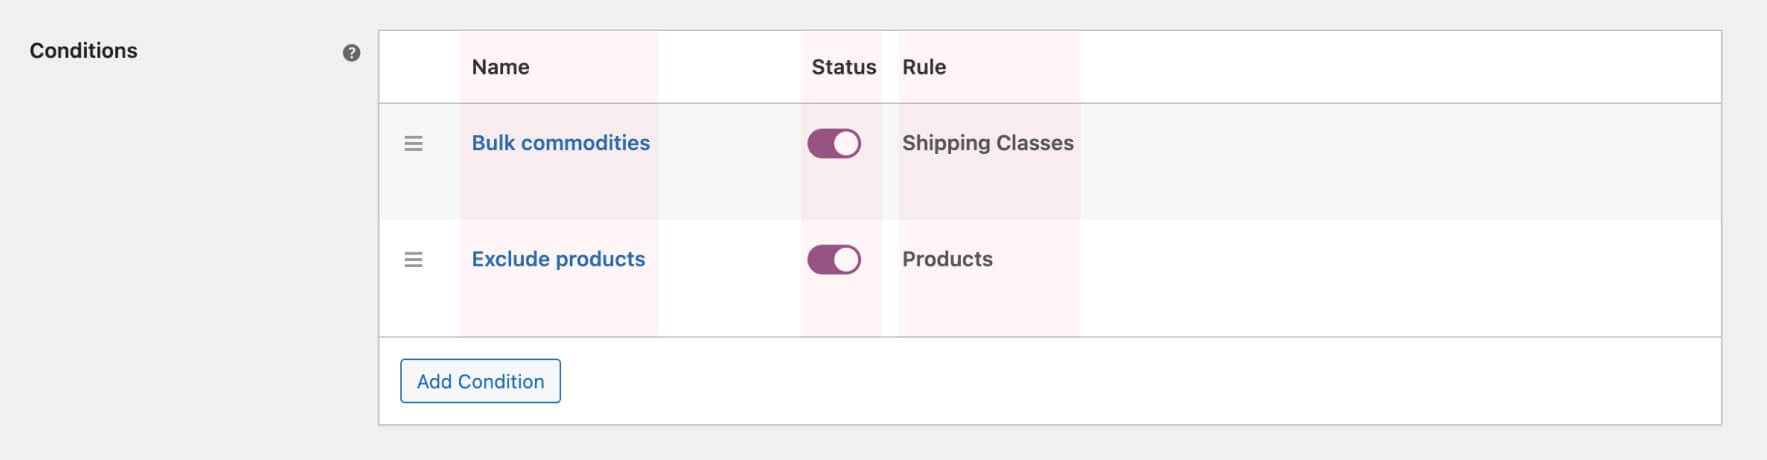
- Name: This column displays the name of your condition. If you haven’t entered a custom name when creating the condition, a horizontal line (—) will be shown as a placeholder.
- Status: In this column, you can view the activation status of your condition. You have the option to change the status by simply clicking on the toggle switch provided in this column.
- Rule: This column displays the condition statement or “if-then” statement that defines the condition. It specifies under which circumstances a certain action or result will occur based on the defined condition.
This table provides a convenient way to review and manage the conditions associated with each term checkbox, allowing you to easily see the condition names, their activation status, and the specific rules governing their behavior.
Editing Conditions
Once you’ve added a condition to a terms checkbox, you can edit its details to make any necessary adjustments. Here’s how to do it:
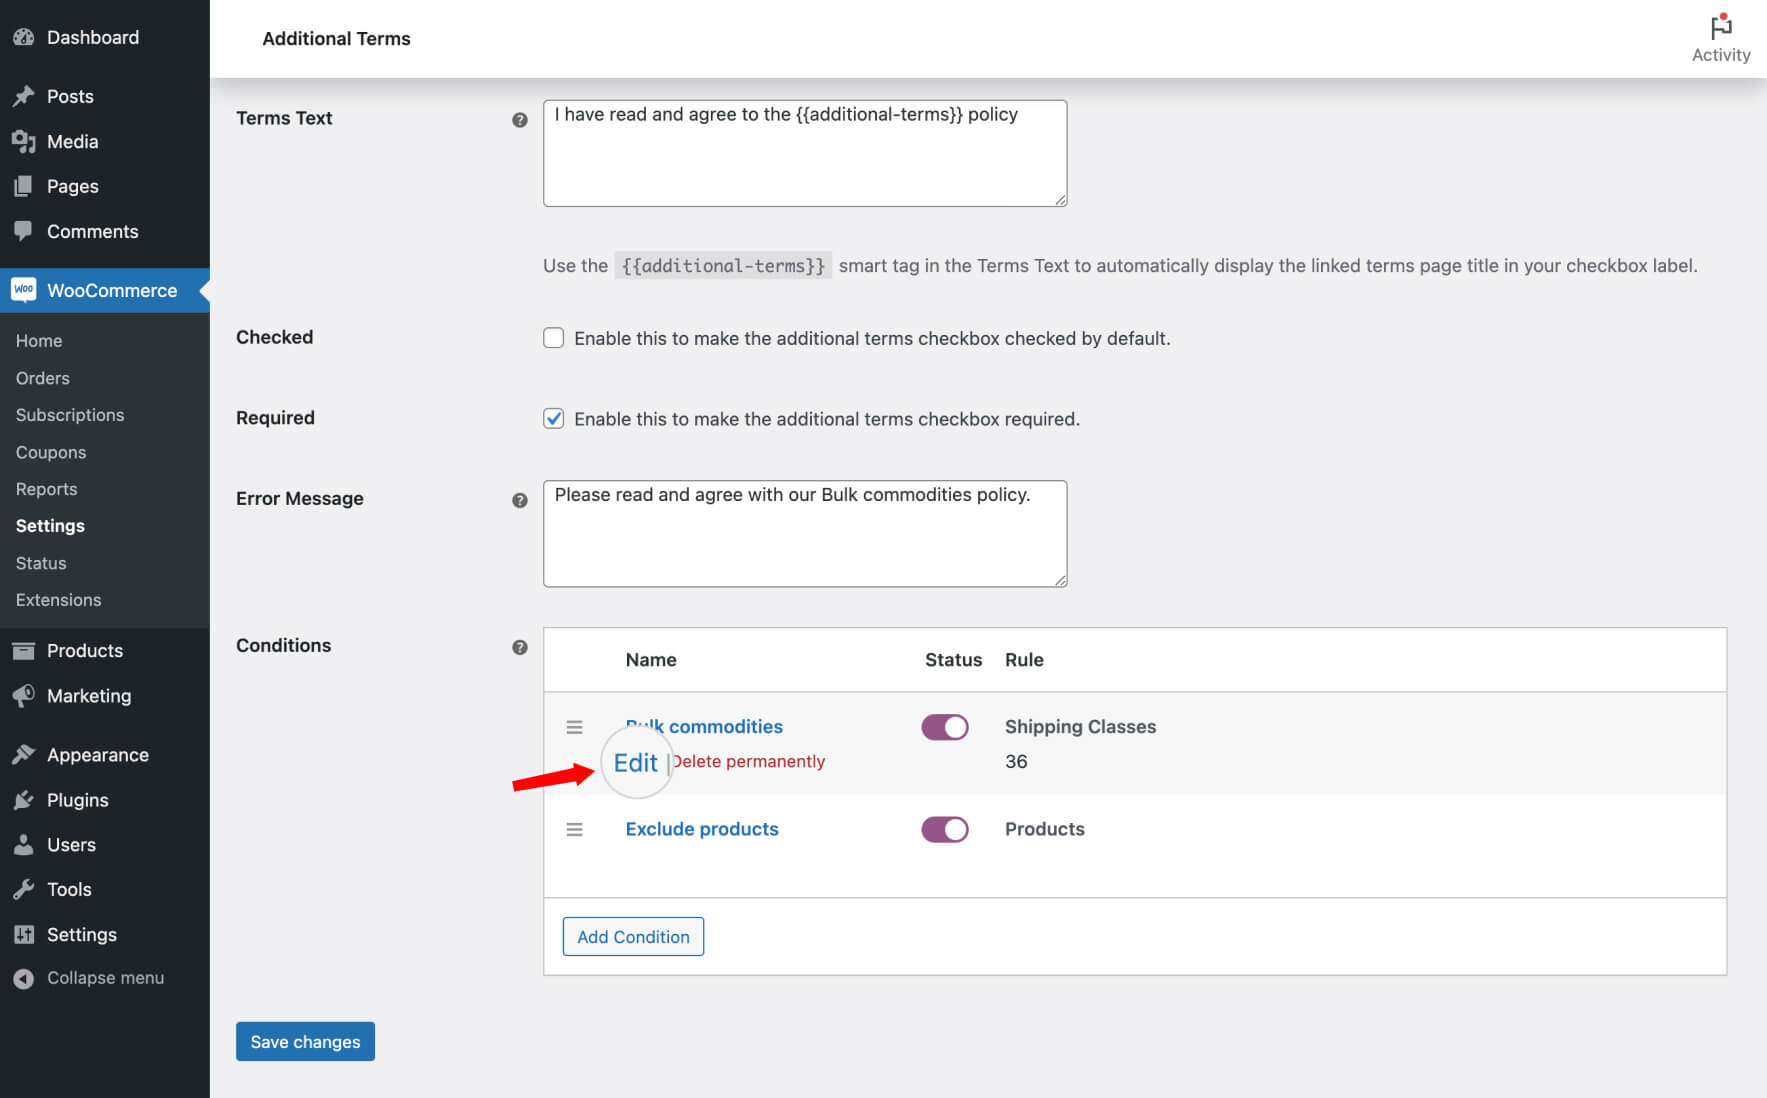
- Navigate to WooCommerce → Settings → Additional Terms → Terms.
- Hover your cursor over the terms checkbox you want to edit, and select Edit.
- Locate the Conditions table on the edit term page.
- Hover over the specific terms condition you wish to edit, and select Edit.
- Apply the new changes to the condition as needed. You can modify the condition statement or any other relevant details.
- After making your edits, click on the Save changes button within the modal to ensure that your changes are saved and applied.
- Save your terms settings by clicking the Save changes button on the edit page.
Removing a Condition
If you need to remove and delete a condition associated with a terms checkbox in the Woo Additional Terms (PRO) plugin, follow these steps:
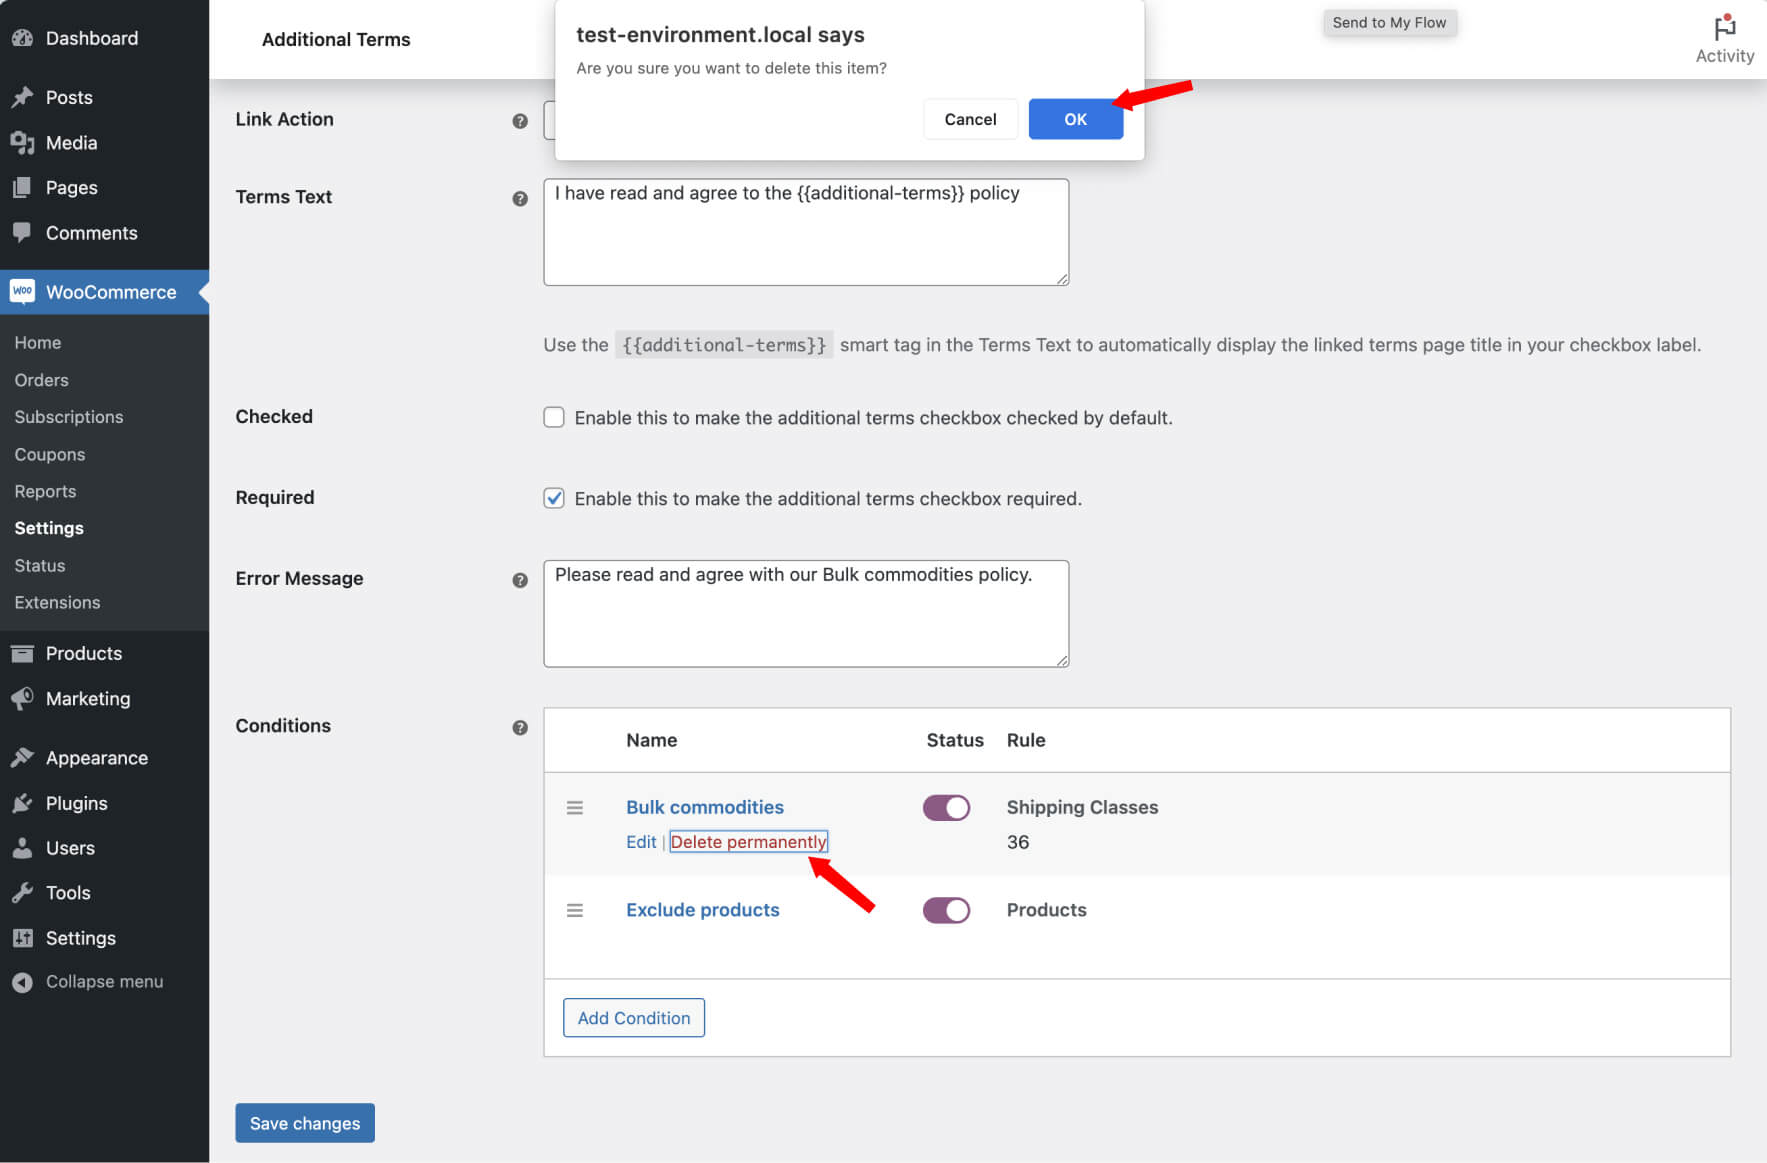
- Navigate to WooCommerce → Settings → Additional Terms → Terms.
- Hover your cursor over the terms checkbox you want to edit, and select Edit.
- Locate the Conditions table on the edit term page.
- Hover over the specific terms condition you wish to remove, and select Delete permanently.
- A confirmation message will appear. Click the Ok button to confirm and remove the conditional logic from the terms checkbox.
- Click on the Save changes button.

Deleting a conditional logic will result in its permanent removal, and there will be no way to restore it. Proceed cautiously and double-check your decision before confirming the deletion, as it cannot be undone.
Disable Condition
You have the option to enable or disable the conditional logic for a terms checkbox using a simple toggle switch located in the Status column. To change the status of a condition, follow these steps:
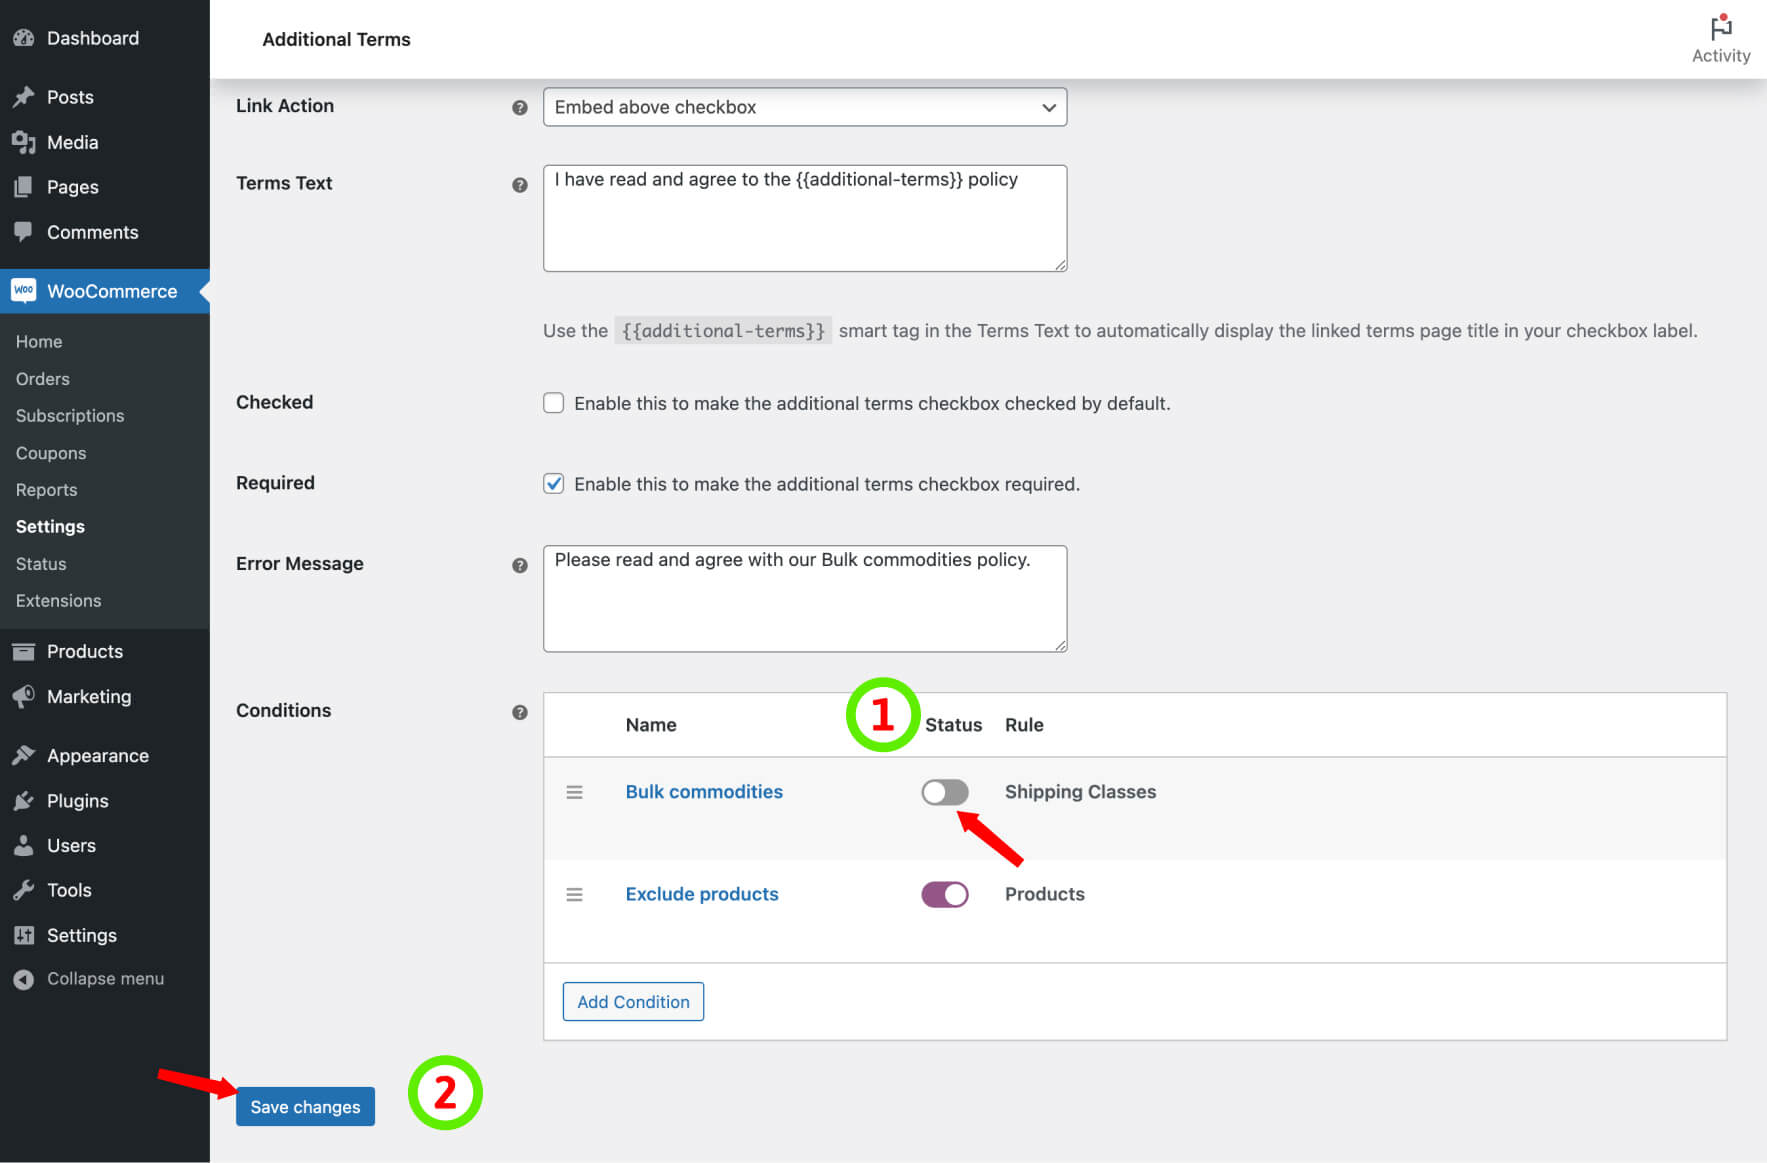
- Navigate to WooCommerce → Settings → Additional Terms → Terms.
- Hover your cursor over the terms checkbox you want to edit, and select Edit.
- Locate the Conditions table on the edit term page.
- Click the toggle button in the Status column to switch the condition’s status between enabled and disabled.
- Click on the Save changes button.
Sorting Conditions
To organize the conditions for a terms checkbox and ensure that the conditional logic is executed correctly, you can reorder them via drag-and-drop. Here’s how to do it:
- Navigate to WooCommerce → Settings → Additional Terms → Terms.
- Hover your cursor over the terms checkbox you want to edit, and select Edit.
- Locate the Conditions table on the edit term page.
- Use the left handle (represented by three horizontal lines) next to the condition name.
- While holding the condition, drag it up or down to change its position in the list.
- Drop the condition at its new position by releasing the mouse button.
- Click on the Save changes button.