How to Make Your WooCommerce Store Compliant With CCPA/CPRA
✍️ Your Guide to WooCommerce Compliance
Protecting Consumer Privacy ✅

By:
Like any online store owner, you may know how it’s important to prioritize data privacy and stay informed about the legal requirements covering customer data. With laws like the California Consumer Privacy Act (CCPA) and the California Privacy Rights Act (CPRA), understanding your obligations can be key to maintaining trust with your customers and avoiding potential penalties. In this article, we will guide you through what’s necessary to ensure your WooCommerce store complies with these regulations.
Understanding the Importance of CCPA and CPRA Compliance
The CCPA and CPRA are California-based data privacy laws designed to protect the personal information of residents. While these laws primarily target large businesses, they also apply to any company that meets specific thresholds, regardless of location. If your store collects, uses, or sells the personal data of California residents, you must adhere to these regulations.
Why You Shouldn’t Fear Compliance
You should know that compliance with laws is not just a legal obligation, in other words, it could be an opportunity for you to build trust with your customers. The CCPA and CPRA empower consumers by giving them more control over their personal data. Embracing these regulations can enhance your store’s reputation and foster long-term customer loyalty.
What is the CCPA?
The California Consumer Privacy Act (CCPA) governs how businesses collect, use, and sell personal data from California residents. If your business earns over $25 million annually, buys, sells, or receives personal data from 100,000 or more California residents, households, or devices, you must comply with the CCPA.
Key Rights Under the CCPA:
- Right to Know: Consumers have the right to know what personal information you are collecting about them and how it’s used or shared.
- Right to Delete: Consumers can request the deletion of their personal data.
- Right to Opt-Out: Consumers can opt out of the sale of their personal data.
- Right to Non-Discrimination: Consumers should not face discrimination for exercising their rights under the CCPA.
To comply, your store must be transparent about data collection and provide clear privacy notices.
What is the CPRA?
The California Privacy Rights Act (CPRA), often referred to as CCPA 2.0, is a revision that strengthens the original CCPA. The CPRA introduces more stringent requirements and lowers the threshold for compliance from 100,000 California residents, households, or devices to 50,000. This means more businesses, including smaller e-commerce stores, are now subject to these regulations.
New Obligations Under the CPRA:
- Expanded Consumer Rights: The CPRA grants consumers additional rights, including the right to correct inaccurate personal information.
- Sensitive Personal Information: The CPRA introduces a new category of sensitive personal information, requiring businesses to limit its use and provide additional disclosures.
- Data Minimization and Purpose Limitation: Collect only the personal information necessary for your business and use it solely for disclosed purposes.
Who Needs to Comply?
If your WooCommerce store meets any of the criteria set by the CCPA or CPRA, you need to ensure compliance, regardless of where your business is based. Compliance is crucial if you collect, use, or sell personal data from California residents.

Additional Terms Pro for WooCommerce
Your path to unparalleled compliance and trust building!
Steps to Make Your WooCommerce Store Compliant
To comply with CCPA and CPRA, online shops must take several steps. Here’s a breakdown of the key requirements:
Create Comprehensive Privacy Notices
You need to provide clear and accessible privacy notices that explain your data practices. These include:
- Notice on Collection: Disclose what personal information you collect.
- Notice on Sale or Sharing: Inform customers if you sell or share their personal data.
- Notice of Use of Sensitive Personal Information: Specify how you use any sensitive data you collect.
- Notice on Financial Incentives: Disclose any financial incentives related to the collection of personal data.
Develop a Detailed Privacy Policy
Your store must have a privacy policy that outlines how you collect, use, and share customer data. It should also detail how customers can exercise their rights. Key elements to include:
- Categories of Personal Information: Clearly state what types of data you collect.
- Purposes of Data Use: Explain why you collect each category of data.
- Third-Party Sharing: Identify the types of third parties you share data with.
- Customer Rights: Describe the rights granted to California residents.
Implement Customer Rights Mechanisms
You must provide customers with easy ways to exercise their rights. For example:
- Access and Deletion Requests: Offer a contact form or a toll-free number for customers to request the deletion of their data.
- Opt-Out of Data Sale: Include an option for customers to opt out of the sale of their personal information directly from the checkout page.
Practice Data Minimization and Purpose Limitation
Only collect the personal data necessary for your operations and limit its use to the purposes disclosed in your privacy policy. If you plan to use the data for a new purpose, you must obtain explicit consent from customers.
Set Data Retention Policies
Establishing clear data retention policies is essential for maintaining compliance with privacy regulations like CCPA and CPRA. These policies dictate how long personal information is retained and ensure that data is only kept as long as necessary for the purposes it was collected. Your privacy policy should explicitly disclose these retention periods to maintain transparency with your customers.
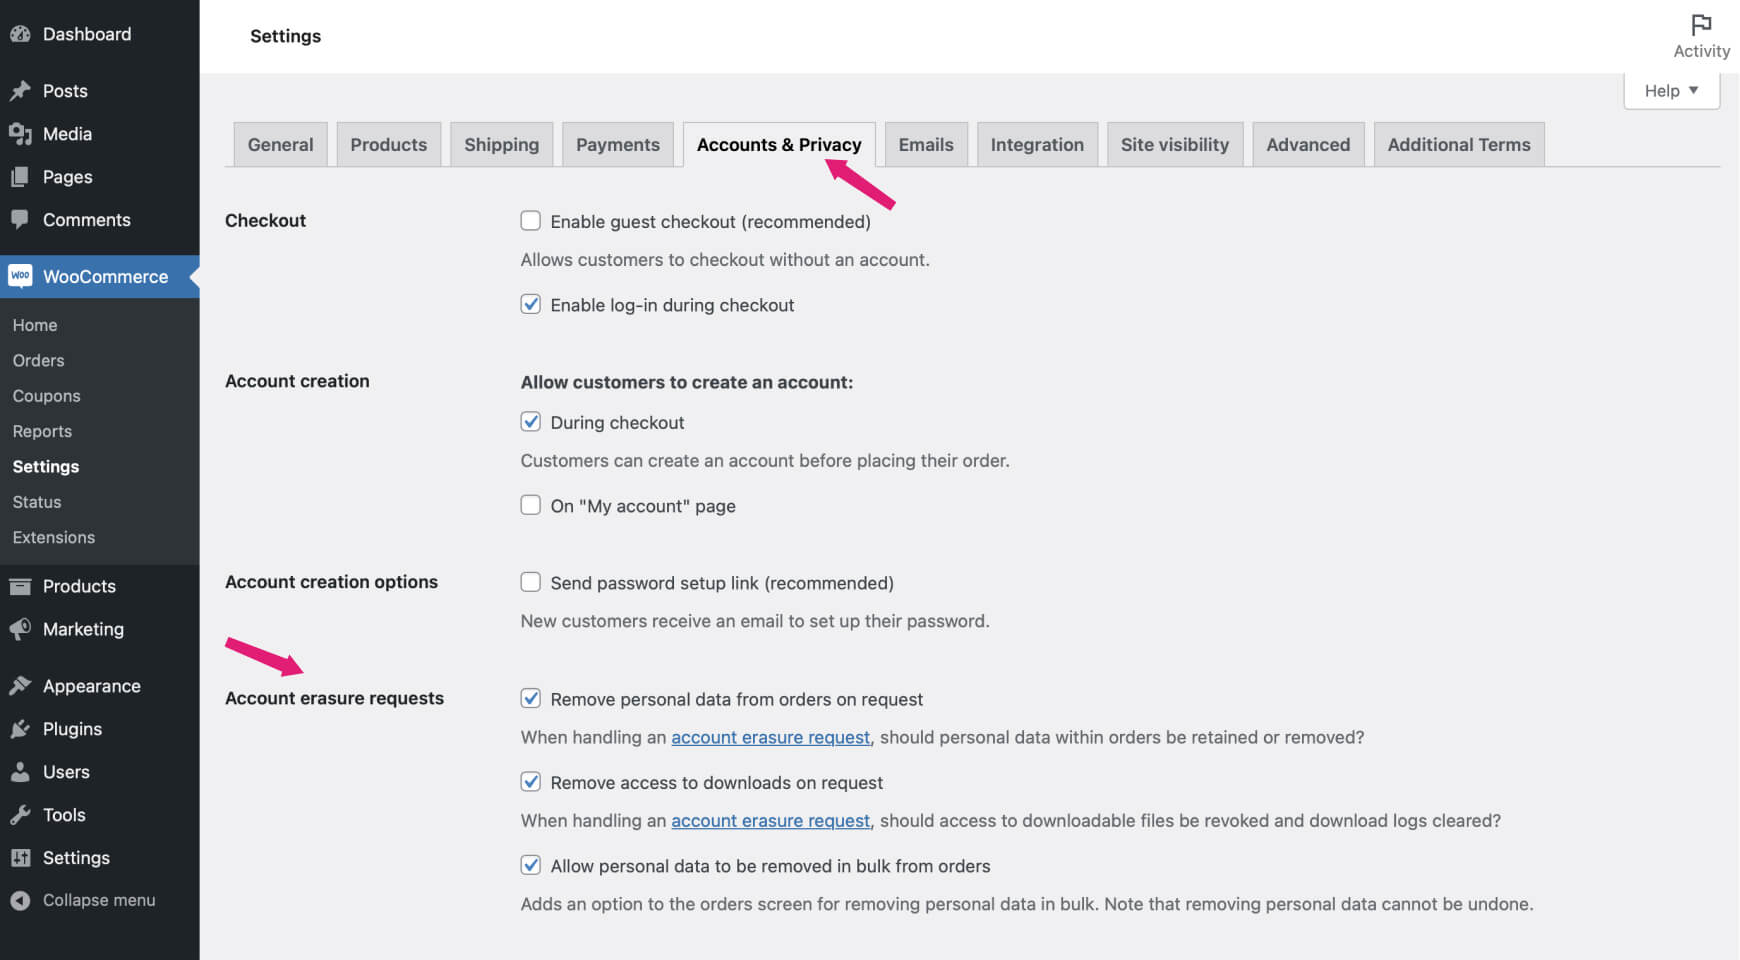
In WooCommerce, you can efficiently manage data retention settings. To do this, follow these steps:
- Go to WooCommerce > Settings > Account & Privacy.
- Customize the Personal data retention options according to your store’s needs.
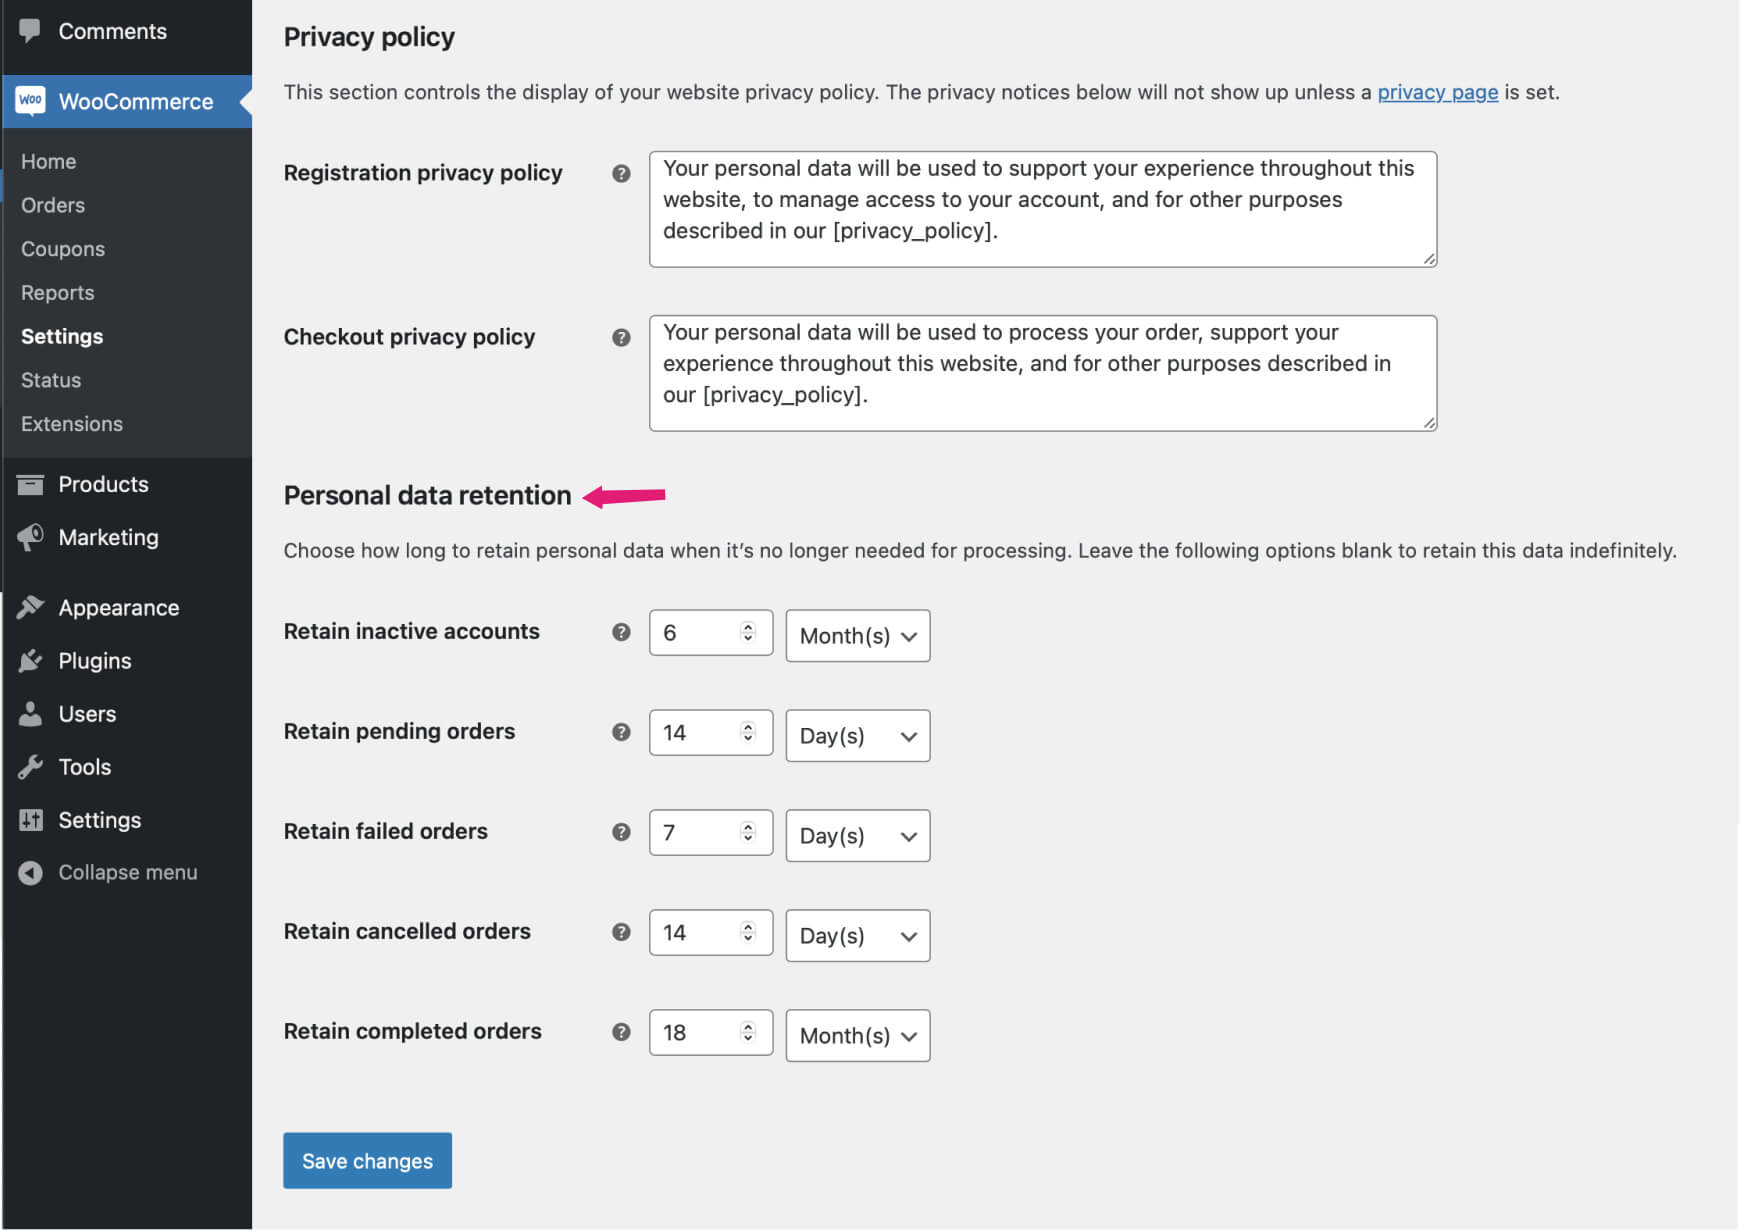
By configuring these settings, you ensure that personal information is automatically deleted after the specified period, helping you stay compliant with data protection laws.
Honor Global Privacy Signals
Respect customers’ opt-out preferences as indicated by Global Privacy Control (GPC) signals. This mechanism allows customers to opt out of data sales across all websites they visit.
To handle GPC, you can install a plugin that detects and respects these signals. Look for privacy or cookie consent plugins that support GPC. Some popular plugins include:
- Complianz – GDPR/CCPA Cookie Consent: This plugin includes support for GPC and allows you to configure your site to automatically respect these signals.
- CookieYes | GDPR Cookie Consent & Compliance Notice: Another option that can help with CCPA/CPRA compliance, including honoring GPC.
Adding the Privacy Policy to Your Checkout Page
A crucial part of compliance is ensuring your privacy policy is visible and accessible during the checkout process. You can use the Additional Terms Pro plugin to create a terms checkbox on your checkout page, specifically for California residents. The plugin offers various display options for the terms content, enhancing user experience and promoting transparency.
Here’s a step-by-step guide on how to set up this feature:
- Navigate to the Settings:
- Go to WooCommerce > Settings > Additional Terms in your WordPress dashboard.
- In the Terms section, click the Add New button to create a new checkbox.
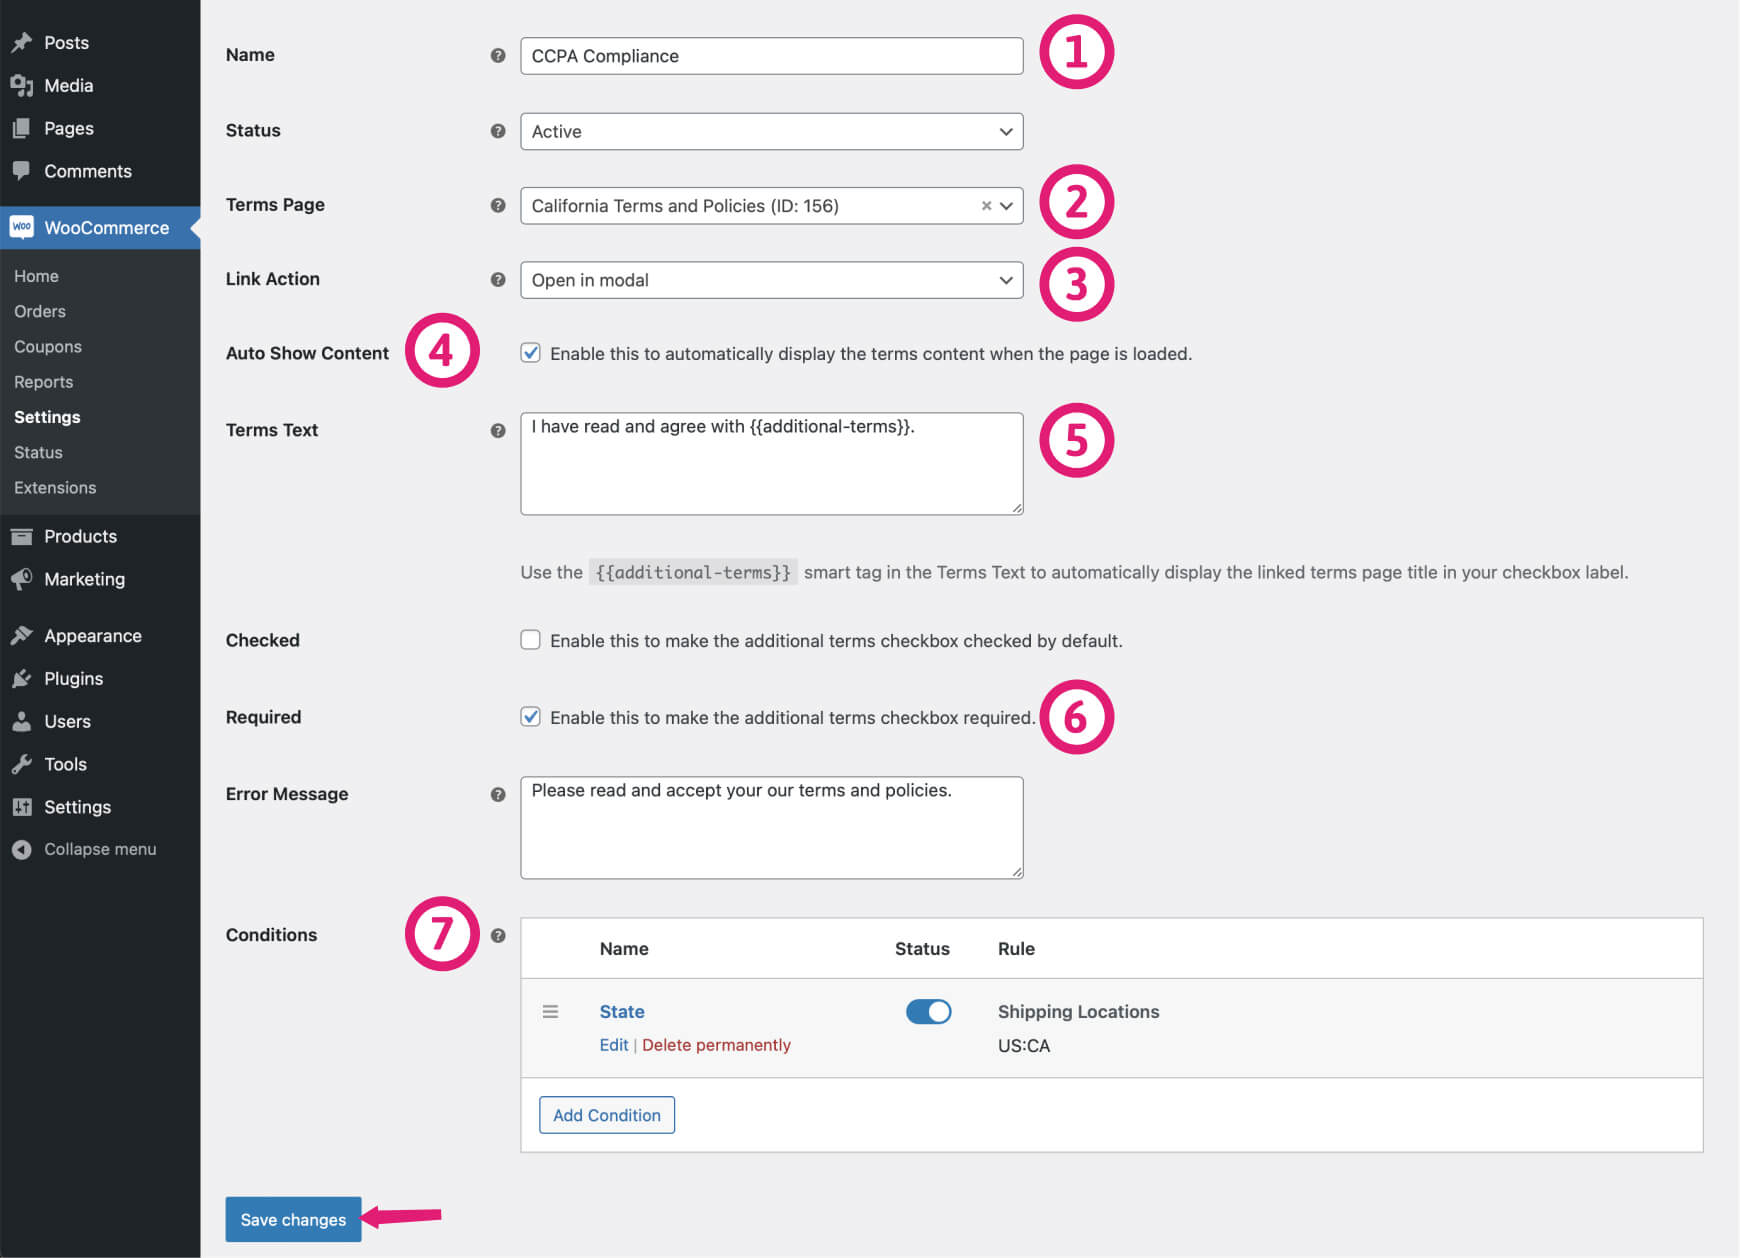
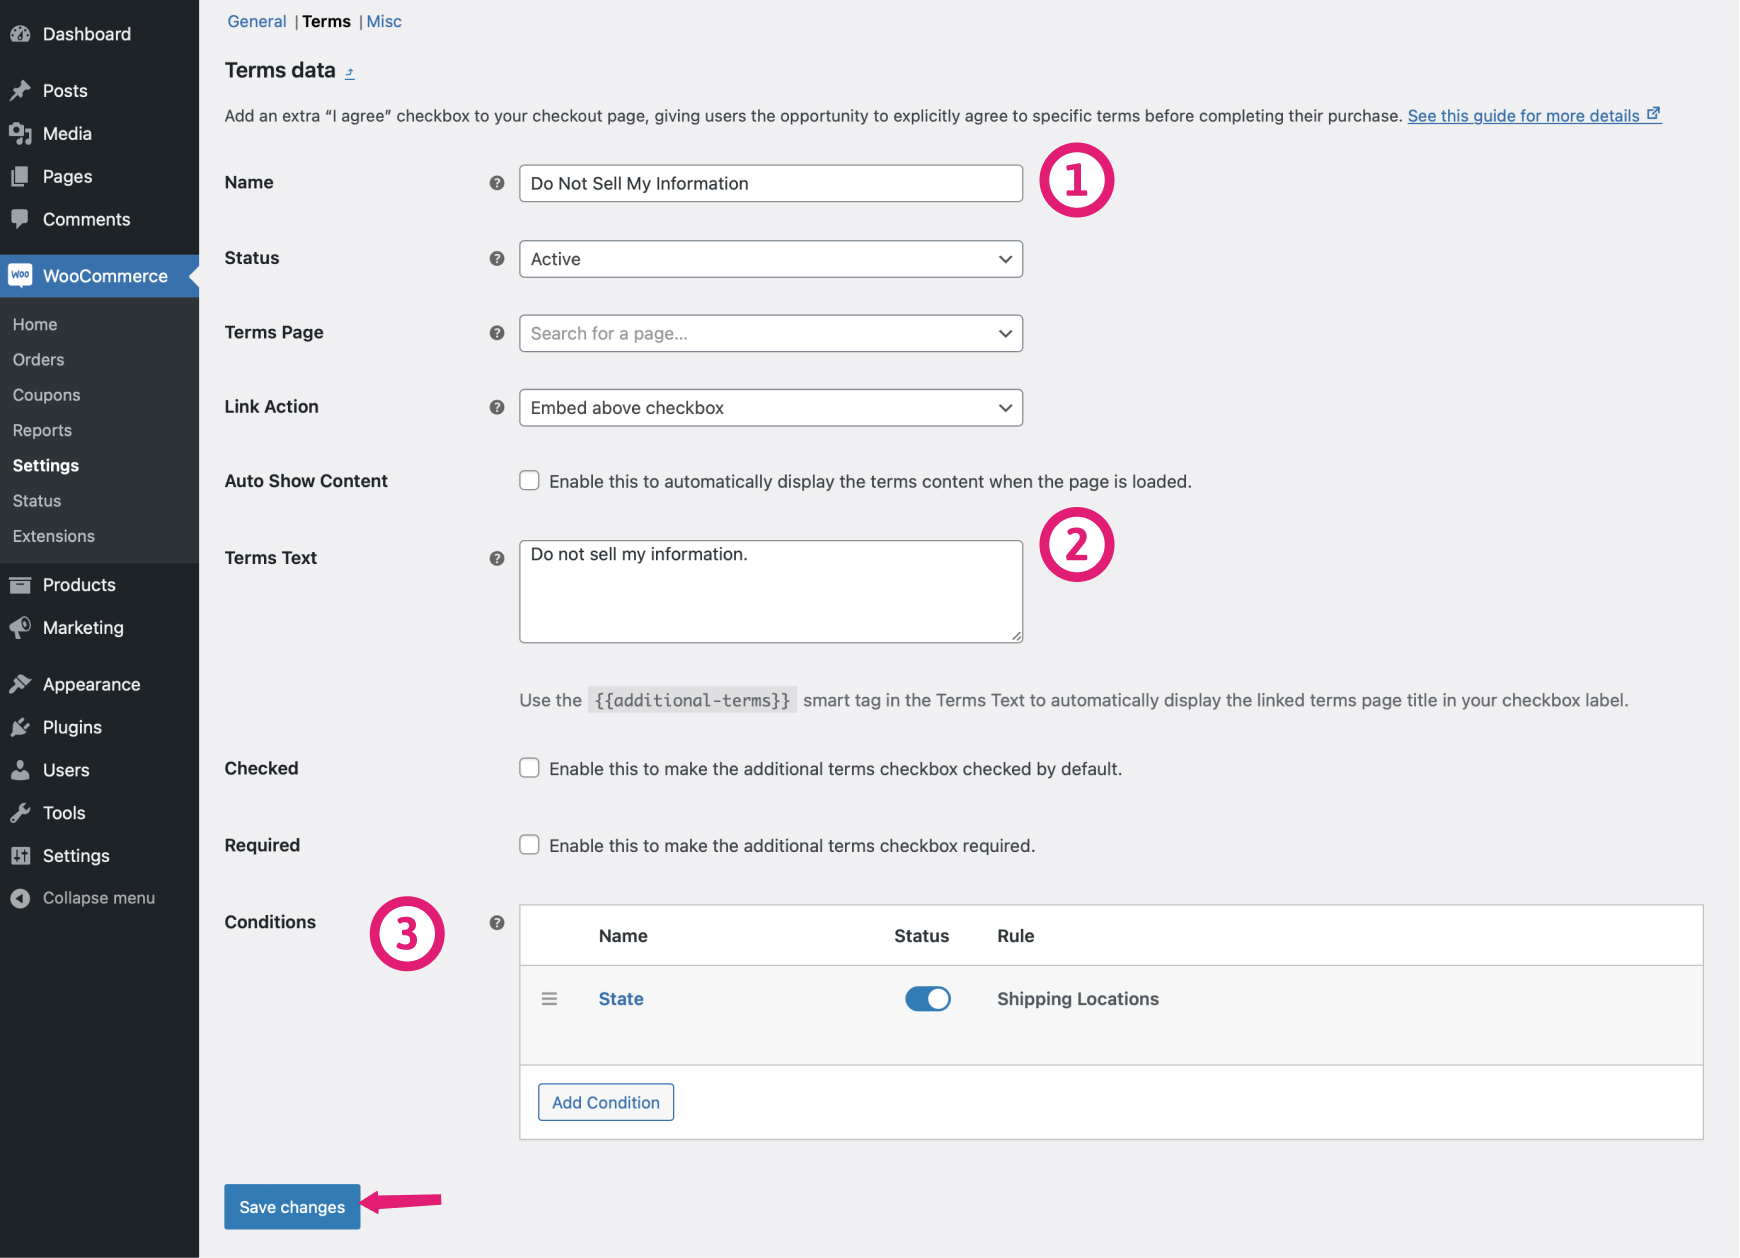
- Configure the Checkbox:
- Name the Checkbox: Enter a user-friendly name, such as “CCPA Compliance” to easily identify it.
- Select the Terms Page: Choose your California Privacy Policy page from the dropdown menu by entering at least three words from the page title and selecting the correct page.
- Set the Display Options:
- Link Action: Choose how the terms content will be displayed when users click the linked terms page.
- Embed above checkbox: The full page content will be shown directly above the checkbox field.
- Open in modal: The full page content will appear in a convenient popup box.
- Auto Show Content: Check this option to automatically display the terms content upon page load. Depending on your selected Link Action, the content will either expand above the checkbox or open in a modal.
- Link Action: Choose how the terms content will be displayed when users click the linked terms page.
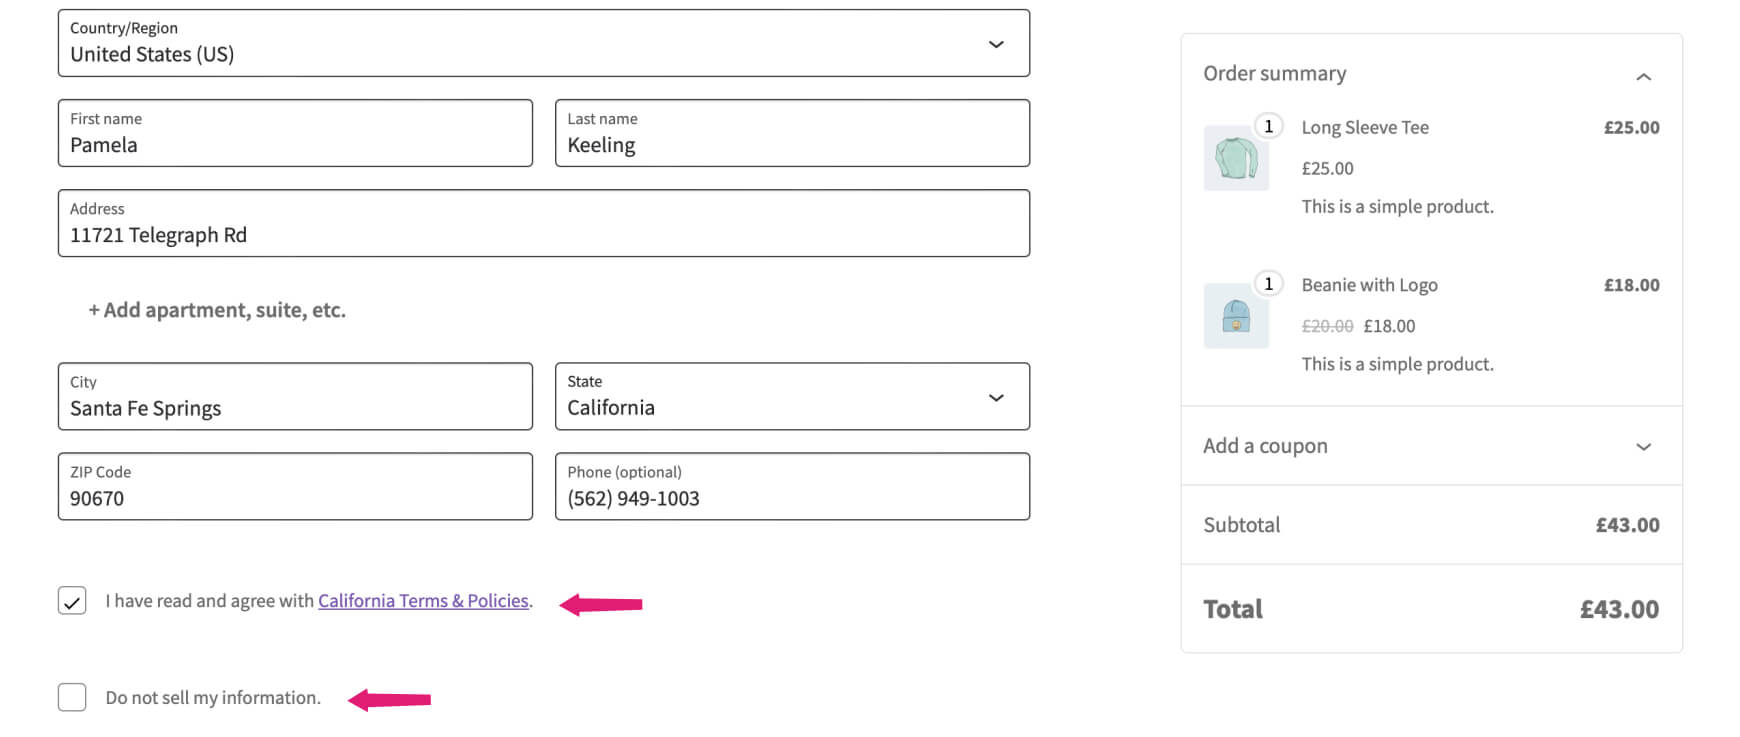
- Customize the Terms Text:
- Specify the label for the checkbox, such as “I have read and agree with {{additional-terms}}.”
- Set Pre-Checked and Required Options:
- Checked: Enable this option so the checkbox is automatically pre-selected when the checkout page loads.
- Required: Ensure this option is selected to make the checkbox mandatory, meaning customers must agree to your terms before completing their purchase.
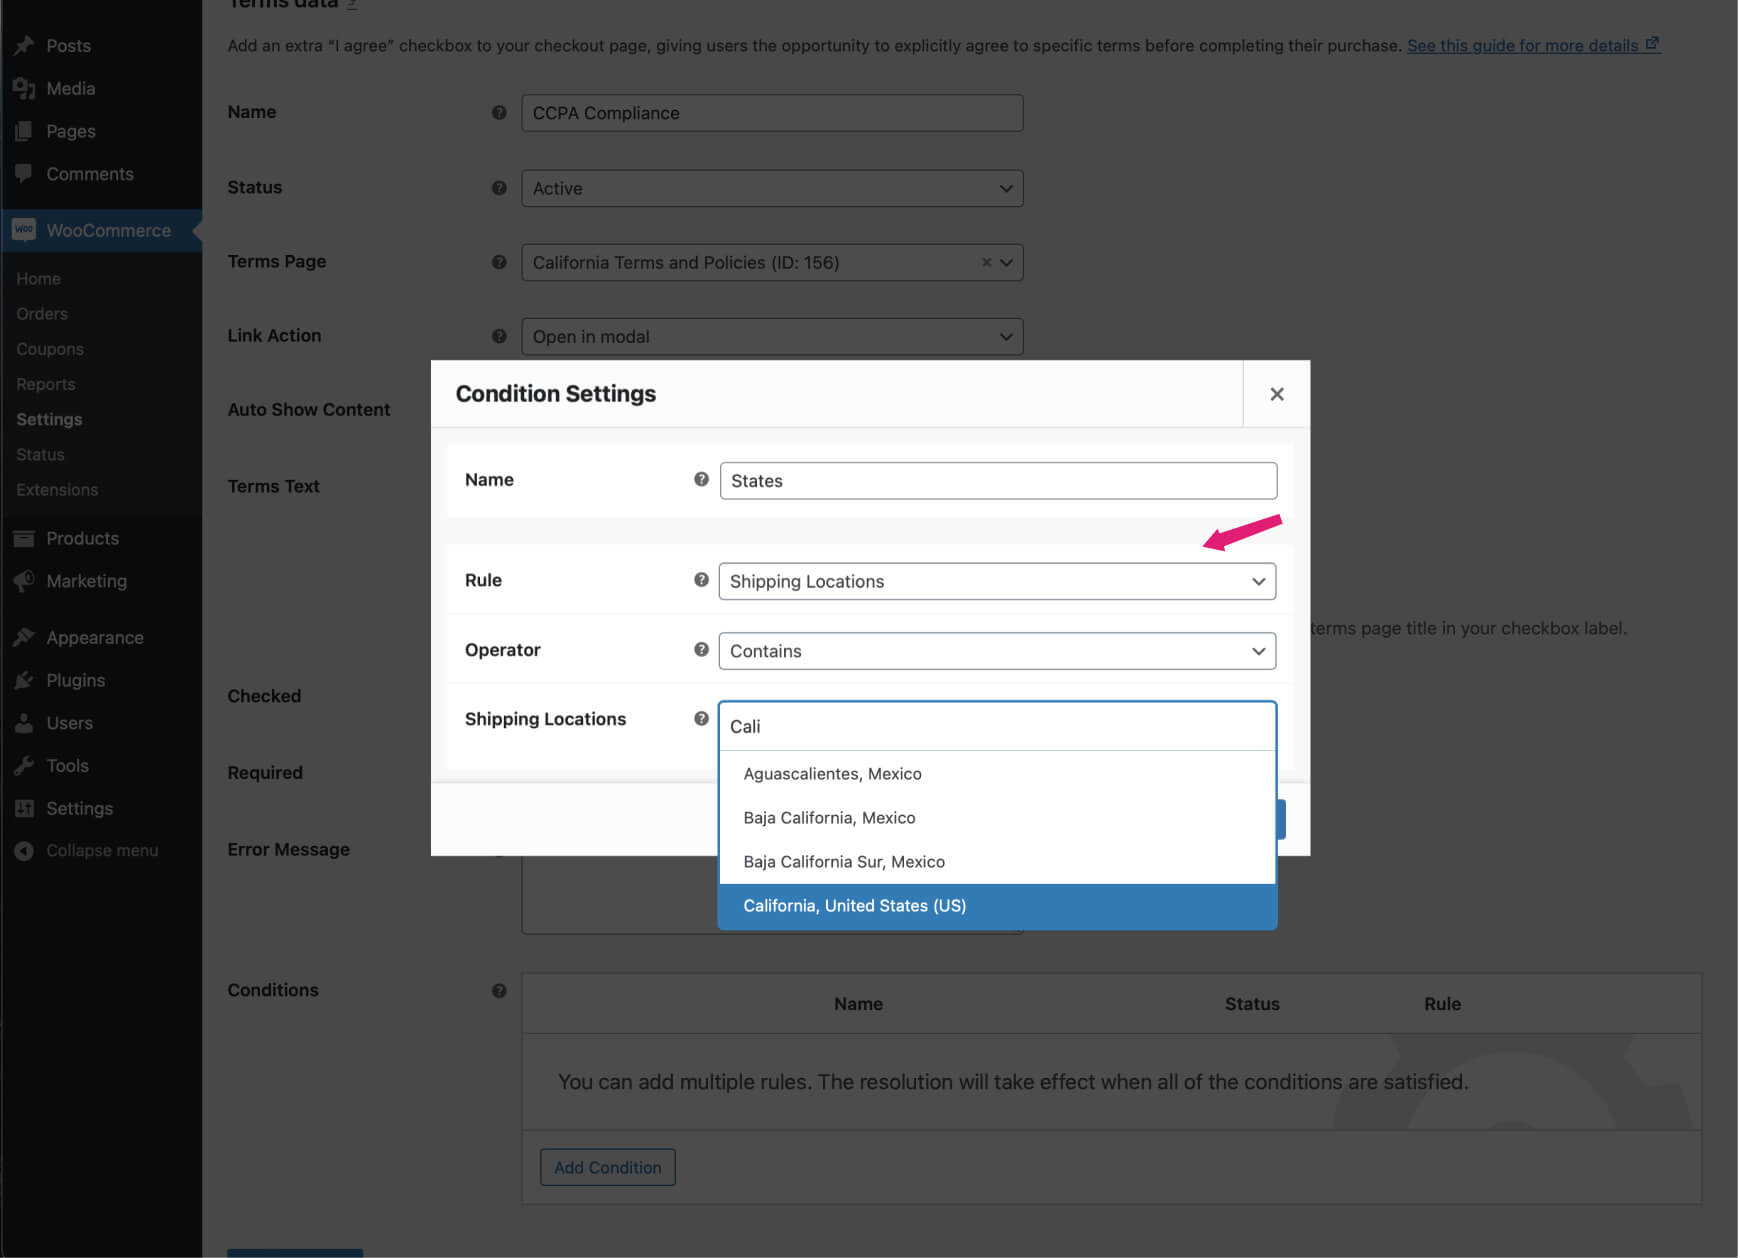
- Apply Conditional Display for California Users:
- In the Conditions table, click the Add Condition button to configure when this checkbox should appear.
- Name the Condition: Enter a descriptive name.
- Set the Rule: Choose “Shipping Locations” from the Rule dropdown menu.
- Operator: Select “Contain” from the Operator dropdown.
- Select Location: Search for and select “California, United States (US)” as the specific shipping location.
- Click Save changes within the modal to confirm your condition.
- Save Your Settings:
- Finally, click the Save changes button on the edit page to apply your configuration.
By following these steps, you ensure that California users are properly informed and agree to your terms, maintaining compliance with CCPA regulations while providing a transparent and user-friendly checkout experience.
Additional Terms Pro for WooCommerce
Your path to unparalleled compliance and trust building!
Adding a ‘Do Not Sell My Information’ Checkbox to Your WooCommerce Checkout
In addition to the privacy policy, it’s advisable to offer an opt-out checkbox on the checkout page for customers who do not want their personal information sold. You can add a ‘Do Not Sell My Information’ checkbox to your WooCommerce checkout page using the Additional Terms Pro plugin. This feature empowers customers to make informed choices about their data, enhancing their shopping experience and building trust.
Here’s how to set it up:
- Access the Additional Terms Settings:
- Go to WooCommerce > Settings > Additional Terms in your WordPress dashboard.
- In the Terms section, click on the Add New button to create a new checkbox.
- Configure the Checkbox:
- Name the Checkbox: Enter a clear and descriptive name, such as “Do Not Sell My Information.”
- Label the Checkbox: Specify the label that will appear alongside the checkbox, for example, “Do not sell my information.”
- Adjust the Checkbox Settings:
- Required Field: Ensure the Required field is unchecked so that customers have the option to choose whether or not to select it. This allows them to exercise their right to opt out freely.
- Set Conditional Display for California Users:
- In the Conditions table, click on the Add Condition button to set when this checkbox should be displayed.
- Name the Condition: Provide a descriptive name for the condition.
- Rule: Choose “Shipping Locations” from the Rule dropdown menu.
- Operator: Select “Contain” from the Operator dropdown.
- Location: Search for and select “California, United States (US)” as the specific shipping location.
- Click Save changes within the modal to confirm your condition.
- Save Your Settings:
- Finally, click the Save changes button on the edit page to apply your configuration.
Track User Choices:
The Additional Terms Pro plugin records whether customers select the ‘Do Not Sell My Information’ checkbox on the single order page.
To review these selections, go to WooCommerce > Orders and click on the relevant Order number. You can also get an overview of all recorded choices by selecting the Acceptance Summary in the General tab.
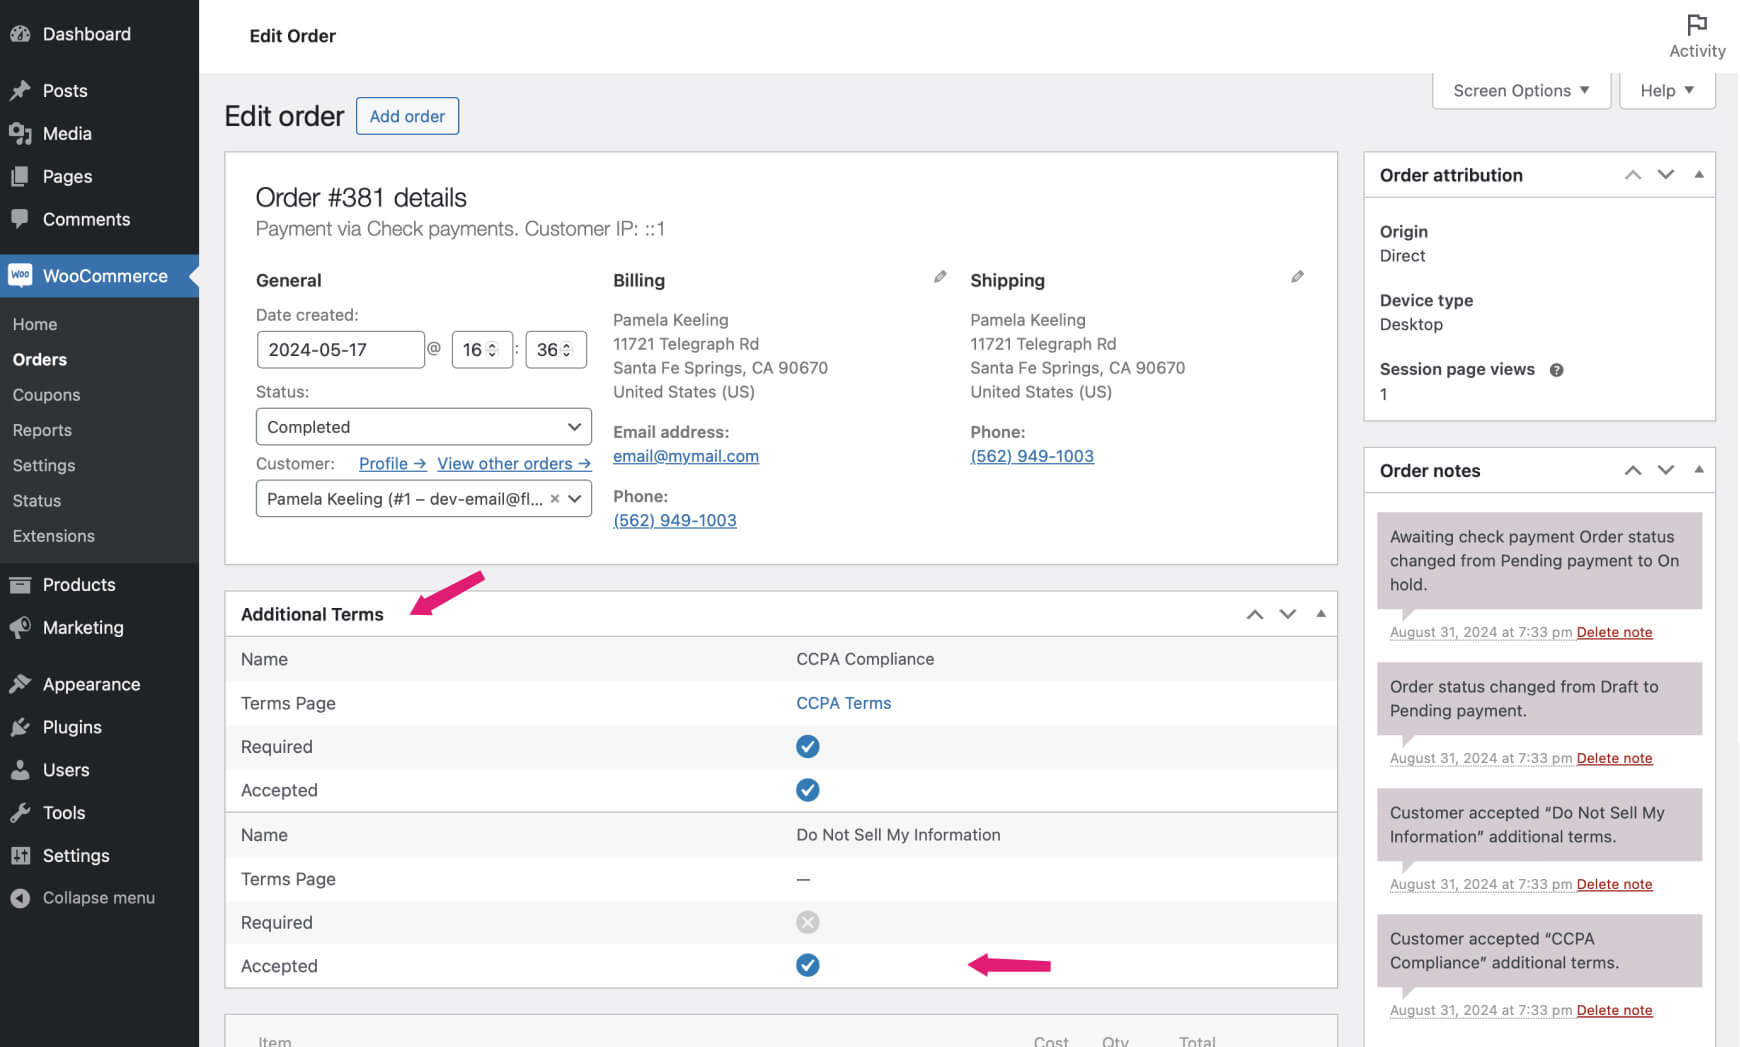
By implementing this checkbox, you give customers greater control over their personal information, ensuring compliance with CCPA while fostering transparency and trust in your business.
Offering a “Remove My Personal Information” Option
To further build trust, provide customers with a straightforward way to request the removal of their personal data. You can create a dedicated page that Clearly states that customers have the right to request the removal of their personal information. Use plain language to ensure that everyone understands their rights. And Explain how customers can exercise this right and the methods available (e.g., through a form, toll-free number, or email).
WooCommerce Data Removal Settings
You can use options available within WooCommerce for handling data removal requests:
- Bulk Editing: Use WooCommerce’s bulk editing features to anonymize customer data across multiple orders.
- Account Erasure Requests: Utilize WordPress’s built-in functionality to process account erasure requests, ensuring that all personal data is removed as requested.
- Personal Data Retention Settings: Configure WooCommerce to automatically clear personal data after a specified period, aligning with your privacy policy and legal requirements.
Conclusion
Compliance with CCPA and CPRA is not just about following the law—it’s about fostering trust with your customers by being transparent and giving them control over their data. By taking these steps to ensure your WooCommerce store is compliant, you’re not only avoiding legal risks but also strengthening your brand’s reputation as a responsible and trustworthy business.
Additional Terms Pro for WooCommerce
Your path to unparalleled compliance and trust building!
FAQs
What is the ‘Remove My Personal Information’ page?
The ‘Remove My Personal Information’ page is a dedicated section on your website where customers can learn about their right to request the removal of their personal data and find out how to submit such requests.
What happens after a customer requests data removal?
Once a removal request is submitted, your WooCommerce store can process the request by:
- Anonymizing data through bulk editing.
- Using WordPress’s account erasure features to delete personal information.
- Automatically clearing data after a specified retention period, as configured in your WooCommerce settings.
Can I set a data retention period in WooCommerce?
Yes, WooCommerce allows you to set specific data retention periods. You can configure these settings under WooCommerce > Settings > Account & Privacy to ensure personal data is only kept for as long as necessary.
How do I track customers who opted out of data sales?
With the Additional Terms Pro plugin, you can track customer choices regarding data privacy options directly on the order details page in WooCommerce. This allows you to monitor which customers have opted out of data sales.
Can I automate the data removal process in WooCommerce?
Yes, WooCommerce offers features to automate the data removal process, such as personal data retention settings and account erasure requests, which can help you manage customer data efficiently and in compliance with privacy laws.
Thanks for reading! 🎉 Your effort in privacy today builds trust for tomorrow—keep up the great work, and happy selling! 🚀
Leave a Reply